Editing Videos & Films
– here's how it's done.
Here's how to edit video into film on a PC:
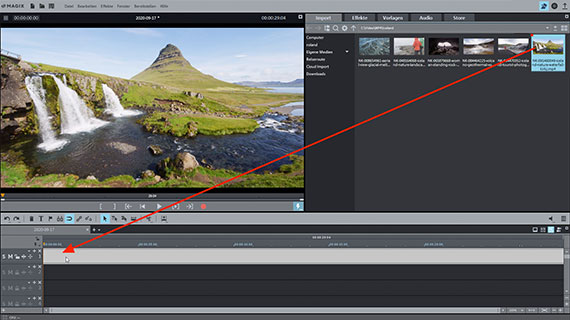
- Start Movie Studio Platinum and drag & drop your video file from the Media Pool to import it into the project window.
- Place the playback marker where you want to cut, and then press the "T" key. Delete the passage you wish to remove and then drag the remaining video objects together, so that there aren't any gaps.
- To edit video and audio separately, you can activate a dedicated display of the audio track by right-clicking on the video object. Then, place the mouse pointer at the desired position for a cut between two videos, press the Alt key and use the mouse to shorten the audio or video track by dragging it inwards.
- If you need to place a number of cuts, use the "Split and trim" mouse mode. This enables you to scrub the mouse through the footage and view the corresponding position in the preview monitor. To make a cut, click and then continue looking for other cuts. After completing your cuts, switch back to standard mouse mode and make fine adjustments to your cuts by dragging the object edges with your mouse.
- To add further videos, use the Insert menu, which can be opened by right-clicking on the button in the toolbar. Here, you'll find various options for inserting new media at the position of the playback marker. When using the two "Ripple" functions, a gap with the length of the new footage will be created and the existing video will automatically be moved back.
- Once you have finished cutting, right-click on an empty space in the project window and select the "Find and close gaps" function to correct unintended empty spaces in your video's playback.
- Finally, you can export your video project as a video file, e.g. in MP4 format, copy it directly to your smartphone, upload it to the Internet or burn it together with a selection menu to a DVD or Blu-Ray disc. You can find the options for these options at the top right of the user interface.
Cutting videos using Movie Studio Platinum, the video editing software for downright amazing movies:
- Import for all conventional formats
- Intuitive editing with a keyboard
- Specialized editing tools for audio and video
- Tons of templates for intros, outros, captions and subtitles, transitions, opening credits and much more
- Helpful program wizards
- Image editing with auto exposure, color correction, slow motion/time lapse and video stabilization
- File export as MP4 or other formats, burn to Blu-ray Disc or DVD, transfer to smartphone
How to trim MP4 video as well as other formats:
It's this simple.
No matter whether MTS, MP4, UHD or 4k...
– cut video and film in the same, user-friendly way with Movie Studio.
Cutting video is the most important and common task in video production. This is why it should be particularly easy to do. Since it is not always clear where to cut, you have to try out different options and undo them in some cases. That's why your video editing program should be easy-to-use and encourage you to experiment. And because nowadays, you have to deal with a wide variety of file formats (e.g., MP4, MTS or MOV) and resolutions (e.g., HD, Full-HD, 4k), your video editing program should support all of the most important formats.
We recommend using Movie Studio Platinum. With this video editing program, you can cut your videos and movies by placing the playback marker at the desired position by clicking the mouse and pressing the "T" key on the keyboard. And if it wasn't quite the right cut, you can undo everything by simply pressing the "Ctrl + Z" With Movie Studio Platinum, the freedom to use various video files and resolutions is at your disposal. All the most important formats are supported and can be editing in the same way. With Movie Studio's proxy function, high-resolution 4k video files can be played and edited as smoothly as any other video footage.
Nothing is changed in the original video files on your hard disk – they are not altered at all during the video editing process. This process is called "virtual" or "non-destructive editing". This way you always have the assurance of being able to access the original version if you don't like your edited video afterwards.
Each cut can easily be changed and moved to forward or back, for example, by moving the edges of the cut video to the left or right with the mouse. And if you accidentally trim off too much video footage, simply pull out the cropped footage again.
Our step-by-step guide below will demonstrate all of the techniques you need to know on how to trim a video with Movie Studio Platinum.
Edit video with Movie Studio Platinum
Importing a video file for editing
- In the start dialog in Movie Studio Platinum, create a new project.
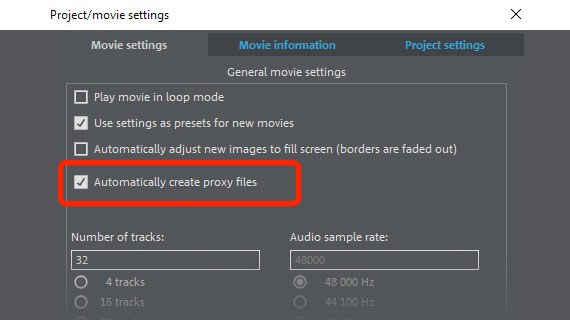
If you wish to import high-resolution footage (e.g., UHD or 4k), activate the "Open film settings" option and click on "Create project". Then, activate the "Create proxy files automatically" option in the "Film settings" dialog. This will allow even large amounts of data from high-resolution videos to be played back and edited without issue.
- Drag & drop the video from the Media Pool into the top track.
- Press the spacebar to play back the video.
During playback a red playback marker will move across the project window to display the current position.
- The playback marker can be moved to any position by clicking the timeline above the track section. This lets you navigate through your video.
- To stop the video, simply press the space bar a second time.


Editing videos – the most important editing techniques
Let's begin with the most common case: You'd like to delete a section of footage from a video.
- Place the playback marker at the beginning and end of the section and press the "T" key at both positions.
- Click on the cut passage and delete it from the track with the "Del" key.
- Switch to "Mouse mode for all tracks" and move the rear parts of the video forward to close the gap.
There are other, faster ways to do this for common applications.
- To remove the beginning or end of a video, place the playback marker where you want to cut and right-click the Cut button on the toolbar.

This opens the Edit menu.
- Select "Remove beginning" or "Remove end" to remove the material before or after the playback marker.
This can be done faster with the keyboard shortcuts U and Z.
- Press the "Z" key to remove the first part of the video before the playback marker.
- Press the "U" key to remove the part of the video behind the playback marker.

You can also slide the video forward and backward as desired. This will also remove the beginning or end.
- Move the mouse pointer to the lower object edge until it becomes the Cut symbol.
- Click and drag the object together by holding down the mouse button.
If you drag the cut and shortened object back again, the removed passages will be restored.


Split and trim videos
The mouse mode "Split and trim" offers a very practical improvement.
- Right-click the mouse mode icon and select the mouse mode "Split and trim".
- Move your mouse over the video object and you'll be able to see the corresponding position in the preview monitor.
This will help you determine where best to place a cut. Once you have found a position where you would like to split and trim the video:
- Click and hold the mouse button and drag the mouse pointer horizontally.
This will move the position of the cut, either to the left or the right, to shorten the end of the first object or the beginning of the second object, respectively.
Once you have made all the cuts desired, switch to the aforementioned mouse mode to close the gaps in the timeline.
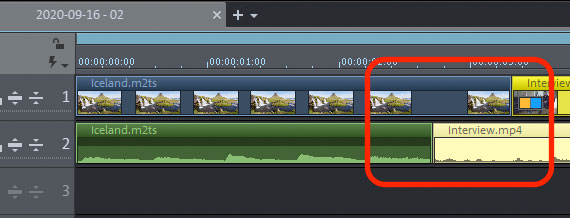
Editing video and audio tracks of a video
independently from one another
In some cases, the video track should be cut independently of the audio track, so that the audio recording continues under the video material, or conversely so that another audio track is played before the corresponding video appears. This editing technique is a "split edit" known as a "J-L cut". To make one of these cuts, make the audio track visible.
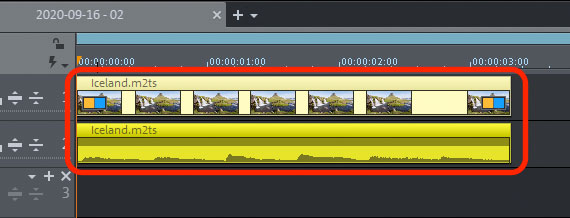
- Right-click on the video and select "Video/Audio on separate tracks".
This will separate the video: The object with the video track is on the upper track (1) and the audio track is on the lower track (2).
When cutting video and audio tracks separately, you can add a waveform display for visual orientation of the media on the audio track:
- Right-click on the object below on track 2 and choose the "Create waveform display" option from the context menu.
The video and audio tracks are automatically grouped, so that neither can accidentally be moved. You can ungroup them using the toolbar at any time to allow the video track to be cut independently of the sound. If you do this, however, there is a risk that the video and sound will no longer be synchronized.
In this situation, a so-called "J-L cut" is intended. The group is temporarily disrupted in order to cut the picture and sound separately.
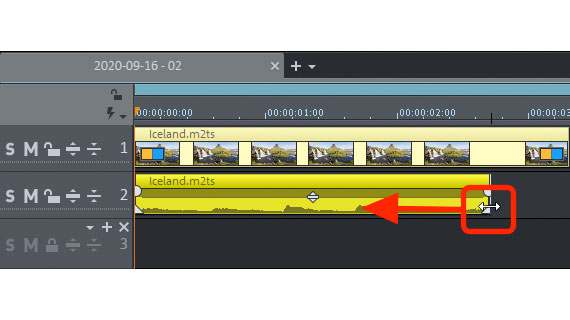
- Hold down the Alt key and move the mouse pointer to the beginning or end of the object group.
Now you can trim video and audio individually.
- If you hold down the Shift key together with the Alt key, you can fix the horizontal position of the object on the track.
This protects the objects against accidental movement. For example, you can move the audio track to a lower track to set a crossfade with the audio track above it.
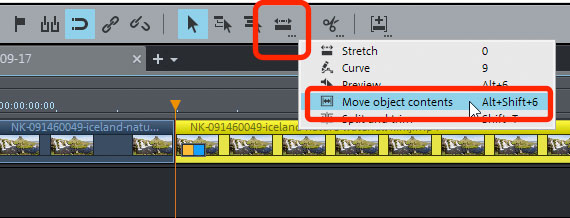
Editing video: Moving object contents
Now, we have come to a special function for video editing. Occasionally, the duration of the cut videos and audio objects are perfectly matched, but nonetheless the first frame of the next object isn't quite right, for example. The "Move object content" mouse mode allows you to retain the framework of objects, but you can still change the content within the cut objects afterwards.
- Right-click the mouse mode icon and select the mouse mode "Move object content".
- Place the playback marker to the position of the cut so that you can see this frame in the preview monitor.
- Click on the back object and shift the content in the object by holding down the mouse button until the desired initial frame appears in the preview monitor.
The object's position in the timeline will not be changed.
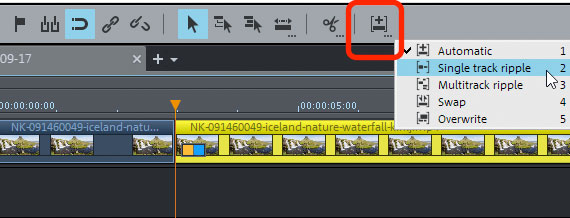
Editing videos: Inserting additional video footage
Last, we'd like to demonstrate the opposite case: If you'd like to insert additional video material in an existing video. For this, you have several options.
- The easiest way to do this is to Drag & Drop the new video footage from the Media Pool to an empty position in the project, trim it to the desired length, create a matching gap in the existing video and insert the additional video footage into this space.
This process can be done faster however.
- Right-click on the Insert button in the toolbar.
This will open the Insert menu. Several special functions are available for inserting new media at the position of the playback marker. "Ripple" means that when inserting material, the material in the track is split at the position of the playback marker and moved backwards.
- Place the playback marker at the position where the new scene should be added.
- Move the mouse over the Media Pool file you wish to insert
- In the pop-up window that appears, click the Insert arrow.
This will add the new footage at the position of the playback marker. When using the two Ripple modes, the existing video will be moved back. In the other modes, you can manually replace or overwrite the existing material.
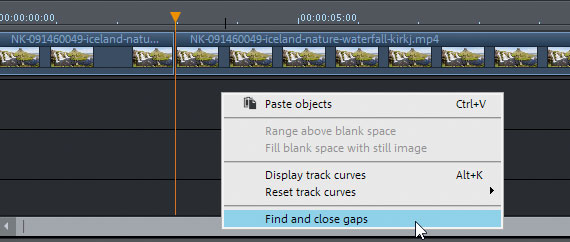
Closing gaps after you shorten videos
If you trim videos, sometimes unintended gaps can occur. Additionally, there is a useful tool that you can use at the end of the editing process.
- Right-click on a gap in the project window to open the context menu.
- Selection the function "Find and close gaps".
Then you can be sure that all objects will be placed adjacent to each other and there are no unintended gaps in your movie.

Exporting video after editing
To finish, you can export the project with the split video:
- To export a video file, go to "File" > "Export movie" and select an export format in the sub-menu, for example "Video as MPEG4".
- To render the video directly to your smartphone, upload it to a social media platform or burn it onto a disc via the Options in the upper right-hand corner of the program. Here, you will see a separate interface for burning discs as well as the dialog "Finish movie".
Trim videos with Movie Studio Platinum, the video audio editor for downright amazing movies:
- Import & export for all relevant formats
- Quick cut & detail cut
- Automatic wizards
- Up to 900 effects & music
- Intuitive templates for intros, outros, subtitles, transitions, opening credits and much more
- Burn videos to DVD & Blu-ray (and design your own menus)


