NEW
Vocal Editing: brilliance with a vocals exciter

If you wish to give your vocals more brilliance and a stronger presence, just follow these easy optimization steps. Usually, this task requires exciter plugins, which recalculate artificial harmonics on one track. This produces a “luster” effect, giving vocals a lighter, more present sound. Because such plug-ins are often expensive, this tutorial is geared toward those who want to create their own vocals exciter effect for quick results. Bear in mind that there isn’t one perfect setup for optimizing vocals. You should keep trying until you’re happy with the results.
This tutorial is made using Music Maker, but it is also compatible with more advanced programs such as Samplitude Music Studio, Samplitude Pro X or ACID Pro.
Required tools:
1 DAW (e.g.. Music Maker, Samplitude or ACID Pro)
1 Equalizer
1 Kompressor
1 Hall-Effekt (optional)
A – Build a vocals exciter effect
We’re assuming that you’ve already edited your vocals track somewhat (filtered out some unwanted frequencies, applied the limiter, a noise gate, etc.) and now simply need to polish off the results. In our example we omit this basic first step and focus on creating the exciter effect. This way, you will hear what’s possible with just a few steps. Listen to the raw material
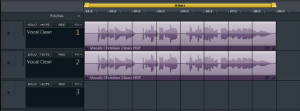
Step 1 – Copy vocal track:
As a first step, copy your vocal take and place it on a track below, as shown on the photo. You can also do this by left-clicking the object and using the Ctrl + C and Ctrl + V shortcuts.
Step 2 – Equalizer (track 2):
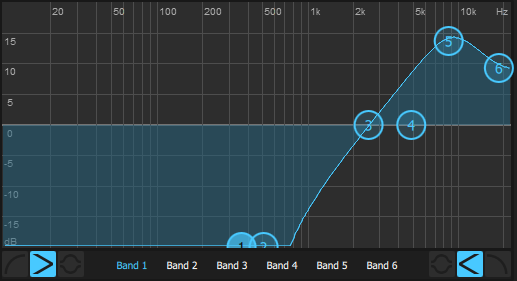
Right-click the object on the copied track. In the dialog, select “Audio Effects” and then “Parametric Equalizer”. The equalizer (EQ) will now open below. Now, cut away all low frequencies and amplify the highs. You can look at our example (see photo). Set track 2 to “solo” so you can hear the changes.
What you hear now are just the high frequencies, which are still pretty dynamic. Using the compressor, everything will be flattened even more in the next step.
Step 3 – Compressor (track 2):
Right-click the object on track 2 once again and open “Audio effects” and then “Compressor”. Now, proceed with aggressive settings for release, attack and ratio and pull down the threshold. What you hear now are the high frequencies, compressed “to death”, i.e. with almost no dynamics to speak of. To adjust the volume, increase gain. Here, you’ll have to play around a bit: if you make the threshold too low and sharply increase the gain, the sound will be extremely distorted. You will have to see what fits best to the sound.
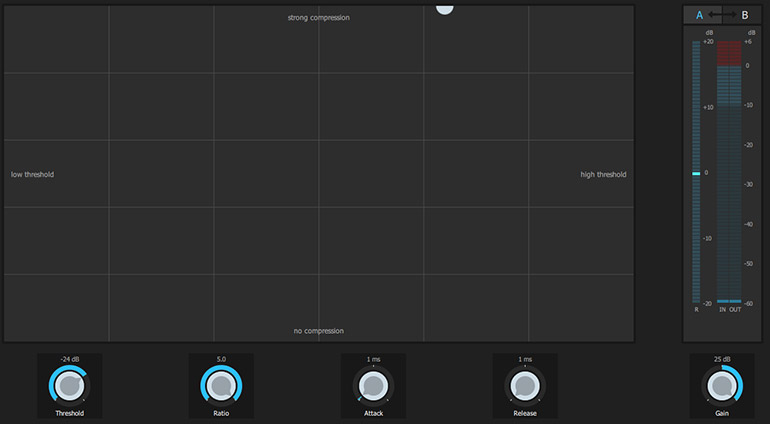
At this point, track 2 is the so-called “exciter effect”. On it, you will hear only high frequencies with a “crisp”, strongly compressed sound.
Step 4 – adding the created effect to the mix:
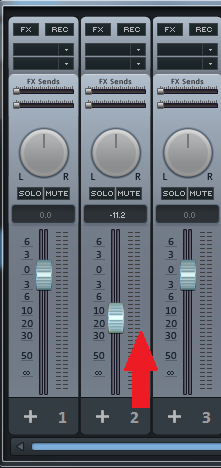
This is where the trick is: first, open the mixer with the M key. Lower the level on track 2 completely and make sure that both tracks are active. Now you can slowly mix track 2 into track 1 by slowly raising the fader. You will notice that the more you raise the fader, the “crunchier”, brighter and more brilliant the sound becomes. You can see in our screenshot how much we mixed in in our example.
B – Reverb effect (track 1)
Reverb is not part of the exciter effect. However, we felt that our vocals could use a bit more spaciousness and the difference between the raw and optimized material (exciter effect + reverb) becomes even clearer.
Right-click on the object in track 1 and select “Audio effect” and “Reverb”. Don’t forget to set the first track to “solo” to be able to follow changes to the sound. You should always decide how high to set the reverb based only on what the overall mix sounds like. This means: set the reverb as you like while listening to the vocals track. Then look how this setting works together with the instrumental track. You can see our settings in the picture.
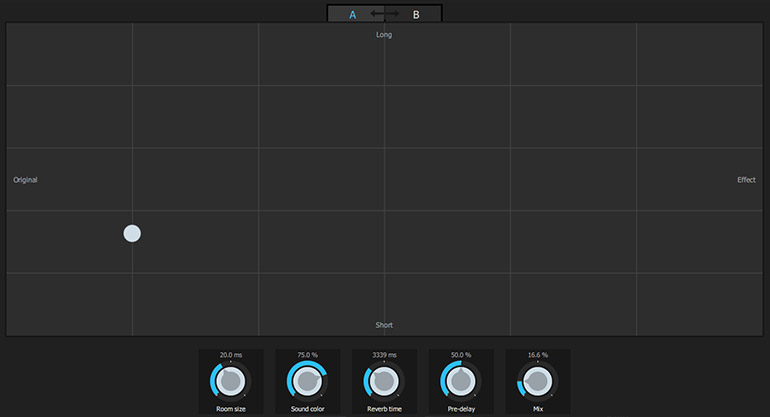
Now listen how the edited version sounds compared to the original material. The vocals are less dull and sound more brilliant.
Tips:
→ Make sure not to mix too much. Your ears will quickly get used to the effect. The more of it you add, the less natural and more distorted the sound will be. For this reason, you should come back to it a day later and listen again with fresh ears.
→ Try playing around with all settings until you reach the result you want. Each voice has unique sound properties and requires individual settings. However, the basic principle behind EQ and compressor settings remains the same.
If you’re still unsatisfied with your vocal track try out the exciter effect yourself!
Next Post >
Which microphone for which purpose?
< Previous Post
Transfer Soundpool Library
Related Posts
From Music Maker to Samplitude Music Studio
Use your Music Maker skills in Samplitude Music Studio. Here we tell all why you won’t regret an upgrade!
Samplitude Elements – Quickstart Guide
This tutorial will help you get started using Samplitude and provide you with efficient workflows for common application scenarios.
Brand new: SOUND FORGE Pro 12
Learn about the new features, improvements and highlights in the latest version of the sophisticated audio editor SOUND FORGE Pro.
The new SOUND FORGE Audio Studio 12
An overview of all the new features and optimizations!
