Making videos out of photos
– here's how!
Follow these steps to make videos using photos:
- Open the video editing software Movie Studio and import all the photos you want to use.
- Arrange the photos into a playable slideshow.
- Add transitions, music, titles and animations to your slideshow as needed.
- Export the slideshow as a video file (e.g. MP4) containing all of the photos, media and effects you added.
Turn pictures into videos with Movie Studio, the video editing software for downright amazing movies:
- Import all standard image formats, including JPG, PNG, GIF, TIF and BMP
- Timeline mode, multiple tracks and easy-to-use sorting features
- Intuitive templates for intros, outros, captions and subtitles, transitions, opening credits and more
- Helpful program wizards
- Export in all essential video formats, including MP4, MPEG2 and AVI
- Burn your picture slideshows direct to DVD or upload them to online platforms such as YouTube
Making a video out of photos
Cameras are everywhere today. Smartphones in particular are an immensely popular way to take photos and capture special moments. And smartphone users are always looking for new and exciting ways to share their photo collections.
A great way to make the most of your pictures is to combine them into an impressive slideshow using video editing software. By adding animation effects, transitions, titles and background music to your slideshow, you can easily turn it into a truly cinematic experience. When you're done editing your slideshow, you can export it as a video file and watch it on your TV, or you can upload it to YouTube to share it with friends.
The video editing program Movie Studio makes it easy to turn your photos into professional videos. Movie Studio comes with everything you need to make amazing slideshows, including multimedia tools that let you zoom and create tracking shots, image effects, transitions, titles and music.
And it's incredibly easy to use. Here's how it works:
Step 1: Import your photos
- Start by transferring your photos to your computer. For example, remove the memory card from your camera and insert it into the card reader on your computer.
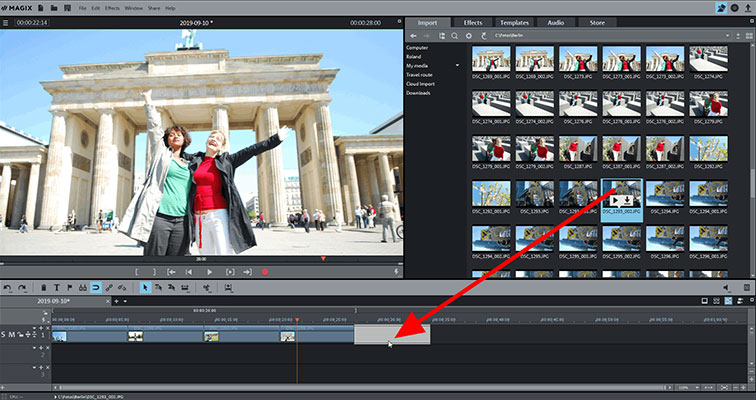
- Open Movie Studio and import the photos into the program by opening the Import tab in the Media Pool and navigating to the folder that contains them. Then, drag and drop the photos onto the uppermost track.
Step 2: Arrange and optimize the photos
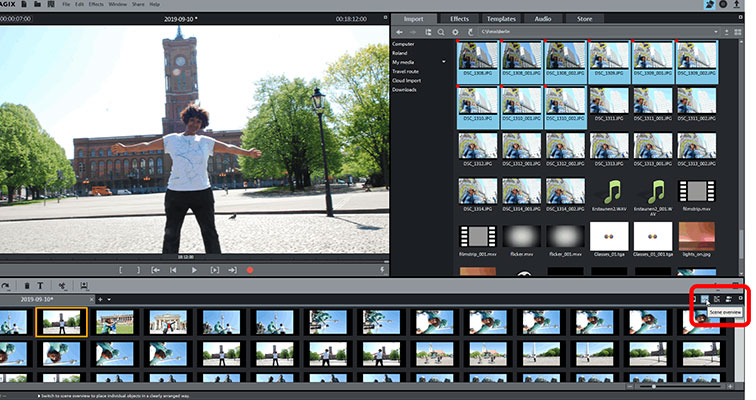
- Arrange the photos in the order you want. If you have a lot of photos, we recommend using the scene overview to do this, since it makes it easier to keep track of your arrangement. The scene overview button is located on the right.
- Each photo can be moved around in the scene overview. Use the Del key to delete any photos you don't need.
- When you're finished, switch back to the timeline view. This view is best for adding media, effects and templates.
- Consider adding some optimization effects to your photos. To do this, open the Effects tab and select the effect you want to use. To improve the picture quality, we recommend using the auto-exposure optimization under "Brightness/Contrast".
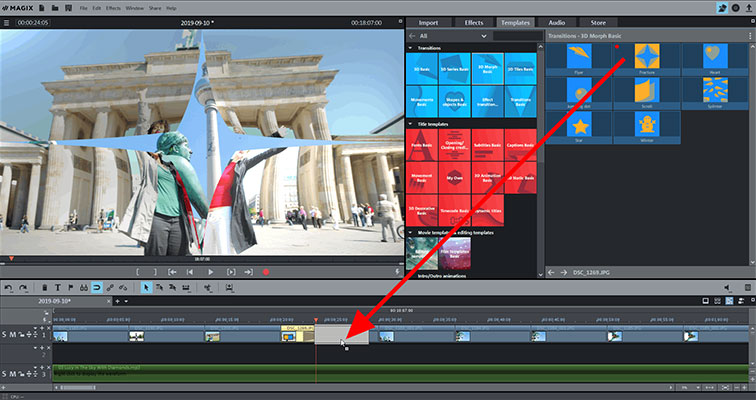
Step 3: Add sound, visuals and effects (optional)
At this point you can add transitions, titles, music or animations to your slideshow as needed.
- To access the transition effects, go to "Templates" > "Transitions" in the Media Pool. There is a preview available for each transition. To apply a transition, simply drag it onto a point between two photos in the timeline.
- To add captions, use the templates under "Title templates". Each of the templates in this section can be preview as well before being applied. To add a template, drag it onto a separate track underneath your photos and modify the text in the preview monitor.
- Background music can be added using the same drag-and-drop procedure you used to add your photos. Simply drag any audio file onto an empty track to add it. A selection of freely usable songs is available under the "Audio" tab in the Media Pool.
- To achieve a more cinematic effect, use the "Camera/Zoom shot" effect to create movie-like animations and make full-screen portions of your photos move across the screen. This effect is located under the "Effects" tab in the Media Pool.
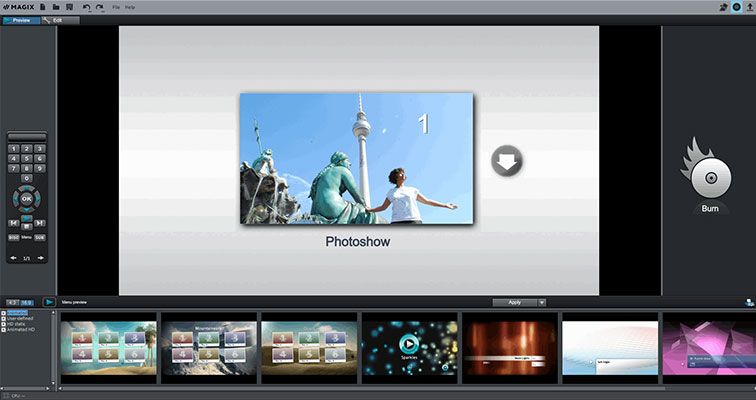
Step 4: Turn your pictures into a video file, burn them to DVD or post them online
- To create a single file which contains all of the footage in the project window, go to "File" > "Export movie". Here you should see a list of available video formats. Select the format you want to use (e.g. MP4), give the video file a name and start the export process.
- Alternatively, you can burn your slideshow to DVD or Blu-ray Disc. Simply click the button in the upper right-hand corner of the program window to open the burn interface. You can also use the burn interface to create a selection menu containing multiple slideshows and even individual photos which can then be selected using your remote control when you play the disc.
- You can also upload your slideshow directly to YouTube. Simply click the Finish Movie button in the upper right-hand corner, select "Upload to Internet" and select "YouTube" as the Community. The slideshow will be automatically exported in the right format and uploaded directly to your account.
Turn pictures into videos with Movie Studio, the video editing software for downright amazing movies:
- Quick cut & detail cut
- Automatic wizards
- Up to 900 effects and music
- Intuitive templates for intros, outros, captions and subtitles, transitions, opening credits and more
- Supports all relevant video formats
- Direct upload to online platforms, including YouTube
- Burn slideshows to DVD and Blu-ray (and design your own menus)


