Action camera editing & cutting
– here's how it's done.
To create great action cam movies as quickly and easily as possible, follow these steps:
- Open Movie Studio Plus and create a new project in the start dialog.
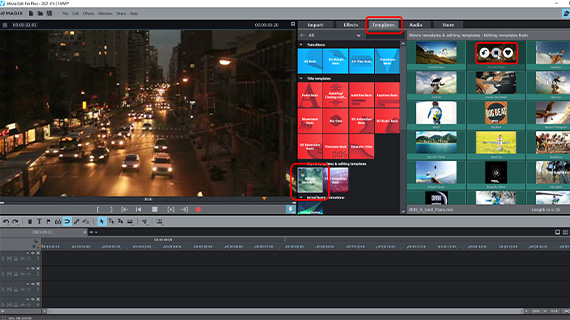
- In the Media Pool above right, open the Templates tab and click on the "Editing templates Basic" tile.
- Move the mouse over the different editing templates and use the middle pop-up button to try out the templates one by one.
- If you want to use an editing template, you can load it using the pop-up button on the left.
- Go to the "Import" tab of the Media Pool, go to the folder where your action cam video files are located, and drag videos or even photos onto the placeholders. You can use the same file for several or all placeholders.
- If you need to you can move the section of the video you want to be shown below on the right. You can change title text for a template here too.
- Export your edited action cam video project as a video file, e.g. in MP4 format, copy it directly to your smartphone, upload it to the Internet or burn it together with a selection menu to a DVD or Blu-Ray disc.
Alternatively, you can set all cuts yourself and then add any music, titles, transitions or exciting effects you like. You can use the main interface in Movie Studio for this – please read the main article on this page.
Create and edit action cam videos using Movie Studio Platinum, the video editing software for downright amazing movies:
- Import for all conventional formats
- Intuitive editing using keyboard
- Specialized editing tools for audio and video
- Tons of templates for intros, outros, captions and subtitles, transitions, opening credits and much more
- Helpful program wizards
- Image editing with auto exposure, color correction, slow motion/time lapse and video stabilization
- File export as MP4 or other formats, burn to Blu-ray Disc or DVD, transfer to smartphone
Action cam videos
Action cam videos are all about fun. It's fun to shoot breathtaking scenes, and viewing them on YouTube or elsewhere is fun too. To make post-production fun as well, we recommend using the intuitive and powerful action camera video editor Movie Studio. The program makes it easy to stitch, edit, refine and then upload action videos from an action cam such as a GoPro directly online. Alternatively, you can burn it to disc (DVD, Blu-ray or AVCHD) or transfer to smartphone.
Motion effects such as jump cuts, time lapse or speed ramps breathe life into action cam videos and for key moments, slow motion can be used to spectacular effect. Before a free video apps takes all the fun out of action camera editing because it won't let you achieve the speed ramp you wanted or optimize brightness and color correctly, try using a real movie editor like Movie Studio. This way, the fun won't fall by the wayside during production either.
And if you need to finish your project even faster, Movie Studio includes special editing templates with matching music. From adrenaline-loaded tracks to happy songs, there's something for every video. You simply choose the template with the music you like best, and the program cuts the material to the beats fully automatically. This saves you a lot of time – which you can then put towards the production of your next video.
Below we'll show you how to produce truly amazing action cam videos with Movie Studio. We'll provide you with action cam tips and tricks for recording, and show you in detail with a step-by-step guide how to use Movie Studio to get the best out of raw material taken with your action cam. Let's get started!
Tips & tricks for recording with action cam
Use a mount for your action cam when filming. A little choppy or shaky footage here or there is all part of the charm of action cam videos. But if there's too much, your action video could be pretty annoying to watch. To prevent this, it's best to use a mount for your action cam. This avoids too much shaking and also makes filming easier. Mounts come in a wide variety of shapes and sizes.
Don't forget to film from different camera angles when using your action cam. Be sure to use as many different camera angles as possible when filming with your GoPro. This keeps the excitement high and stops viewers from getting bored. Take a good look at the location before shooting so you know which angles are suitable for filming and which ones won't work.
Don't forget to have fun when filming with your action cam. Try to focus less on getting the perfect result and more on having fun. Because that's what your viewers are all about, too. So – enjoy filming!
Action cam video editing
– the creative possibilities
When you're done capturing your footage, the first thing you want to do is review the material and start cutting individual scenes together using action cam software. Keep in mind that scenes that are less than one and a half seconds long are difficult for viewers to pick up, and scenes that are more than four seconds long can slow down the pace of your action video. A quick and easy way to get great results is to use an editing template.
First, transfer your action cam videos from the camera to your hard drive.
Open Movie Studio and create a new project in the start dialog.
Editing templates for action cam videos
For fast and simple action camera editing, use a Movie Studio editing template. All cuts in the template are already set to match the music's beat. All you have to do is fill the placeholders with the right clips from your videos.
Here's how to do it:
- In the Media Pool above right, open the Templates tab and click on the "Editing templates Basic" tile.
All editing templates in the folder are listed on the right. You can purchase additional editing templates in the Media Pool tab "Store".
- Move your mouse over a tile and click the preview arrow in the center of the pop-up window. Pay particular attention to the music.
- If you like a song and want to use the editing template as the basis for your action cam video, click the import icon on the left in the pop-up window.
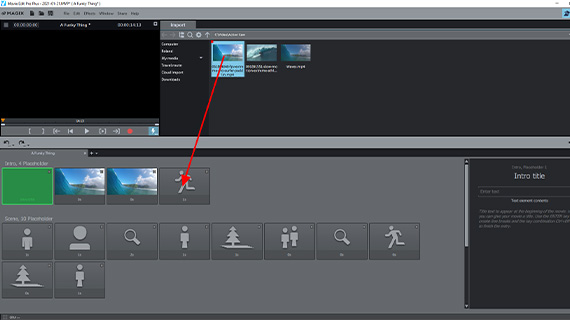
The editing template is now loaded and opened in the editing template wizard. Below left, you will now see a row of gray placeholders. From the top of the Media Pool, you can access all drives on your computer.
- Drag your action cam video files from the Media Pool onto the placeholders.
- If you need to, you can define the section of video to be used in the placeholder in the range display below right.
The range display also gives you information about the effects used in this scene (e.g. slow motion).
You can use the same video for several or all placeholders. Simply drag the action video files one after the other onto the placeholders.
- The fastest way to start and stop playback is to use the space bar. This is a good way to check the finished product too.
If you're happy with it, no more post-production is required. Once you're happy with the way it looks, you can export your edited action cam video or upload it online (see below).
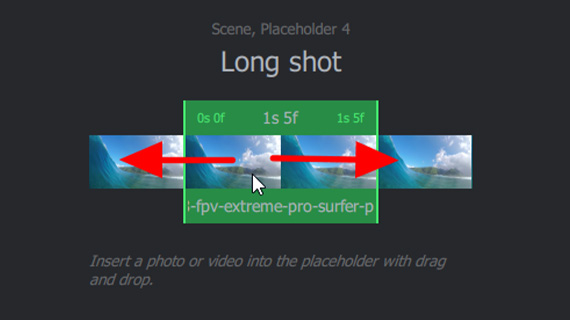
You can also edit a video manually. To do this, close the editing template wizard by checking the mark on the range display.
This opens the normal program view of Movie Studio, where you have access to all program functions. We'll talk about these now.
Add music to action cam videos
If you want to use your own music instead of applying an editing template with music, proceed as follows:
- In the start dialog in Movie Studio Platinum, create a new project, or switch from the Editing Wizard to the normal program view in Movie Studio.
- To edit high-resolution 4K footage, go to the "Film settings" (under "File> Settings > Movie") and enable the option "Create proxy files automatically". This will allow you to play back and edit 4K and 8K without any issue.
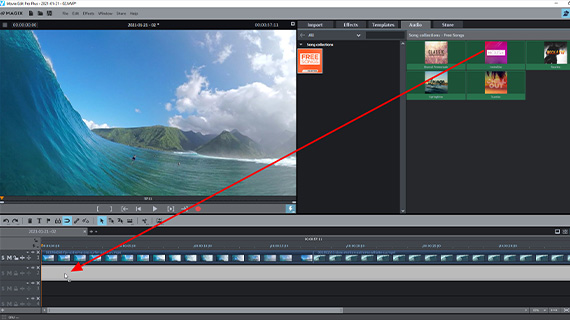
- Drag & drop to load your video files from the import tab of the Media Pool and arrange them one after the other in a track.
- To add music to the images, drag any music file to a track below the video track.
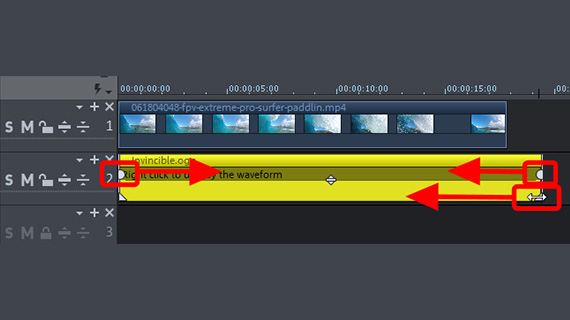
To adjust music to action video length, simply drag out the audio object with the music to the correct length:
- Move the mouse pointer to the lower object edge until it becomes the Cut symbol.
- Click and drag the object borders inwards while holding down the mouse button until the music starts and ends at the right positions.
- To set a fade in or fade out, use the upper object handles.
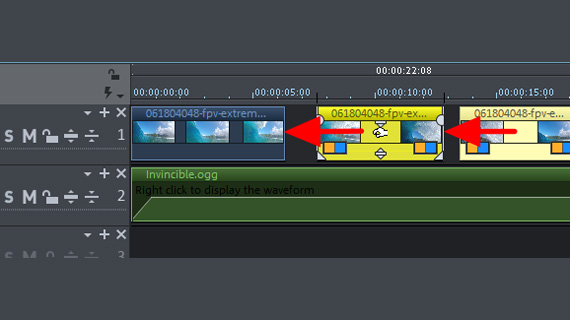
Editing action cam videos
Let's begin with the most common scenario, where you want to cut some unusable footage from your action cam video.
- Place the playback marker at the beginning and end of the section that you want to keep and press the "T" key at both positions.
- Then click on the sections that you'd like to remove and press the "Del" key.
- If doing this creates a gap that needs to be closed, go to the toolbar and select "Mouse mode for all tracks".
- Move the section on the right of the gap to the left until it docks with the preceding section. When you use this mouse mode, all other objects further right are moved back too, so following sections of the action video won't get mixed up.
If you drag out a cut or shortened object to its borders again, the deleted sections will be restored. You can play around with these cuts and effects as much as you like without changing the original files in any way.
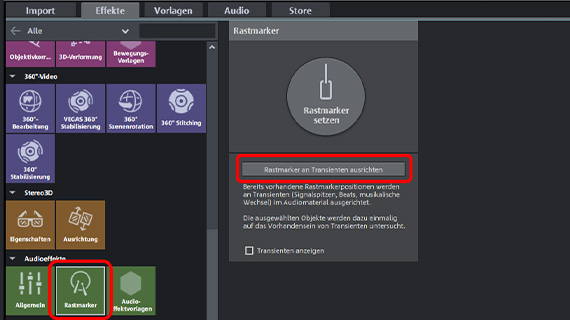
To help you make an edit with music, place snap markers at the locations of the beats. As they are moved, the video scenes now automatically snap to positions that suit the rhythm.
- Click on an audio object with music to select it.
- In the Media Pool, open the "Effects" tab and under "Audio effects", click on the "Snap markers" tile.
- Click on the "Align snap marker to transients" button.
- Move your video objects so that they snap to the locations of the snap markers.
Jump cuts
Jump cuts are motion effects created when a shot is broken into parts using cuts. With a jump cut, the video is edited in the middle of the action to create striking jumps between images – hence the name. Jump cuts are modern, fast, dynamic and sometimes a bit hectic, so they're perfect for action cam videos.
Where should you place jump cuts, and how often should you place them? This depends on the material you are using; there's no one-size-fits-all answer when action camera editing. A certain feeling for the rhythm and the right amount of cuts is necessary. Add too many cuts, and you'll end up with a hectic and busy video which most viewers won't be able to watch for long. Add too few, and the cuts themselves will look like errors. You should always use multiple jump cuts in sequence to make it clear to the viewer that they are intentional.
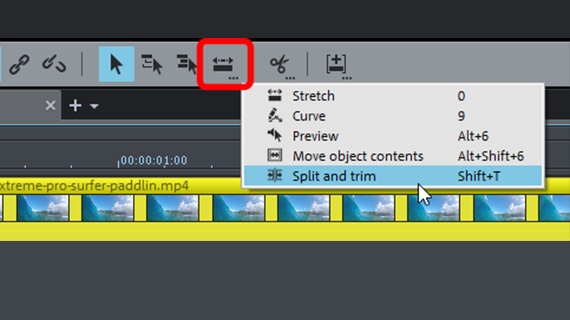
The "split and trim" mouse mode offered by action cam editing software is helpful for adding jump cuts.
- Right-click the mouse mode icon and select the mouse mode "Split and trim".
- Move your mouse over the video object and you'll be able to see the corresponding position in the preview monitor. This will help you determine where it's best to place a cut.
- When placing a jump cut, click and hold the mouse button and drag the mouse pointer left or right.
This way, when you're done editing, you can move the cut borders and trim the video slightly to create the desired jumps between frames. Then, as described above, switch to "Mouse mode for all tracks" and move the objects together to close the gaps.
Adding effects to action cam videos
Effects can be used to enhance action in your videos. Try to avoid using too many playful effects such as images that fly out of shot. Effects like these can make your video look amateurish, and they will distract viewers from the content and slow down the general pace. Time lapse and slow motion effects are much better suited to action cam videos. Slow motion is great for making fast actions even more impressive, while time lapse can make longer video sequences more interesting.
When it comes to action camera editing, it's often advisable to optimize your video using a movie editor. Here, we'll show you how to go about this.
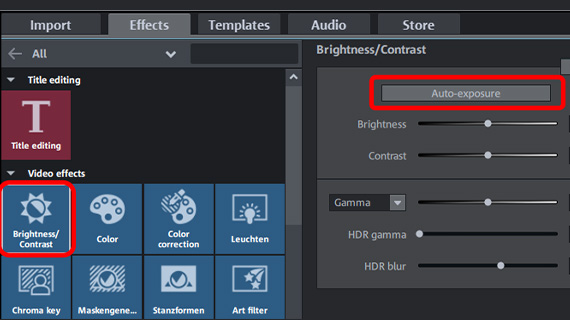
Image optimization for action cam videos
Above right in the Media Pool, open the Effects tab and under "Video effects", click on "Brightness & Contrast". This effect dialog offers these options:
- The "auto exposure" button sets parameters following an automatic analysis of the image.
- The "brightness" and "contrast" sliders can be used to change the basic values manually.
- "Gamma" is subjective brightness, i.e. brightness as perceived by people. This is different from objective brightness, which deals with the ratio of bright to dark image areas. When you adjust the brightness, all of the pixels in the picture are made brighter or darker; when you adjust the gamma, the ratio is changed.
- "HDR", or "High Dynamic Range", refers to a particularly high range between the brightness and contrast values. "HDR blur" affects the transitions between bright and dark areas.
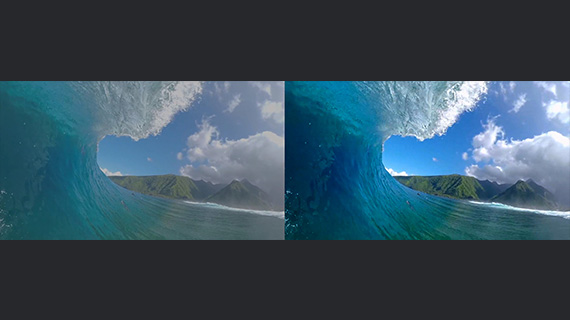
It's often a good idea to color correct your video. The three parameters of color, brightness and contrast work together to define how the video picture looks. Click on the "Color" icon to open the color dialog. You now have the following options:
- To balance out a specific tint, select the complementary color of the tint in the dialog. For blue tint, select yellow. For green, select violet. This is only necessary in special cases.
- To universally tone down colors or intensify them, use the "Saturation" fader. Experiment a little.
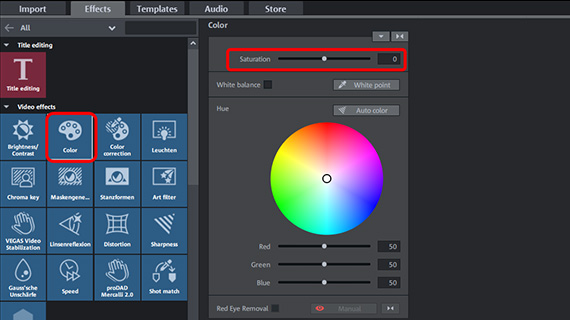
The color correction tile enables you to colorize the foreground and background to make specific objects in the picture stand out from each other. Click on "Add" in the effect dialog and select the color range that should be used for editing the foreground with the mouse cursor which is now a pipette. Then, adjust the colors for the foreground and background separately.
Video speed effects for action camera editing:
Time lapse, slow motion, speed ramps
Use speed effects to enhance the action in your video. Slow motion places emphasis on the climax of your video and shows decisive moments in detail in slow motion, while time lapse accelerates the images in fast motion and provides drama.
Speed ramps are a particularly popular effect which can be used to dynamically change the playback speed of a video. These work especially well in action cam video scenes, where they can be used to turn fast-paced visuals into a brief slow motion sequence to focus on a crucial moment before allowing the action to continue at normal speed. This technique is great for highlighting key moments such as those in sports videos (e.g. when the ball hits the net or a skateboarder begins to make a jump).
Here's how to do it:
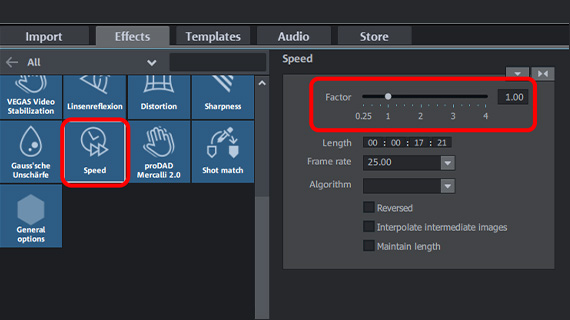
- In the Media Pool, open the Effects tab and click on the Speed tile.
- Click on the video in the track and move the speed factor slider In the effect dialog to the left to create a slow-motion effect. You can also type in the factor number yourself. If you set the factor to a value less than 0.75, we recommend enabling the option "Interpolate intermediate images" to ensure that the video plays smoothly.
- To create a time lapse effect, move the speed factor slider the other way, to the right. The time lapse effect makes the video play faster. As a result, the video object will be shortened. Objects further to the right in the timeline will be shifted to the left automatically.
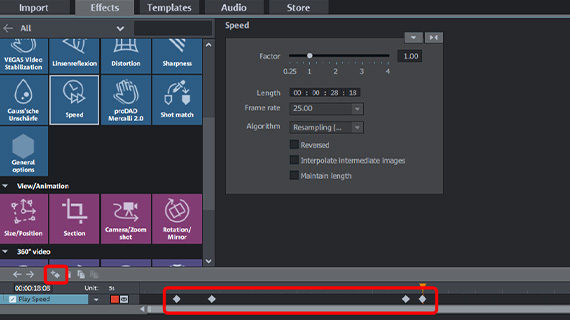
For speed ramps, use the keyframe animation tool below in the dialog.
- Position the playback marker where you want the speed ramp to begin.
- Open the keyframe animation in the Media Pool and add an initial keyframe here.
- In the keyframe animation, move the playback marker further to the right to the end of the first speed ramp.
- Move the speed factor slider to the left to create a slow motion sequence. The program will automatically add a second keyframe where the playback marker is positioned. When you now play back the sequence, you'll see that the speed is continuously reduced between the two keyframes.
- Move the playback marker further to the right to where you want the slow motion sequence to end. Here, place a third keyframe manually. Do not change the speed factor. The playback speed remains constant in slow motion between the second and third keyframe.
- Then, move the playback marker even further to the right to where you want the action camera movie to return to normal speed. Double-click the speed factor slider. The speed will jump back to the default position (1.00), and the program will automatically add a fourth keyframe.
Play the action cam editing sequence to check how it turned out. The speed transitions between the keyframes are calculated automatically by the program. In the resulting sequence, the video is slowed down until playback reaches the end of the first speed ramp. Then, the slow motion sequence begins. Between the second-to-last and last keyframe, the speed is gradually increased.
Once you've understood how this principle works, you can use speed ramps to create any kind of speed transition you want.
Uploading action cam video online or transferring to smartphone
Once you're happy with the way it looks, you can upload your action cam video directly online, or transfer it to smartphone.
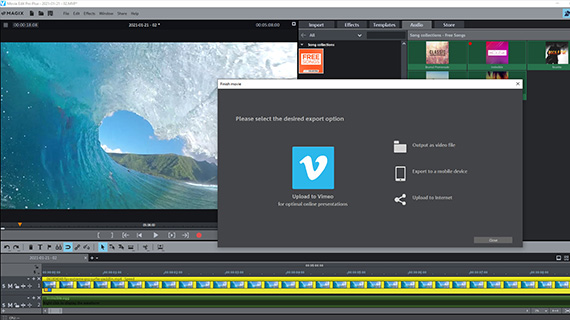
- Upload online: Vimeo and YouTube are directly connected to the program. A click of the mouse is all it takes to upload a complete video file including all action cam video sequences and music to your account. Just click on the arrow symbol in the top right to open the dialog "Finish movie". You can begin uploading here.
- Transfer to smartphone: In the "Finish movie" dialog you will see the option "Export to mobile device". Here you simply pick a device and Movie Studio sets the parameters automatically. The action cam video will be output to your device together with all cuts, effects and music.
- Additional options: You can also burn your action cam video footage to disc from right within the program. DVD, AVCHD and Blu-ray Disc are all available. To open the "Burn" interface, click to the right on the button with the disc icon. Here you can select a menu template or design a custom selection menu. If you've created several action cam movies, you can burn them all together with the same selection menu to disc. Alternatively, you can export your action cam movie as a video file. All available formats e.g. MP4 are located in the "File" menu under "Export movie"
Produce and edit action cam videos with Movie Studio Platinum, the video editing software for downright amazing movies:
- Import & export for all relevant formats
- Quick cut & detail cut
- Automatic wizards
- Up to 900 effects & music
- Intuitive templates for intros, outros, subtitles, transitions, opening credits and much more
- Burn videos to DVD & Blu-ray (and design your own menus)


