How to Master Songs
– here's how it's done.
Would you like to master your own songs on your PC? Keep reading to find out how.
- Download the free version of Music Maker, install the program and start a new project.
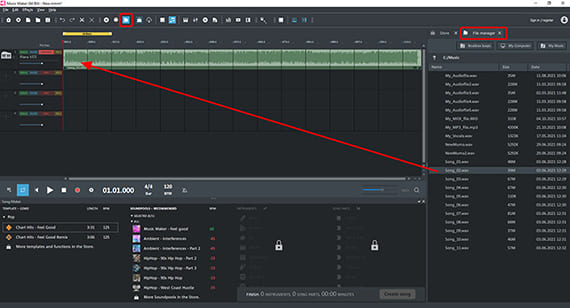
- Click the icon for the file manager in the upper toolbar.
- Navigate to a folder containing the files, then drag & drop the song files that you want to master into the arranger. It is possible to load several files into a single project, for example to combine them into one song compilation or an album. It's best to arrange songs on separate tracks so that you can properly mix them later using the mixer.
- Play back the project by pressing the space bar. To move the playback marker, simply click in the timeline. In the bottom right, you can zoom out to see all the material.
- The free version of Music Maker Free includes a compressor and a graphic equalizer for mastering, as well as a mixer to balance the volume levels of the tracks. To apply individual songs with mastering effects, open the object effects that can be accessed using the FX button in the toolbar. Additional track and mastering effects are available in the mixer that can be opened by clicking on the mixer icon in the toolbar. This is where you can adjust the volume and position of each track in the stereo panorama.
- To use the Auto Mastering features and professional mastering effects, you'll need the "Premium FX" add-on module. On the right in the Store, you can purchase, download and immediately start using the module. This add-on includes an additional multiband compressor, a parametric equalizer, a stereo processor as well as a limiter. Auto Mastering applies typical sound characteristics from selected music genres to your audio material. Using the Clone feature, you can take any song and use it as a mastering template. These features can be found on the right side of the mixer after you've installed the add-on module.
- To finish, export the songs you've finished mastering via the "File" menu, for example as a WAV, MP3 or OGG file. In the export dialog, you can define whether the complete project or only the current playback range should be exported.
Mastering Songs: Achieve Studio Quality Sound Without Any Experience
Mastering is the final process in audio production where a mixed song is prepared for publication. Preparing multiple songs for an album or compilation of songs is also called mastering. During this process, the sound and volume levels of the individual songs are adjusted so that they form a cohesive entity.
Professional mastering is an art that usually requires a lot of production experience. It's about giving a song the necessary punch and tonal brilliance without losing the musical feel, subtleties and transparency. The goal is to achieve the most perfect compromise between dynamics and loudness.
The compressor plays a key role in this process. This is an automatic volume controller that dampens louder passages compared to quieter ones and condenses the sound. This produces more homogeneous, punchier, and louder audio. There is the risk to make a lot of mistakes here, and a mix can easily sound pumping or muddy. Processing the frequency spectrum with an equalizer and balancing the stereo panorama also belong to the core competencies of mastering and require a lot of listening experience.
If you need professional mastering, but don't have any experience of your own, we recommend the music software Music Maker. It includes real, professional mastering tools that are easy-to-use without any previous experience. You have the option to choose from a supplied list of preset and quickly apply them to your songs per drag & drop. Using the Auto Mastering feature, you can select between sound templates like "70s Disco", "Rock", "Bar jazz" or "Classical" and then apply the sound characteristics to your songs with a mouse click. With the Clone feature, you can even use any song as the basis for mastering, then Music Maker will analyze the tonal characteristics of the chosen song and transfer them to your material. This results in songs that sound as if they were mastered in the same studio and by the same producer as in the original.
Additionally, Music Maker provides the ideal software environment for producing your own songs. You can easily play the included VST instruments using your computer keyboard or with MIDI keyboard. There are electronic instruments for techno beats or synth sounds, you can access "real" pianos, organs, woodwind instruments such as flute, bassoon or oboe, "brass" (including trumpet, trombone, saxophone and tuba), strings (including violin, viola and cello), acoustic or electric guitars, basses and percussion instruments. The Soundpool loops aren't played note for note like a software instrument, you simply drag & drop to arrange them like building blocks. It is almost impossible to do anything wrong: All the loops automatically fit together.
The basic version of Music Maker is free and can be used indefinitely. You don't need any previous experience. There are unlimited ways to master songs or make a song yourself – simply try it out! If you're having fun, you can always upgrade your Music Maker version later by purchasing additional Soundpools, VST instruments or additional program functions from the program's in-app Store.
In the following, you'll learn how to master your own songs using Music Maker. Find out about the different mastering options available in Music Maker and learn valuable tips on how to get the most out of your song's material.
Importing a song into a project to master
Here's how to get started:
- Download the free software.
- Double-click the installation file to install the program.
- Start the program and create a new project.
To import a song file into a project for mastering, proceed as follows:
- Click the icon for the file manager in the upper toolbar. This will open the file manager on the right.
- In the File manager, go to the folder where your song file is located and drag & drop the song file (by clicking and holding the left mouse button) to the left into the arranger.
- If required, zoom in using the zoom buttons in the lower right so that you can see the media in the arranger.
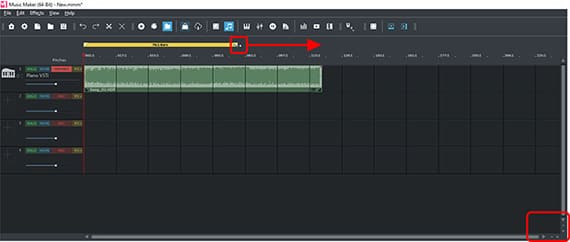
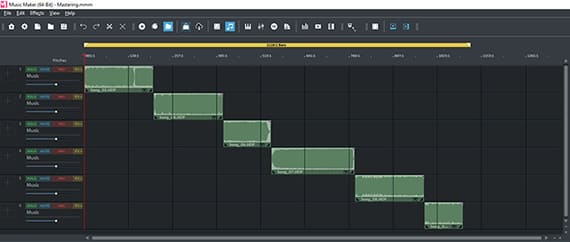
You can drag song files anywhere onto any track. In general, it makes the most sense to drag the file directly to the beginning of track 1. To combine multiple files in one project, drag them individually from the File manager onto different tracks.
- The easiest way to play and pause playback is by pressing the space bar.
- Click in the timeline to move the playback marker.
This allows you to jump to different position. The yellow range above the top track is the section that is played.
- To change the range, drag the ends of the bar to the left or right with the mouse. You can also move the ends with a simple click in the range bar: Left-clicking sets the start of the range, right-clicking sets the end of the range.
- The yellow playback range can also be shifted freely. To do this, click in the middle of the area and drag the range to the left or right over another part of the project.
Mastering Songs With the Free Version
In traditional mastering, you usually don't directly have access to the instruments within the song, but rather work with a finished song file that is already mixed and provided in WAV format. With a song compilation, you also use pre-produced files of song and master them into a single mix.
If you have the original multitrack project containing the separate instrument tracks, you can change each voice as necessary and switch back and forth between the different musical layers. This provides even more creative possibilities.
The basic version, Music Maker Free, offers the most important mastering effects, which you can use to mix and master your songs and song compilations for free. You don't have to be an expert to adjust each effect and instead can choose from supplied templates.
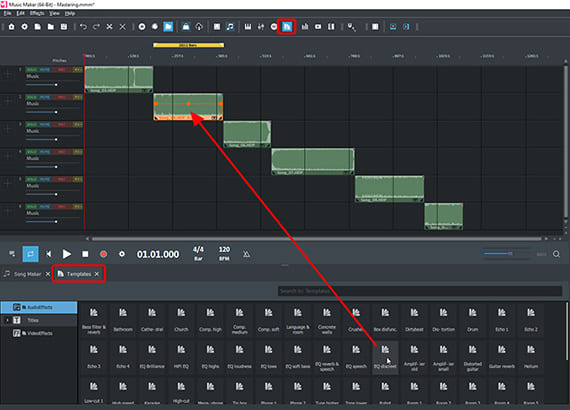
- Above in the toolbar, there is a button for templates. The templates will then open in the lower area in the interface.
- Open the "Audio effects" templates and test different templates by simply dragging them onto your audio in the tracks.
- To delete all the effects, drag the "No effect" template (at the end of the list) onto the audio object in the track.
This helps to ensure that the mastering effects you've used are applied in a useful ratio. Simply experiment with anything you like.
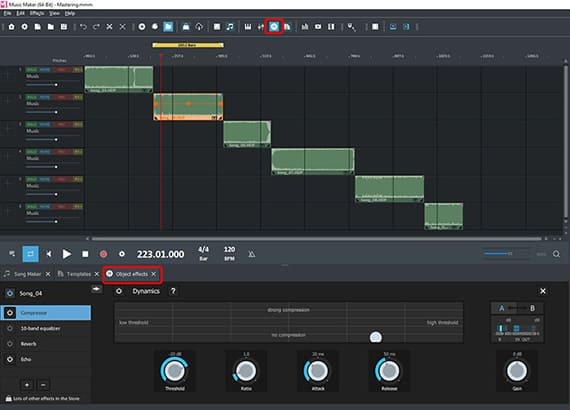
Of course, you can also manually adjust all effects and control the amount of them as you like. There are effects for individual objects, complete tracks, and the master mix.
- Click on the FX button in the upper toolbar to open the object effects
Here, the compressor, 10-band equalizer, reverb and echo can be found for use on individual tracks.
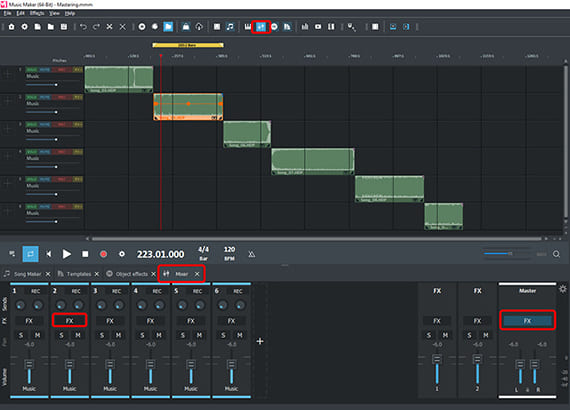
Additional track effects can be found in the mixer.
- Open the mixer by clicking on the mixer button in the toolbar (or simply pressing the M key).
Here, you can find a volume control and a stereo pan control for entire tracks. You can apply an equalizer or a compressor using the respective FX buttons.
On the right in the mixer, you'll find the mastering section for controlling the overall sound. There is an FX button here too with additional master effects, which affect the overall sound after the object and track effects.
Naturally, the most important question is how to best set up various effects. This largely depends on the music genre, your personal preferences, and the source media. If you are working with a finished song file, the waveform in the object display is a good guide. If a peak is clear to see, the recording is probably a bit too loud at this point.
You can also use the zoom buttons in the bottom right of the arranger to zoom in vertically so that it is easier to see and examine the waveform. Please note, however, that the waveform is only an indication. Ultimately, it depends on what you can hear.
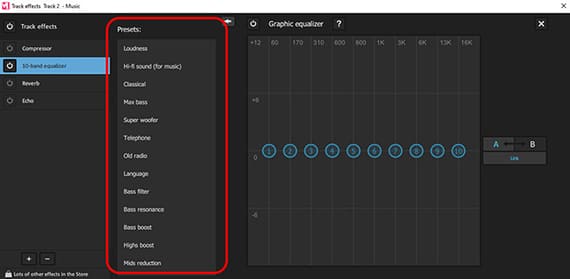
- Use the equalizer to emphasize specific frequency ranges. This is where an indirect approach might be advisable: For example, instead of increasing the treble sliders, it might make more sense to decrease all the other sliders. This also results in a boost to the high frequencies, but avoids clipping. When mastering, it's recommended to use the equalizer cautiously and sparingly. If possible, open the original mix with each individual instrument and change the mix there, as needed.
- The compressor levels volume peaks and adds more presence and loudness.
- The reverb features several presets for specific room sounds. In general, you shouldn't use reverb on a bass, otherwise the sound will become overcrowded and muddy. All other frequency ranges work well with reverb.
In turn, each effect provides different presets with useful settings. The presets can be found on the left side of the effect dialog. They offer an idea of the sound characteristics of the respective effect. You can use them as a starting point and then adjust them further using the intuitive controls in the effects window.
Professional mastering with premium audio effects
Perform mastering automatically in a professional way with just a few clicks using Auto Mastering and the Clone feature. To use these, you'll need the "Premium Audio Effects" add-on module (or Music Maker Premium Edition). In addition to the automated features, you also receive professional effects modules for performing mastering manually: A multiband compressor that lets you compress different frequency ranges individually; a powerful stereo FX processor for processing in stereo panorama; a parametric equalizer with customizable frequency bands; tape simulation to simulate the sound characteristics of magnetic tapes ("am-Track SE"), and much more.
Here's how to gain access to Premium FX:
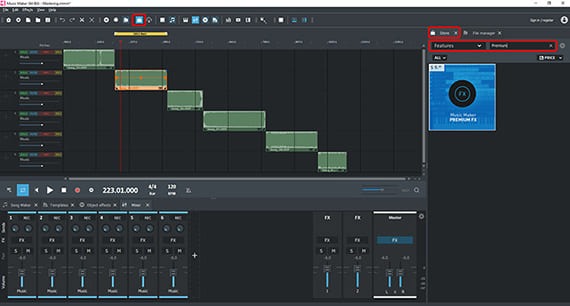
- Open the Store in the upper right, select the "Features" option from the drop-down menu, enter "Premium" in the search box or scroll through the listed items until the "Premium audio effects" tile appears.
- Click on the "Premium FX" tile to read more detailed information.
- Click on the price to to buy the add-on and follow the instructions.
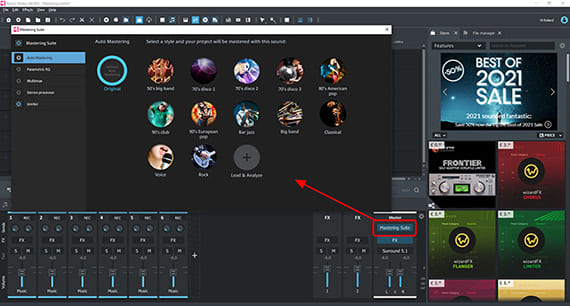
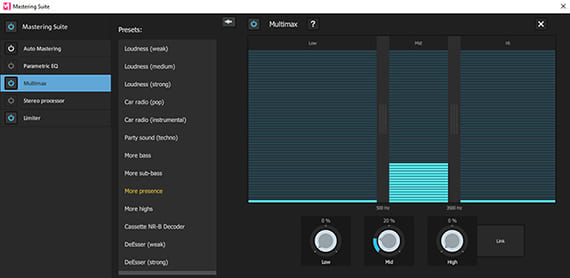
Afterward, new professional effects will be available for use. The mixer will now feature an additional "Mastering Suite" button that lets you access the mastering tools.
The effects under the FX buttons have been expanded as well. For example, you can access the Tape machine simulation effect by clicking on the plus (+) symbol in one of the FX dialogs and selecting "MAGIX plug-ins" > "am-Track SE" from the menu. This somewhat hidden compressor feature lets you simulate the sound of old recordings that is a particularly interesting creative possibility.
Alongside manual operation of the numerous mastering tools, the Auto Mastering features are especially interesting because they produce professional results quickly and easily.
Auto Mastering can also be found in the Mastering Suite. It's exceptionally easy-to-use.
Auto Mastering option 1: Click on one of the buttons and listen to the resulting effect. Choose from "50s Big Band", "80s American Pop", "90s Club" and many other mastering settings. Your song's sound will be adjusted to match your selection. Simply pick what you like best – you can be sure that the mastering will be done with usable settings that aren't too over the top.
Auto Mastering option 2: Choose a custom song, for example your favorite song, which sounds exactly like what you want to hear in your own song's master. Click the "Load & analyze" button and select the song that you want to use. This will employ an FFT filter that emulates the frequency response of the chosen song and applies it to your material.
Whether you prefer quick results using Auto Mastering or want to control the professional effects processing yourself, Music Maker's Premium FX enable you to train your ear through experimentation and gain production experience as make real progress in the professional field.
Music production with Soundpool loops
Last, let's take a look at another area – music production. Every master first requires a song and Music Maker is a powerful production tool not only for mastering, but for creating your own songs as well.
The included Soundpool loops are the easiest and fastest way to create music yourself. You can produce your own songs entirely using Soundpool loops, or simply arrange a few loops into a harmonic framework for instrumental recordings or vocals.
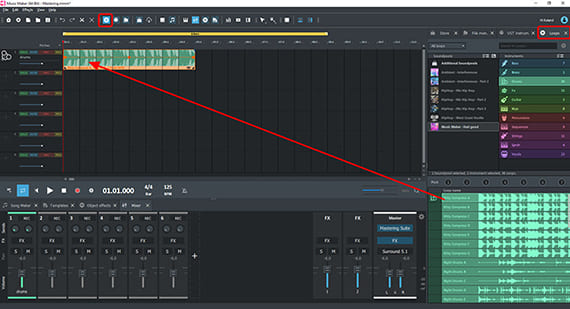
- Make sure that the "Loops" tab is selected in the upper right if you want to use Soundpool loops.
Only the Soundpool "Feel good" will be shown in the Soundpool list in the beginning. This Soundpool is installed with the free basic version, Music Maker Free. If you install additional Soundpools in other genres later, they can be selected here too. On the right, the list of instruments can be found. Here's where you can find the instruments in the Soundpool: "Bass", "Drums", "FX", etc. You can select the loops in the area below. In the "Bass" category, for example, the choices include "Right Bass" (in the variations A-C), "Right Sub Bass" (in the variations A and B), etc.
- Click on a loop to begin listening to a preview.
- Drag & drop the loops you want to use to the left into the arranger. You can also just press the Enter key to do this. This can even be done "live" during playback.
- Play back the arrangement with the drum loop by pressing the space bar. Press it a second time to stop playback.
It all works like a musical puzzle: You drag matching loops onto the tracks to make your own music. Each loop is designed in a way that it can be played it over and over again without the listener realizing that it's the same recording. If you move the mouse to the back edge of a loop, the mouse pointer will turn into a double arrow. You can now click and hold the double arrow to drag out the section on the track as long as you wish. It will then continue to play as a "loop". You can also use the same method to trim part of the loop in order to make its beginning or end shorter.
You can also modify song tempo. Use the BPM field in the transport control to do this.
- Click in the BPM field and change the playback tempo, for example from 125 to 90.
Listen back to your first short arrangement slowed down. A completely different, more relaxed groove emerges that might work well with a hip-hop track.
Of course, this doesn't result in a perfect song right away. It takes a bit of experience to create great music yourself using Soundpool loops. Take a look at the structure of the demo projects. This will give you an idea of how to arrange and produce your own song.
Play and record VST instruments
Another option for making your own music on your PC is to play the VST instruments provided by the program. These instruments are based on short musical "samples" and are played using the computer keyboard or, if you prefer, by playing a MIDI keyboard in the same way as any keyboard instrument. Alternatively, melodies or chords can be programmed by clicking the mouse to draw notes in the MIDI editor or corrected there after recording.
First, load a VST instrument for the track. The free version comes with three instruments: A piano, a synthesizer with a lot of different sounds, and an acoustic drum kit ("Vita").
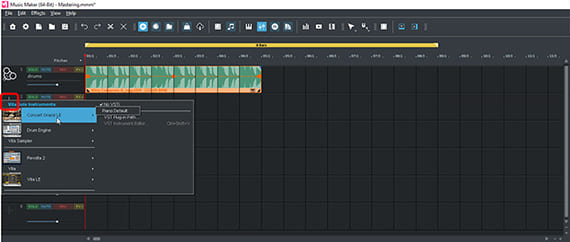
- Click on the track icon of any empty track on the far left to open the VST Instruments menu.
- Select a VST instrument It is probably best to begin with the piano.
This will open a dialog for the VST instrument where you can configure and adjust the sound.
- Close the VST instrument dialog.
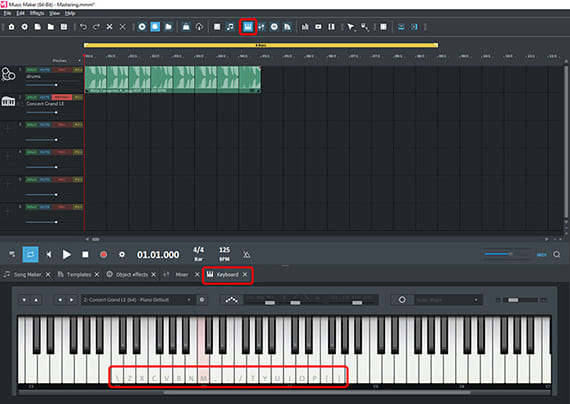
At the bottom of the interface, you'll see a virtual piano keyboard. This controls the VST instruments. A piano sound is set as default.
- If the keyboard is not visible, open it by clicking the "Keyboard" button.
- Click once on the keyboard to activate it.
Letters and symbols will now appear on some of the keys. These keys can be played using the corresponding keys on the computer keyboard. You can also press several keys simultaneously to create a chord.
You can play the normal C major scale using the top row of your computer's keyboard (starting on the left with the letter "Q" and ending on the right with the "[" symbol). It is the easiest to use this row of keys to play melodies when starting out. Through trial and error as well as a little practice, you'll learn to play instruments dynamically and accurately on the computer keyboard.
To record your playing, you'll need an "armed" MIDI track. On the track with the piano symbol, everything has been set up properly for the piano. This is indicated by the instrument icon and by the red "MIDI REC" button on the left side of the track header.
- Click on the red "Record" button in the transport controls.
Recording will start on the track. During the recording, a sound block will be created that will become increasingly longer as the recording continues.
If you click the "Record" button again, the playback marker will jump back to the position where it started. The recording will start again from the beginning and the previous take will be overwritten.
- Play a piano melody on the computer keyboard.
If you play a wrong note, just click the record button to start the recording again. You can also just let recording continue and correct any mistakes later in the MIDI editor (see below).
- When you're finished, stop the recording by clicking the "Stop" button in the transport controls.
Now you'll be able to see your recording in the track and play it as usual.
Export options after mastering
Now you have an idea of what's possible with Music Maker. It's not only a comprehensive mastering tool, but provides a complete software environment for music production, as well as a virtual recording studio full of instruments, effects and even musicians – so to speak. Music Maker isn't a musical computer game, but music making software that enables you to produce your own real songs and publish them outside of the Music Maker program. Share what you've produced with your friends and invite them to collaborate with you during your next production!
The best method for exporting your mastered productions is as an audio file in WAV format or in the compressed OGG format. Both formats can be shared easily and played back on any playback device.
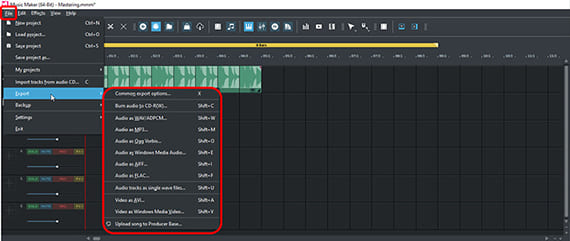
- Select "File" > "Export" from the menu.
Here, you can find all export formats available in Music Maker. During export, all tracks in the arranger are mixed down together with all effects and mixer settings into one "proper" audio file. The final result will sound exactly the same as when played back in Music Maker. For this, you can choose to export the entire project or just the current playback range.
- To export several songs in a row, set the playback range appropriately and then export the range accordingly. Activate the "Only export the range between start and end markers" option in the export dialog.
- To burn your project to an audio CD, you will need the "Music Editor" add-on module, which can be purchased from the in-app Store as described above for "Premium FX".


