Table of Contents
Follow these steps to edit your 4k videos:
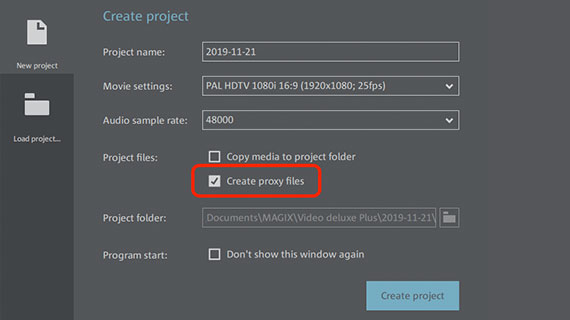
- Open Movie Studio and in the start dialog in select the option "Create proxy files".
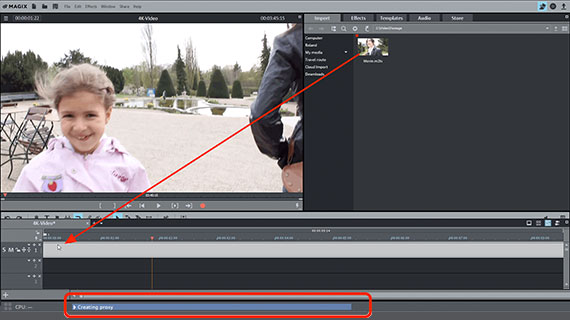
- Import your 4k video files. Simply drag & drop the files into the project from the Media Pool – proxy files will be automatically created.
- Cut and optimize your 4k footage with the whole range of effects and creative options offered by the editing software. The proxy function ensures that edited 4k video footage plays smoothly.
- Finish by exporting your 4k video with modern HEVC codec as an MP4 file, or in a different format. Alternatively, you can burn your 4k video directly to DVD or Blu-ray, upload them online or transfer to your smartphone. Burning the 4K video to disc automatically converts it to the required DVDor Blu-ray format and lowers resolution.
Edit 4k footage with Movie Studio, the video editing software for downright amazing movies:
- 4k import support
- Proxy function for smooth playback and intuitive editing
- Professional features for cutting and editing
- Helpful program wizards
- 4k export
- Conversion to other formats
4K editing
– what you need to know
When editing 4k footage, you need to remember that it contains a massive volume of data. 4k images deliver ultra-high resolution with more than 4000 horizontal pixels, hence the name "4k". Many video editors can't process these kinds of data volumes, or can only process them with limited success, because the computer struggles with the image rendering. As a result, the 4k video appears choppy, the image jumps or freezes – or it can't play at all.
For 4k editing, this is no good. As a user, you want to be able to preview your results during the editing process, and your video needs to be able to play smoothly for this.
Video editing software Movie Studio provides the ideal solution, since the Movie Studio's integrated proxy function means you can edit 4k video without any problems. When 4k footage is imported into the video editor, smaller proxy files are created instead of the large-scale original files. This way, the proxy files replace the large 4k video files, and they can be played back and edited even on weaker PCs without a hitch. When you export files or burn discs, the original 4k video files will be used in place of the proxy files.
The concept behind the video editor is that no changes are made to the source material during 4k editing. The program simply creates a list with all the steps of the editing process. When exporting or burning the video at the end, this list will then be applied to the source material. Video editing with Movie Studio is basically "non-destructive". This means that all cuts, enhancements, titles, transitions, special effects and other editing changes made within the program will not be factored into the original material, but will be added by the computer in realtime when the video is played back. The original files on your hard disk are not affected.
This process offers two decisive advantages. Firstly, it protects your source data against any accidental changes. In addition, the intelligent proxy editing process can be used for editing 4k footage.
A third and even more important benefit for 4k editing is the high level of overall performance offered by Movie Studio. It's a marked difference to other 4k editing software, which can have a noticeable impact on loading times, export and in particular, playback smoothness.
Keep reading to learn more 4k editing with Movie Studio through our practical step-by-step guide.
4k editing in Movie Studio
Step 1: Import 4k footage
- In the start dialog in Movie Studio, select the option "New project" and then in the dialog "Create project", activate the option "Create proxy files"
- Above right in the Media Pool, open the folder containing your 4k video file.
- Drag and drop the 4k video file into the top track.
The import process takes a little longer because the proxy file must be created first. You can check import progress in the status bar that shows "Creating proxy" in the info section at the bottom of the program interface.
The 4k video will then appear in the top track, where you can play or edit it right away.
Step 2: Edit 4k video
All the creative options in Movie Studio can be used for 4k editing – in general, there are no limitations when working with 4k video material.
Typical 4k edits are described below.
Editing 4k footage:
- Place the playback marker at the location where you want to cut and press the "T" key on your keyboard to split the 4k video object in the track into two separate objects.
- You can easily delete cut objects from the track with the "Del" key. Make sure you don't leave any gaps in the footage. You can drag the scenes that follow the cut section of the video forward to fill any spaces.
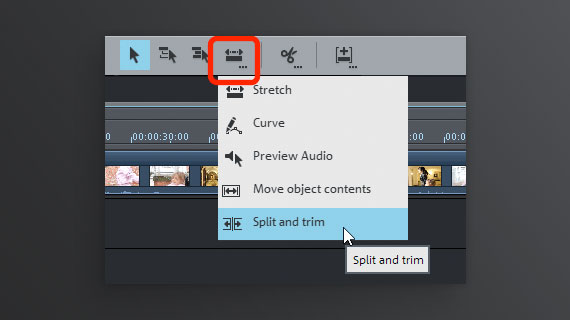
- Use the mouse mode "Split and trim" to scrub through your 4k video quickly. This mode can be activated by right-clicking the mouse mode button in the toolbar. Drag the mouse over the video object in the track while following the video image in the preview monitor. Click on the locations where you want to cut. Click and hold the mouse button and trim the interface.
4k video editing with effects and templates:
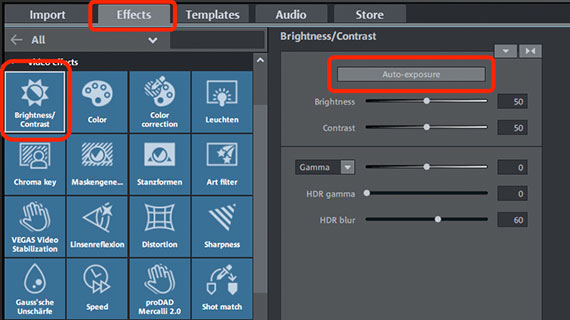
- In the Media Pool to the right, open the Effects tab. Here, you'll find a wide range of special effects and effects for optimization – you can make use of these to enhance your video or add creative touches. For instance, you can try out auto exposure under the effect tab "Brightness & contrast".
- Open the "Templates" tab to integrate additional transitions, titles and intros into your 4k video. There's a preview function for each template. If you want to use a template, drag & drop it into the project window.
- Open the "Audio" tab for background music or audio dubbing with sounds. Drag and drop the audio files to an empty track in the project window.
You can undo any actions by pressing Ctrl+Z – this means you can play around with different sounds first.
Step 3: Export and upload 4k video or burn to disc
Export 4k video as video file:
Here's how to export your film as a 4k video:
- In the "File" menu, select "Export movie" > "Video as HEVC" or "Video as MPEG-4".
HEVC is a common compression standard (codec) for 4k videos. HEVC is also known as H.265 and supports various containers, such as AVI, MOV or MP4. MPEG-4, in contrast, is not a compression standard, but a file container that can use different codecs, e.g. H.265 or its predecessor H.264.
Via the option "Video as HEVC" in Movie Studio you can create an MP4 file with the modern powerful codec H.265. The option "Video as MPEG-4" also can be used to create a MP4 file that uses H.265's predecessor, H.264.
The advantage of H.264 is that it is used more widely than its successor, H.265. This means that all computers should be able to play videos you create using the "Video as MPEG-4" option. If you choose "Video as HEVC", when you play the video on another device, a message may appear saying that the video format cannot be read because the required codec is not available. Generally, the HEVC codec can be installed right away for free, which solves the problem quickly.
Whatever option you choose, an almost identical export dialog will appear.
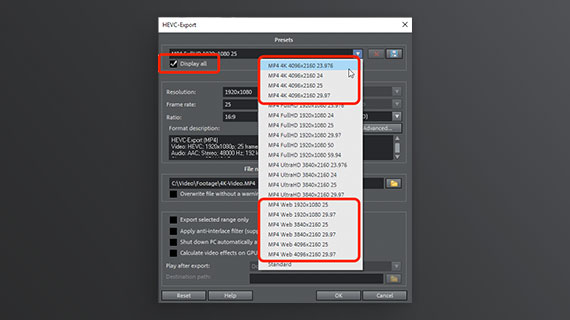
- Activate the "Show all" option in the presets.
- Open the preset list to see what presets are available.
Presets for 4k export are also listed here. However, 4k videos are very large, meaning they're not always suitable for use. Think about what you want to do with the video file after you export it. If you're posting it on a website and want to stream it from there, don't use a 4k preset. We recommend using one of the "MP4 web" presets for this instead. These presets are all streamable, meaning they trigger a stream in the browser once someone clicks on them.
Transferring to smartphone, uploading online or burning to disc
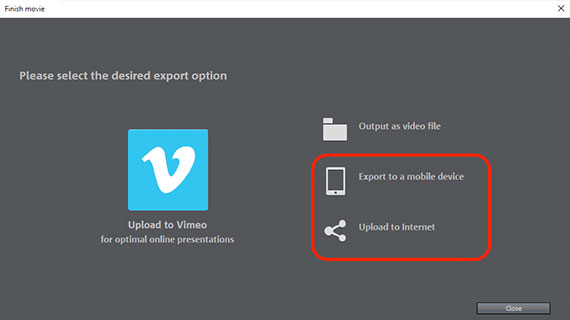
You can also transfer your 4k video directly to a connected smartphone, upload to a web platform like YouTube or burn to disc. Movie Studio automatically selects the necessary format settings here, so you don't have to do anything else.
- To transfer to a smartphone, click on the arrow button top right and open the dialog "Finish movie". Select "Export to mobile device".
- Or, for uploading to a YouTube account, pick the "Upload to Internet" option.
- To burn a DVD or Blu-ray Disc, click to the right on the button with the disc icon. In the "Burn" interface, select a suitable layout for the selection menu and the disc type, and then start the burn process. Please note that your high resolution 4K video will be converted to the respective target format. This lowers the resolution. Burning to DVD will create an MPEG-2 video with a resolution of 720 × 576 pixels; Blu-ray has a maximum of 1920 × 1080 pixels.
4k video editing with Movie Studio, the video editing software for downright amazing movies:
- Import & export for all relevant formats
- Quick cut & detail cut
- Automatic wizards
- Up to 900 effects and music
- Intuitive templates for intros, outros, subtitles, transitions, opening credits and much more
- Burn videos to DVD and Blu-ray (and design your own menus)


