Make video collages with Movie Studio Platinum
– here's how!
Want to combine your photos and videos into video collages? Keep reading to learn how.
- Open Movie Studio Plus and drag the video files you want to use into the program.
- Open the "Templates" tab and select a video collage or picture-in-picture effect to use.
- To create your own video collages, open the "Effects" tab and select the effect "Size/Position".
- Combine your videos and photos via the preview monitor to create your own video collage.
- Lastly, export your photo and video collage as an MP4 or HEVC file, burn it to disc or upload it directly to your Vimeo, Facebook or YouTube account.
Create video collages with Movie Studio Platinum, the video editing program for ambitious movie makers:
- A huge selection of templates for creating video collages and picture-in-picture effects
- Use as many video and photos as you want in your video collages
- Resize, position and animate photos and videos directly in the preview monitor
- Intuitive and powerful tools that make it easy to get professional results
Video collages and picture-in-picture effects
Photo and video collages are collages which show both photo and video material at the same time. They often contain effects and animations as well. A photo and video collage might start by showing a full-size image which then becomes smaller as it moves towards the edge of the screen and the other images are faded in. This results in spectacular effect transitions or video collages which contain multiple videos and photos arranged in the video picture at the same time.
In contrast to video collages, picture-in-picture effects do not contain animations or transitions. Rather, the images and videos they contain are made smaller and positioned so that they are all visible at the same time. Movie Studio Platinum provides templates for creating both animated video collages and static picture-in-picture effects.
If you can't find the right template for your project, you can also design your own video collages. There's no limit to how creative you can get: combine as many videos and pictures as you want. Enjoy total creative freedom when it comes to using effects and animations as well: have your pictures fly in from off-screen, shrink them, zoom in on them, move them straight from one end of the screen to the other. If you can imagine it, you can do it.
We'll start below by showing you how to use the templates included with the program. Then we'll teach you how to create your own custom video collages.
Templates for video collages
in Movie Studio Platinum
Start by using one of the video collage templates included with the program. If anything, this will help give you an idea of how video collages work on a basic level in Movie Studio.
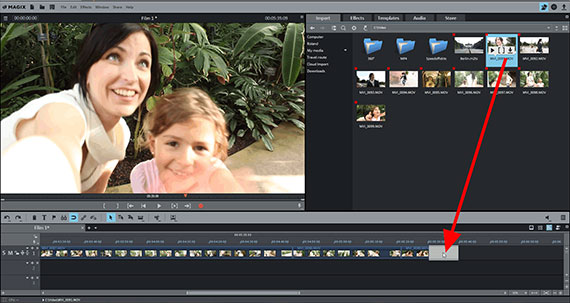
Step 1: Import your photos and videos
First, import the videos you want to use in your video collage into the program. Follow these steps:
- Open Movie Studio Platinum.
- In the Media Pool to the right, navigate to the folder containing your photo and video files.
- Hold down the Ctrl key and click the files one after the other to select them.
- Hold down the mouse button and drag and drop the selected files onto the first track.
- Arrange the photos and videos back-to-back in the desired order on the track.
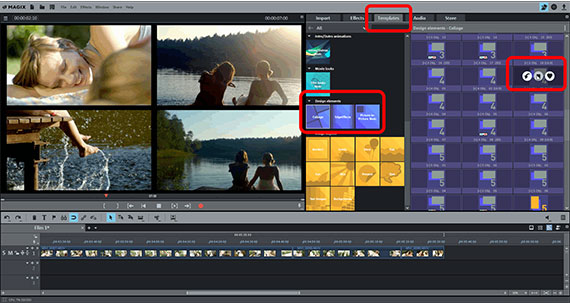
Step 2: Select a template for the video collage
Next, choose a template to use for your video collage:
- Open the Templates tab in the Media Pool.
- Under "Design elements", go to "Collages Basic".
If you take a closer look at the contents here, you should notice that each template is marked with a number. This number refers to the number of photos or videos that the template can hold. A template with the number 2, for example, can hold two videos or photos; a template with the number 3 can hold three, and so on.
- Place your mouse over one of the templates. A small window with three buttons should appear.
- Click the center button (preview) to watch a preview of the template. A sample video will play to illustrate how the collage works.
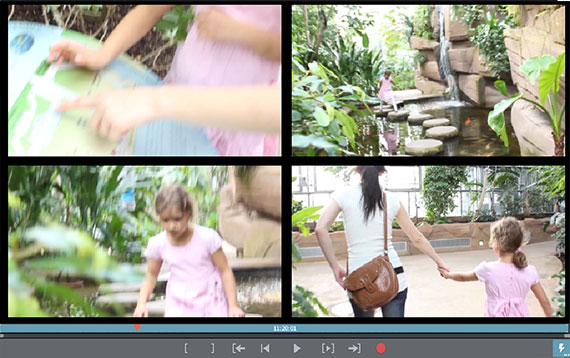
Step 3: Generate your video collage
Once you've chosen a template to use, apply it to your photos and videos:
- Hold down the mouse button and drag the template onto the first file in your video collage.
The sample images in the template will be replaced by your own photos and videos. You should now see your video collage on the preview monitor when you press the play button.
Creating video collages with picture-in-picture effects
Next, let's take a closer look at the templates for picture-in-picture effects. These work a little bit differently than video collages.
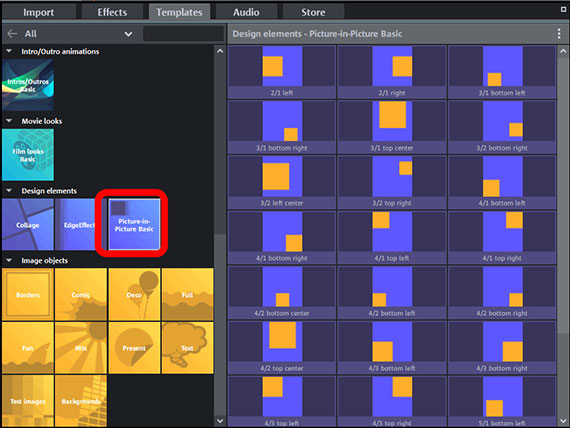
Step 1: Open the picture-in-picture templates
- Open the "Picture-in-Picture Basic" templates folder.
These templates can be applied to either one photo or one video. Unlike the video collage templates, picture-in-picture templates do not automatically combine your photos and videos into video collages. They merely shrink them and position them on the monitor.
The icons in the Media Pool tell you how the templates work:
- The orange square indicates the size and position of the image.
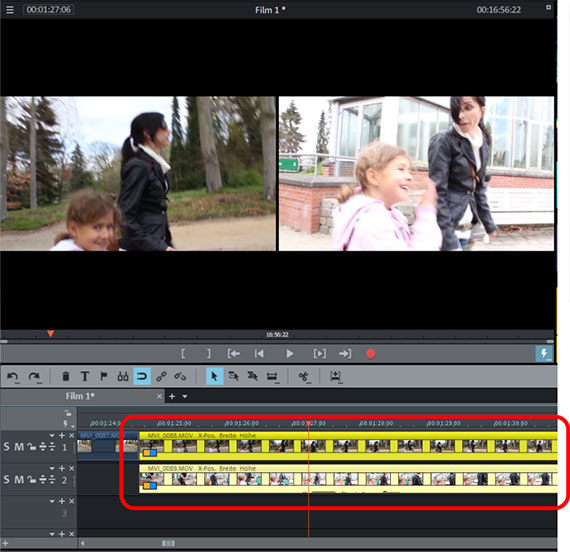
- The names tell you which templates go together. For example, the templates "2/1 left" and "2/1 right" go together. To use these templates, you need two videos or photos which will be positioned next to each other on the monitor.
Step 2: Generate your video collage
- Drag templates that go together onto the files in the timeline. For example, drag "2/1 left" onto the first file, and drag "2/1 right" onto the second file.
- Arrange the videos or photos on top of one another on separate tracks. In our example here, we want to drag the second video onto track 2 and then move it to the left until it lines up with where the first video starts on track 1.
When you do this, both images will appear next to each other in the preview monitor.
Videos and photos which are placed on top of one another an separate tracks are displayed at the same time as long as the upper image isn't covering the lower one.
Custom video collages
Step 1: Prepare your video collage
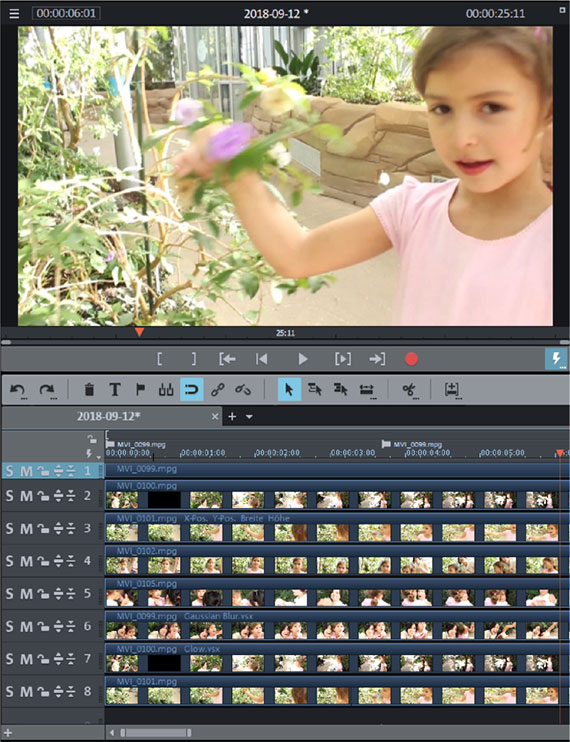
In our example, we want to create a video collage with eight videos.
- Drag all of the videos you want to use onto different tracks. Make sure the videos are positioned directly above one another.
- Mute all of the videos whose audio tracks you don't need by right-clicking them and going to "Audio functions" > "Mute audio object".
- Open the Effects tab in the Media Pool and select the effect "Size/Position".
Step 2: Position the first image in your video collage
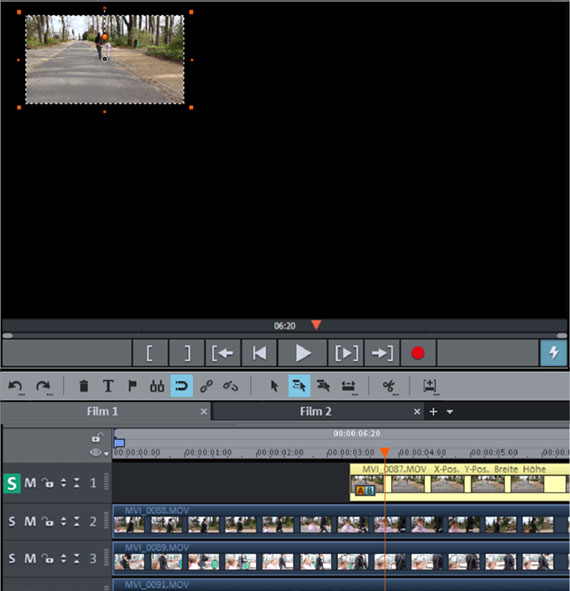
Let's start with the video on the first track. First, we need to shrink it to create enough room for the other seven videos, then we need to position it in the upper left section of the frame.
- Switch the video on the first track to solo mode by clicking the S button in the track header on the left.
- Click the video in the track to select it. Selected videos are highlighted yellow in the track.
- Click on one of the handles in the preview monitor and drag it inwards until the image is small enough.
- Move the shrunken image to its position in the video collage.
Step 3: Add additional images to your video collage
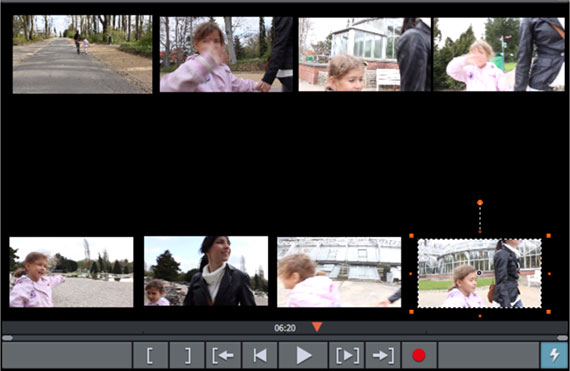
Continue in the same manner with your other photos and videos:
- Activate solo mode on each track to see the video or photo.
- Shrink the picture in the preview monitor and move it to its position in the video collage.
- When you're finished, disable solo mode.
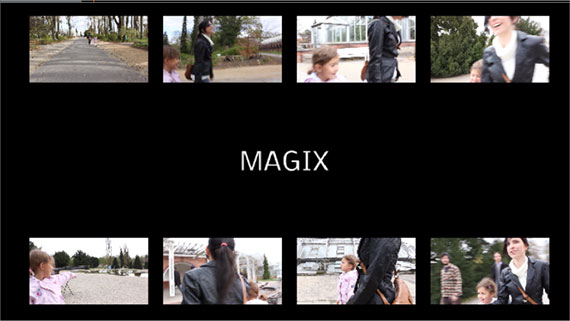
You should now see all the photos or videos on the preview monitor at the same time.
Step 4: Arrange the video collage sequence
Lastly, think about how you want to arrange the sequence of images and videos in your collage. Images aren't normally shown at the same time in video collages; rather, they appear one after the other. Movie Studio makes it easy show and hide images and videos in any order you want:
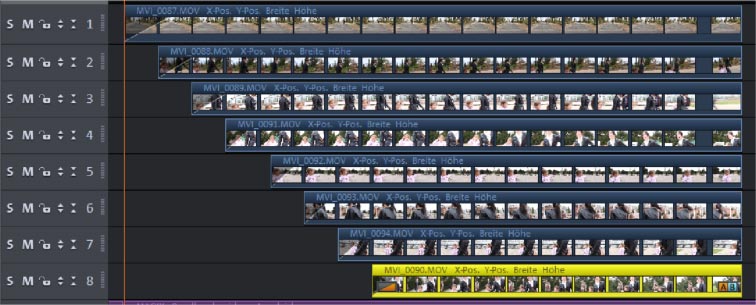
- Move all of the photos or videos to the desired starting and ending positions on the tracks to create the sequence you want.
If you want the videos to play one after another, you should arrange them in a staircase sequence. When the video reaches a new step in the staircase, a new image is shown.
Additional options for video collages
There are plenty of other ways to get creative with custom video collages.
You can animate the images, have them fly in from off-screen, make them smaller or zoom in on them. You can also add captions to your video collages, or apply border effects to the black sections of the background.
To do this, use the title templates and the effects in the Media Pool.
There's no limit to how creative you can get with your photo and video collages.
Movie Studio Platinum: One of a kind – just like your movies.
- Smooth proxy editing in up to 4K
- Up to 1500 effects and music
- Automatic wizards
- Burn your movies to DVD, AVCHD or Blu-ray


