Increase video sound and adjust volume – here's how!
To increase video sound volume and adjust volume for multiple videos and audio tracks, follow these steps:
- Open Video deluxe Plus and drag & drop to import your video from the Media Pool. To combine several videos, drag them one-by-one to the top track and arrange them in the correct order.
- Right-click on the videos and select the option and select "Audio functions" > "Normalize (maximum level)". If you notice that loud signal peaks decrease the total volume, cut these into individual objects by placing the play cursor on these points and pressing the "T" key and then normalize video audio separately.
- To increase volume further, use the compressor from the "Audio Cleaning" dialog in the Media Pool. This will increase audio volume in video objects to match louder video objects. In addition to higher average volume, you'll achieve better intelligibility of speech.
- For even more editing options, open the audio mixer using the "M" key and use the multiband compressor "MultiMax" in the "Mastering" effects section. There's also a limiter here, which automatically prevents clipping.
- If you want to combine several audio sources (for instance natural sound, voice-overs and background music), order the audio objects one below the other onto separate tracks. Use the volume faders in the mixer to adjust the video volume across the audio tracks and set total volume.
- For flexible volume control, activate a volume curve in the context menu of the object. Double-click on a curve and new curve handles will appear. Use these to adjust video volume as desired.
- Once everything sounds and looks good, pick "File" > "Export movie" and select an export format in the sub-menu (e.g. MP4). This will export all the videos together with a master stereo audio track containing all the audio material as a video file. You can also transfer the video directly to your smartphone or burn it to disc.
Adjust video volume and increase sound using Video deluxe Plus, the video editing software for downright amazing movies:
- Import all common video formats
- Custom volume control via object handles and object normalization
- Increase volume using audio effects (normalization, compressor, 1-click effect templates)
- Audio mixer for multiple audio tracks
- Mastering FX with multiband compressor for professional volume editing
- Track curves for dynamic volume control
- Helpful program wizards
- File conversion into all essential formats, CD burn function and direct transfer to smartphone
What you should know when you want to increase video volume
Adjusting the audio track is often a headache when you're creating a video. Modern camcorders or smartphones provide amazing images, but their built-in microphones can leave a lot to be desired, And when you don't have the optimal acoustic conditions when recording a video, the sound resulting movie may be too quiet or noisy.
If this happens, you'll need to adjust video volume during editing. It usually makes sense to enhance other audio elements too, to achieve a better, more transparent and greater intelligibility of speech, for instance.
For several videos with various pieces of footage, it's also essential that you synchronize volume to achieve a uniform overall sound.
Often several audio tracks are combined in video creation; for example the original sound of the recording can be mixed with background music and a voice-over. In this case, you need to adjust video volume for all the tracks so they're perfectly synced. This is because you want the finished video to contain a single stereo audio track with the right volume balance for all sound sources.
Freeware or video apps usually can't cope with these kinds of demanding audio tasks. Video and audio editing software Video deluxe Plus provides a much better alternative when you want to increase MP4 volume. It offers all the audio editing functions you need, from fast and easy video volume boosting to effective loudness editing, noise removal and sound optimization for multiple videos and audio tracks.
Our step by step guide below shows you how it all works.
Increase and adjust video volume with Video deluxe Plus
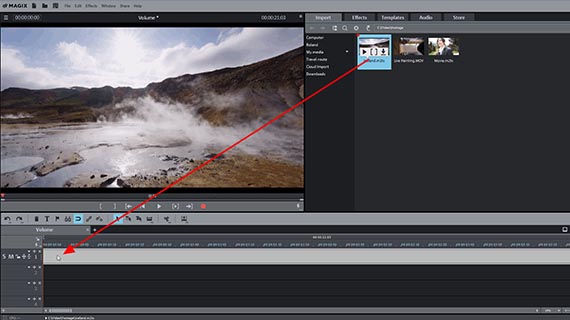
MP4 volume booster: Import video
- Open Video deluxe Plus and create a new project using the Start dialog.
- In the Media Pool in the upper right, locate the folder containing your video file.
- Drag & drop the video file into the program.
- To combine several videos, drag them one-by-one to the top track.
You'll now see one or several video object(s) lying on the first track of the project. When you press the spacebar, this will play the project from the start. Press it again to stop playback.
The playback marker can be positioned anywhere by simply clicking the mouse button.
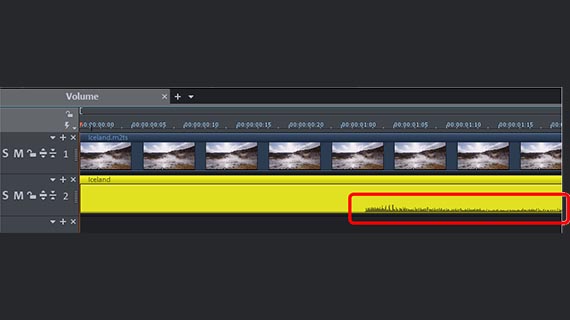
- Right-click on the video and under the audio functions option, select "Video/Audio on separate tracks".
- To do this, right-click on the audio object and select the option "Create wave form display".
The audio track will now display as an audio object underneath the image track along and a waveform will display within the audio object. The waveform isn't strictly necessary when you want to increase the volume of an MP4 file, but it's recommended, as it provides you with a clear overview of your audio track and allows for easier editing.
Option 1: Manually increase video volume
To increase video sound for a video, you have several options to choose from: Let's start with the simplest.
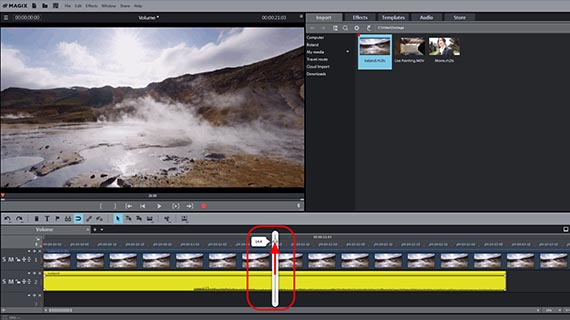
- Drag the object handle into the middle of the audio object. The volume fader will display.
- Drag the volume fader up to increase video volume.
The method is especially easy. However,clipping can easily occur at loud sections. A crackling sound in your audio is an indication of clipping.
- If you hear some kind of crackling or popping during playback, open the mixer via the "M" key (or in the toolbar on the right via the mixer button).
Use the peak meter to check for clipping. You can also use the peaks in the waveform display to help you do this. The peak meter display should not exceed 0 db at any point in the track: if it does, reduce the volume of the audio object further.
Option 2: Automatically increase video volume
It's usually best not to increase video volume manually, but to use the normalization feature. This ensures that clipping won't occur anywhere in the audio track.
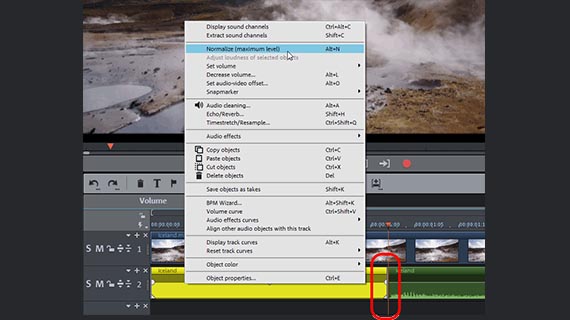
- Right-click on the audio object and in the context menu that appears, select "Normalize (maximum level)".
When you adjust volume in this way, the tool you use will automatically scan the audio track for the point with the highest volume and then set it to the highest possible level of 0 db.
However, this might not be enough, since a single loud section in the audio is all it takes to "push down" the entire audio signal. For instance if you accidentally bumped the mike during recording, this single loud rumble noise will mean that all all parts stay quiet.
You can resolve this issue by cutting the audio track into sections and normalizing the cut audio objects separately. You should proceed as follows:
- Place the playback marker just before a loud section in the waveform and press the T key on your keyboard to split the audio track into two separate objects at this point.
- Place the playback marker after the peak and press the "T" key again. This cuts the audio object again.
You have now cut the audio track into three audio objects, which can be normalized separately. You can deal with particularly loud sections that negatively influence the master volume in this way. This will significantly increase overall volume for the video.
Option 3: Increase video volume using audio effects
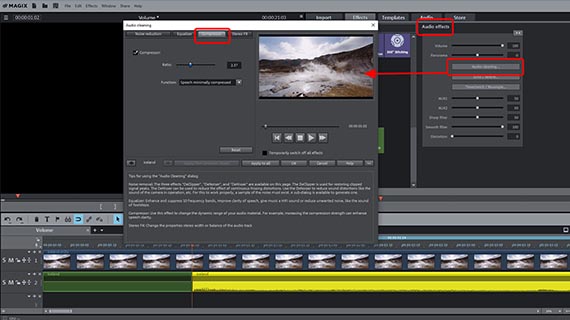
Another possibility to increase video sound's effective loudness is by applying audio effects to audio objects. The compressor will increase video sound volume as an average and enhances speech intelligibility by providing an MP4 volume booster to balance out volume levels.
- In the Media Pool, open the "Effects" tab and click on the icon "Audio Effects".
- Click on the "Audio Cleaning" button in the effect dialog.
- Switch to the "Compressor" tab in the dialog and set the strength of the effect using the slider.
There's no need to worry about clipping with this effect, since it will increase video sound of quiet passages whilst leaving loud ones unchanged.
- To edit the levels of individual frequencies, open the "Equalizer" tab. Here, you can boost mid-range frequencies to enhance audio characteristics that are dull.
To avoid clipping in the equalizer, it's better to make the surrounding ranges quieter. In this way you can accentuate the frequencies you want to adjust indirectly.
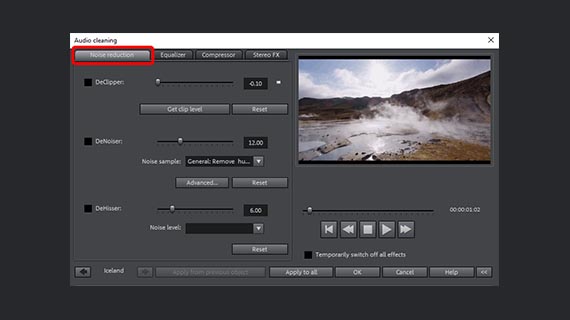
Effects editing can sometimes have side effects: When quiet parts are made louder, noise in these parts can be made much louder too. If this occurs, you can set up a noise removal process via the Audio Cleaning dialog.
- Use the DeHisser to reduce background noise.
- If the results still aren't what you're looking for, use the "DeNoiser". When applying the DeNoiser first choose a type of noise interference (e.g. Tape noise removal) or generate a noise sample from the video itself Then set the level for the DeNoiser effect using the slider. Frequencies from the noise sample will be filtered out of the recording as a result.
Tip: If this seems a bit too complicated, you can take advantage of pre-configured effect presets in the "Audio effect presets" in the Media Pool. These can be used to easily modify volume and enhance sounds. You can preview each effect preset first and then simply click it to apply to the audio track.
Option 4: Increase video volume using the audio mixer
Video deluxe Plus includes a virtual mixer that offers a wide range of options for professional audio editing. It essentially allows you to mix different audio tracks together and adjust their volume. So if you for instance want to combine background music with the sound of the original video recording and perhaps add a voice-over too, the audio mixer is what you need.
It's great for editing single audio tracks too. Above in "Option 1", we looked at how you can use the peak meter display for identify clipping.
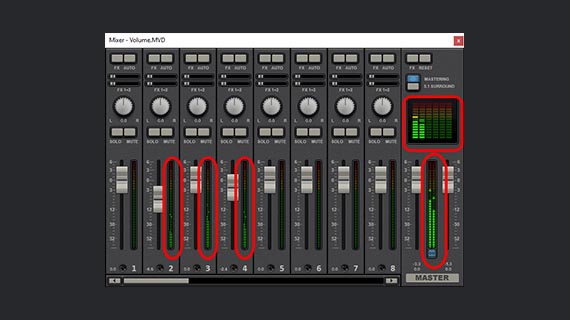
The audio mixer can be kept open while working on a project. Every project track in the mixer contains its own volume fader. Master volume can be set in the "Master section". The master section includes two faders for adjusting levels for the left and the right channel of the stereo master signal separately.
If only using a signal audio track (normally the audio track for video on track 1 or 2), you can use all track effects and the master section on the right in addition to the volume fader.
To combine several audio tracks or videos from different sources with one another, first move all videos and audio objects one below the other on a single track. By holding down the shift key, you can adjust the videos horizontally so that the cuts don't get mixed up.
You should now have all acoustic recordings from the same source lying on their own dedicated tracks – for instance the original video sound on track 2, background music on track 3 and a voice commentary on track 4. Or in the case of multiple videos, assign all videos from camera 1 to tracks 1 + 2, videos from camera 2 to tracks 3 + 4, and so on.
- During playback, follow the peak meter display in the audio mixer. You can check volume for any track and for the overall output in this way.
- The "FX" buttons are located above on the channel strip. Via these buttons you can access all the track-based editing effects – for instance, a compressor and an equalizer.
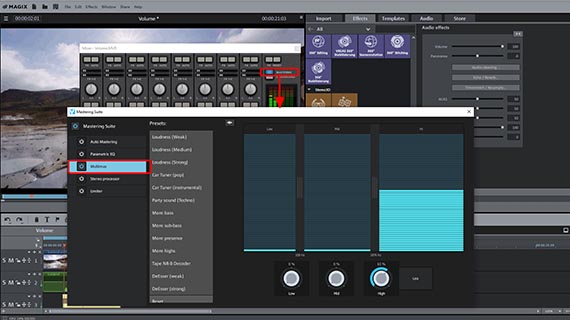
- Via "Mastering" on the right you can open the effects for the overall sound.
- Here, you'll find a limiter for preventing clipping. The limiter analyzes signal peaks and eliminates distortion by bringing any levels set to over 0 db down to 0 db.
- With the MultiMax multiband compressor you can split the frequency spectrum into three ranges. Use this to keep all deeper sounds uncompressed and work only on higher frequencies by using precise compression to give them higher volume and more presence.
The effects in the audio mixer offer many options for volume and sound optimization and are the ideal way to increase MP4 volume in Video deluxe Plus.
Option 5: Adjust video volume using track curves
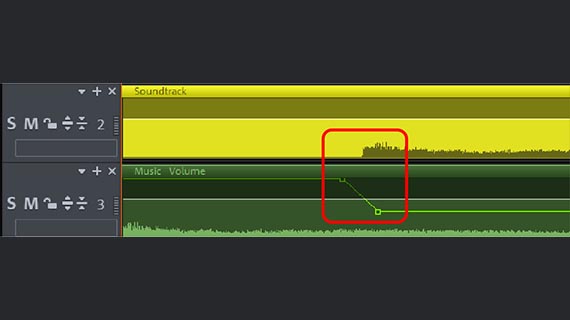
When working with multiple audio tracks, it's often necessary to briefly lower an audio track if an important acoustic event is occurring at the same time on another audio track (this is known as "ducking"). This can be achieved in Video deluxe Plus using what are known as volume curves.
A volume curve is useful for editing single audio tracks too, when you want to increase video sound volume during playback.
Working with volume curves means that there are no instances of clipping, because object volume can only be reduced and not increased.
- Activate the volume curve in the context menu of the audio track (right-click in the audio object >"Volume curve"). A curve will appear in the project window as a thin line within the audio object.
- Double-click on the curve and curve handles will appear.
- Move the curve handles up and down to increase or lower the volume respectively.
Example: A "U" shape lowers the volume and then increases it again (ducking). For this you'll need a total of four curve handles: Leave the outer two handles the way they are and drag the middle two handles downwards. Die äußeren beiden lassen Sie, wo sie sind, und die mittleren beiden ziehen Sie nach unten. Controlling volume in this way is ideal when you want certain audio events from the original recording – for instance a sudden noise – to be clearly audible. This "ducks" the music briefly so that the noise is heard, then the volume of the music increases again.
Tip: Video deluxe Plus offers helpful functions for automatic volume reduction ("Auto Ducking"). First, cut the sequence in which the distortion you wish to correct is found into an independent video. Right-click this object and choose "Volume reduction" from the shortcut menu. In the dialog, you can define to what extent the volume of the other tracks should be lowered.
Adjust video volume – Export
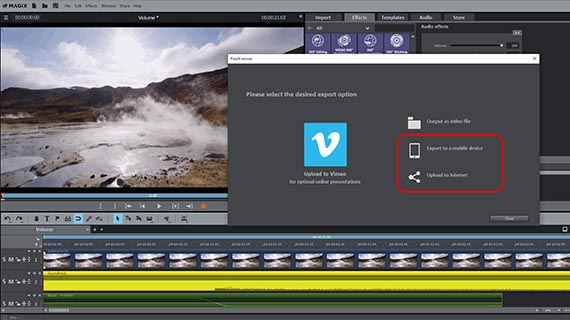
Finally, when you've increased video volume and enhanced sound and are happy with the video image quality, you can export your video. There are several ways to do this:
- Create video file: Go to "File" > "Export movie" to create a new video file e.g. in MP4 or MOV format. There are a range of codec settings and presets available in the Export dialog.
- Burn to disc: You can also burn your footage to disc from right within the program. DVD, AVCHD and Blu-ray Disc are all available. To open the "Burn" interface, click to the right on the button with the disc icon. Pick a selection menu layout and then start the burn process.
- Upload to the Internet: Vimeo and YouTube are directly connected to the program. Just click on the arrow symbol in the top right to open the dialog "Finish movie".
- Transfer to smartphone: In the "Finish movie" dialog you will see the option "Export to mobile device". Here you simply pick a device, Video deluxe Plus sets the parameters automatically. The video will be exported first in the correct format, and then output to your device.


- 1,500 effects, templates & transitions
- Professional video stabilization
- Direct editing + travel routes
- Fast INFUSION Engine
- Multicam and 360° editing


