Make music videos
– here's how it's done.
Follow these steps to create your own music videos:
- Film the musician or band from as many different angles as possible.
- Open MAGIX Video Pro X and import your footage onto different tracks.
- Edit your footage and delete any parts you don't need.
- Drag and drop the audio file onto a separate track and mute the audio tracks on your video footage. Or, alternatively, select an audio track with very high quality sound.
- Right-click the audio object on the track and select "Create snap marker". Cut your footage into short scenes and align the scenes with the snap markers. If you are using footage from multiple cameras, select "Multicam mode" and cut the source tracks into a single master track.
- Use color grading or lookup tables to adjust the color, and add titles.
Producing music videos
– how to make professional video clips
Produce music videos using the professional video production program MAGIX Video Pro X:
- Intuitive and professional editing tools
- Professional post-editing tools, including color grading, lookup tables, chroma key and much more
- Easily match video to music with snap markers
- Use multicam mode to film live performances or as a virtual control console
- Superior video quality for music videos thanks to HDR support and 4K source videos in FullHD
- Export in the most common and important file formats, burn direct to DVD and Blu-ray
Film music videos
First, you need footage that you can use to produce your music video. There are many options available for footage. Many music videos work like short films that tell a stand-alone story within the short amount of time available (usually only 4-5 minutes). Others employ complicated animations or atmospheric landscapes. Others still showcase a live performance by the musician. This last example is certainly the most common, and it's the one we'll be using in this guide. But the steps provided here can also be used to work with other types of footage if you want to use different visuals.
Start by deciding what you want to show in your video. Then, film as much footage as possible so that you'll have plenty to work with when it comes time to start editing on your computer.
Here are a few tips:
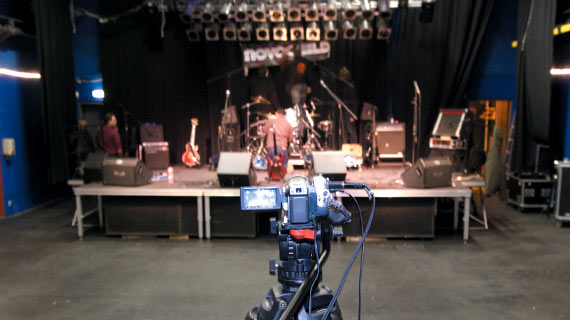
Location
What kinds of locations to you want to use to capture your footage? Since everything else depends on the location, this is the first question you should ask yourself. Filming in an old industrial building requires a different shotlist and different equipment than filming outdoors on a summer day.
Choose a location which offers unique and interesting visuals and, ideally, one which works well with the music.

Shotlist
A shotlist is a list of all the shots you need for your video, i.e. a set of instructions of what to record.
You'll definitely need to shoot lots of close-ups of the musicians, e.g. the guitarist's hands moving and playing or the drummer's foot stepping down on the hi-hat pedal.
In addition to close-ups, you'll also need medium long shots which help the viewer make sense of the action in space. Using lots of different shots and angles helps give the video a dynamic feel.
You should also film footage which doesn't relate directly to the music, such as the equipment being set up, backstage shots, sound check, interviews, etc.
And be sure to also capture some mood shots which don't contain any subjects in them.
In general, you should try to film as many different things and moods as possible so that you have plenty of footage to use and combine later in Video Pro X.

Technical equipment
When filming live performances, you should use at least two cameras: one camera on a tripod for long shots and one handheld camera in front of the stage to capture close-ups. Let both cameras run the entire time.
If you already have an audio file of the music, you won't need the audio tracks from either video camera. If you do use the audio from the video cameras, it's important that the sound is recorded in high quality. Don't use the integrated microphone on the camera; rather, use a good external microphone.
If there is a mixing board present which you can use, record the sound via the outputs on the mixing board. Talk to the mixer before the performance starts and ask for your own stereo audio track. Ideally, you want a separate mix, not the room mix.
Be sure to use headphones to make sure the sound is balanced.
Lighting
Lighting and colors play an important role in music videos. Although there are plenty of post-production options available in Video Pro X, we recommend filming in bright, evenly lit conditions.
The brightest and most affordable light source is the sun. When filming using sunlight, keep an eye on the clouds and the time of day. Your music video will look pretty odd if the first two minutes of a clip are shot around sunset, and then suddenly the midday sun is shining in all its glory for no explainable reason.
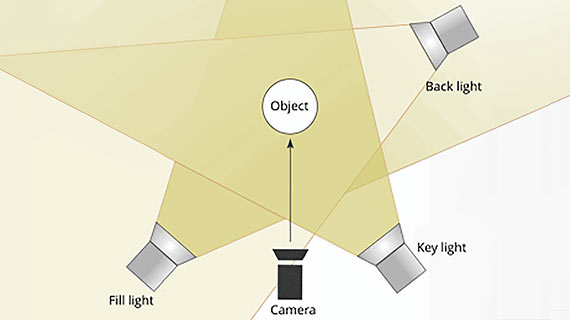
If you choose to use artificial lighting, be sure to use three light sources in combination with one another: a heavy spot light from above, indirect lighting from the front and a spotlight from behind (three-point lighting). This technique reduces the occurrence of shadows and gives the scene visual depth.
Producing music videos: Post-production
The music video itself is brought to life on your computer during post-production. If you wanted to, you could produce a perfectly good music video using readily available images and videos without ever shooting any of your own footage. If you choose to do this, be sure to use pre-produced video material which fits the music you are using.
Making music videos:
Import your footage
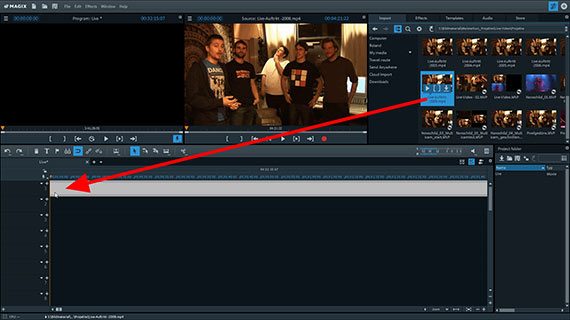
- Import all of the videos you want to use in your music video into MAGIX Video Pro X. The monitor on the right can be used to preview the files in the Media Pool. Drag and drop the files onto the tracks. Use a separate track for each subject.
- Right-click the videos in the tracks to open their respective context menus. For each video, select "Audio functions" > "Mute audio object".
- If you already have a song you want to use for your music video, import the song file onto the last track. Right-click the file in the track and select "Create snap marker". The program will set snap markers on the transients (beats), which will enable you to dock your videos onto the beats of the song. If you don't have a separate song file, find the audio track of your video footage and choose the one with the best sound quality. Then, create snap markers for that track.
Making music videos:
Editing manually
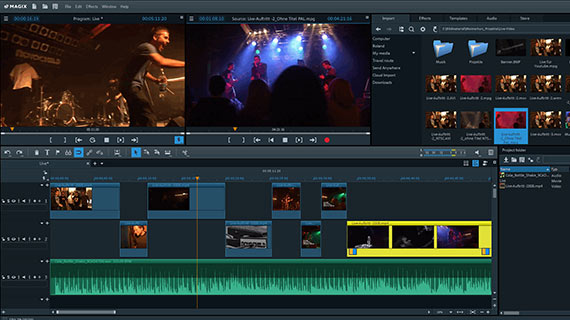
Now, cut your footage into scenes of any length. If you have any parts left over that you don't need, delete them from the project. You can move any scene to any position on its track. If the magnet button is enabled, the scenes will snap to the snap markers in the audio material so that the transitions between each scene follow the beat of the music.
Here are a few tips:
- Cut musically. But instead of always cutting directly on beat 1, try cutting on the offbeats as well. Listen to the music and use the cutting tool like a musical instrument.
- Cut in a "picture-before-sound" manner. In other words: when in doubt, have the video picture start a little bit before the beat. It will take a bit longer for the conscious mind to become aware of the visuals, but the beat will be perceived immediately.
- Cut based on your content. Your transitions and cuts shouldn't be the only things that get synchronized to the music. If there's a scene in your video where a door opens, arrange the clip so that the door opens on beat 1.
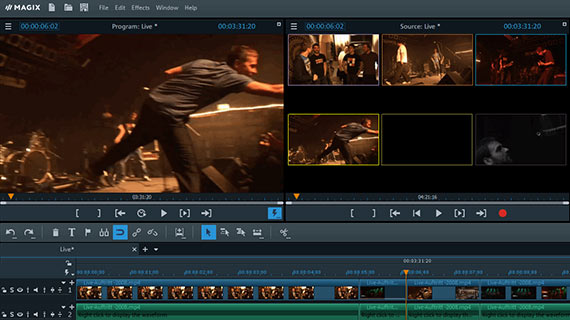
Making music videos with multicam editing
Multicam editing comes into play when you have a recording of a live performance which was filmed with multiple cameras. But it can also be used as a control console for other types of footage, too.
- Move all of the videos you want to edit using multicam editing onto separate tracks. Leave the first two tracks empty.
- If you need to synchronize your source videos first, use the audio tracks to do this. Right-click on the videos and select "Audio functions" > "Waveform display". You might find it helpful to also create separate audio objects to make it easier to see the waveforms. Look for a clearly defined sound that appears in the waveform of each video and move the videos so that the peaks in the waveforms line up with each other.
- Enable multicam mode by clicking the button below and to the right in the toolbar. Click on one of the images in the preview monitor to the right to apply it to the target track. You should see the target track on the monitor to the left. To apply another image, click the preview image on the monitor to the right. You can either start playback and edit live by clicking with the mouse, or you can move the playback marker manually and edit at your own pace. When you're done, you should have a multicam target track which consists of many individual clips from your source tracks.
- Next, we need to perform some more detailed edits. When you place your mouse over a cut point, the cursor changes. You can now snap the cut point to the snap markers. Play the music and look for cut points which make sense musically.
- Finally, disable multicam mode.

Making music videos:
Post-editing
Lastly, it's time to work on the visuals in your music video. The main thing to focus on here is the coloration of your footage, but you can also apply other effects in post-editing. Music videos lend themselves well to creative experimentation.
- Open the Effects tab in the Media Pool and search for a suitable effect to use. Select a video and apply the effect.
- Do you want all your clips to have the same look? Perhaps you want the live performance to be in color, and all your supplementary footage to be in black-and-white? Take a moment to think about what would work best for your music video, and play around with different options. If you want certain scenes to have the same look, place them on separate tracks.
- To apply the current effect settings to all videos, click the triangle button in the upper right-hand corner of the effect dialog and select "Apply video effects to all". To apply the current effect settings to the other videos on the current track, select "Apply video effects to all of the following objects".
- Be sure to also try the film looks included with the program. These can be found under the Effects tab. Here, you'll also find lookup tables which can be used to give your music video a professional cinematic look. To apply the film looks or lookup tables, simply drag them onto the videos in the track.
- Also think about whether you want to add opening or closing credits to your music video. Open the "Templates" tab and look for a suitable title template.
Produce professional music videos with MAGIX Video Pro X's intuitive controls and powerful production tools:
- Full track handling
- J-L cuts
- Multi-track & multi-format timeline
- Three and four-point editing
- Nested sequences
- Beat-based editing
- Advanced search for gaps
- Multicam editing
- Lookup tables, VEGAS image stabilization, color grading, slow motion / time lapse
- Complete package for 360° video
- Templates for intros, outros, captions and subtitles, transitions, open credits and much more
- HDR support
- Burn videos to DVD and Blu-ray (and design your own menus)


