Record screen with Movie Studio Platinum
– here's how!
- Start Movie Studio Platinum.
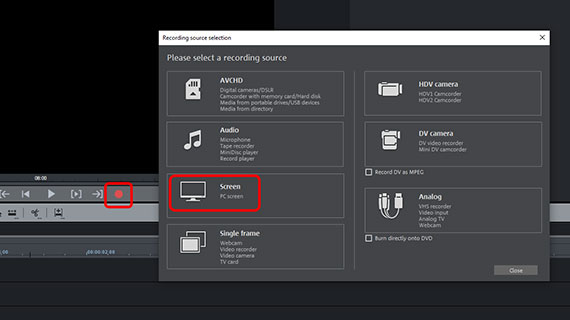
- Click on the red recording button below the preview monitor to open the recording dialog.
- Select the "Screen" recording option. The screen capturing dialog will open.
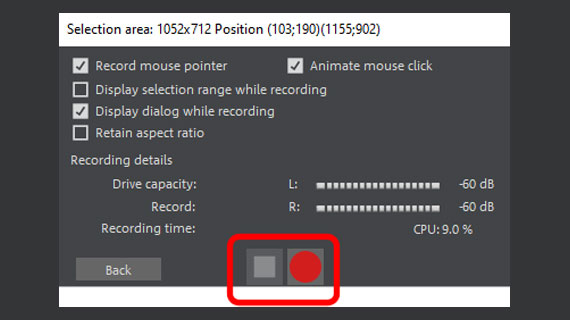
- Select the audio source for recording above in the screen capturing dialog. You can record computer sound for instance to archive a live stream, or alternatively record using a microphone for video tutorials. Once you have defined all the settings you need, click on the red recording button in the dialog. The Movie Studio program interface will fade out and be replaced by a gray selection rectangle graphic as well as another small record dialog.
- Move the selection rectangle over the range of the monitor that you want to screen record (e.g. the player window). You can increase the size of the rectangle by clicking on the borders and dragging them.
- Start the recording in the recording dialog. During screen capturing, everything on screen within the selection rectangle will be recorded, including the mouse pointer or a drop-down menu if you open one. At the end of the recording, click on the stop button. After recording, the Movie Studio program interface will display. The recorded video of your screen is now lying on the top track and you can cut it just like any other video, optimize its image and audio, or add titles, music or overlays.
- To finish, go to "File" > "Export movie" and select an export format in the sub-menu (e.g. MP4). You can also burn your video to DVD, transfer it to smartphone or upload it directly to a social media platform. To do this, use the buttons in the top right corner of the program interface.
Record screen with Movie Studio Platinum, the video editing program for ambitious movie makers:
- Selectable display section
- Selectable audio source (computer audio or microphone)
- Editing functions, titles, overlays, background music and tons more
- Useful templates
- Helpful wizards
- Easy-to-use controls
- Professional results
Screen capturing:
How to create video tutorials and record videos of your screen!
To screen record basically means to take a video of your screen – that is, of everything on your monitor. Sound from your computer is captured alongside the video image, but you can also make a microphone recording. This way you can create a tutorial video for YouTube – for instance to show people how to use a certain function of a computer game or program. If you're wondering how to do screen recording for a video like this, it's simple: You start recording, click on the program interface with the mouse, open menus, apply functions, and describe what you're doing all the while into the mike.
All of this, including mouse movements and your voice-over, will be recorded as a video file. Another scenario is where you record your player during a live video stream in order to archive your streamed content to your hard drive for accessing again at a later point.
There are a lot of software tools that allow you to record screen. If you're recording video on screen and it is intended not only for private use, but for sharing on YouTube or other platforms, it's best to make sure that the software you are using delivers enough power and that it offers some creative options in addition to screen capturing.
The possibility to drag out a transparent rectangular range on your monitor for screen capturing in your monitor is absolutely essential. In addition, the software should allow you to screen record with sound and to choose between either your computer sound or a microphone.
High-quality editing functions are hugely important too, especially when your screen capturing doesn't turn out perfect. If this happens, you can cut out mistakes and sequences that went wrong or trim the start and end of your screen recording to get picture-perfect results.
If the software offers you the option of creating a picture-in-picture collage, this is also a definite bonus. Using this option you can embed a separate photo or a video in your screen recording so that the viewer can see who is speaking. You should also be able to fade in a logo or title as an overlay object after the fact.
Having access to a range of audio functions is also important for your video's soundtrack. You might want to add background music to video sections without dialog, for instance. An option for optimizing voice-overs or commentary for your video is an absolute must. You want to ensure clarity of speech so that viewers can understand everything being said.
Lastly, the screen recorder tool you work with should offer diverse options for exporting your videos. You should be able to export a video in all standard file formats, e.g. as an MP4 file, or upload it to social media platforms. Alternatively, the options of burning the video to DVD or Blu-ray Disc, or transferring it directly to a smartphone, are practical and can help you save time.
Free tools for screen capturing may be free, but they're restrictive in many ways. When it comes to screen capturing, video editing software Movie Studio Platinum ticks all the boxes. With the program, you're fully equipped for any kind of project and have access to a massive range of functions for recording screen as well as for all other video editing tasks. Plus, it's simple and intuitive to use.
Our step-by-step guide below shows you how to create and optimize a screen recording using Movie Studio Platinum.
Record screen with Movie Studio Platinum
Step 1: Preparing to record your screen
- Open Movie Studio Platinum and create a new project in the start dialog.
The program will start and display an empty project window.
- Click on the red "Record" button below the preview monitor to open the recording dialog.
- Select the "Screen" option.
This opens the recording dialog with screen record options.
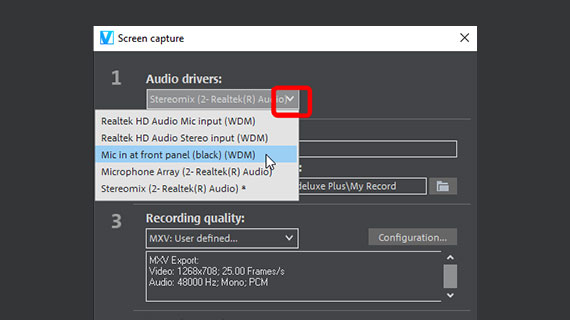
Point 1 in the dialog regards settings for the audio driver used to record audio.
- If you have a microphone set up and ready to use and it's connected to your computer system, you can select this here. This is great for producing tutorial videos, where you talk about the current activity on screen.
- The option "Stereo Mix" is used for recording computer sound. This option should be selected if you are recording a live stream or a YouTube video.
Note: Please note that if you want to record video on screen of something that is shown on a video player, you need to open the video player first before initiating screen capture. This prevents switching into the overlay mode. Capturing from overlay outputs is not possible.
- Under "Recording quality" (Point 3) you will find multiple predefined settings, each serving different purposes.
- "Recording control" (Point 4) displays settings for sound levels. To avoid clipping, make sure that the maximum level does not exceed 20 dB. Alternatively you can click on the peak control setting and decrease the recording volume.
- Movie Studio will disappear into the background when you press the record button.
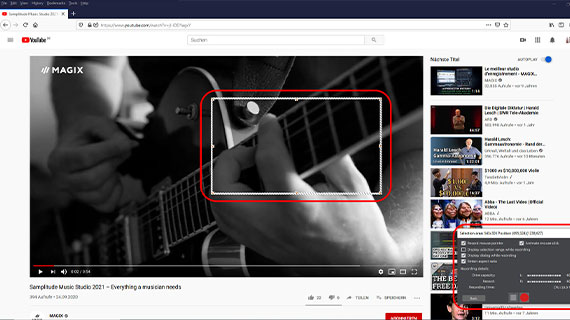
A dialog window will now appear below right, which offers other options to help you screen record. A frame with a light gray border will also display. This frame captures the area of the screen that will be recorded.
- You can adjust the size of this frame.
To be able to adjust it more freely, deselect the option "Maintain aspect ratio" below right in the dialog.
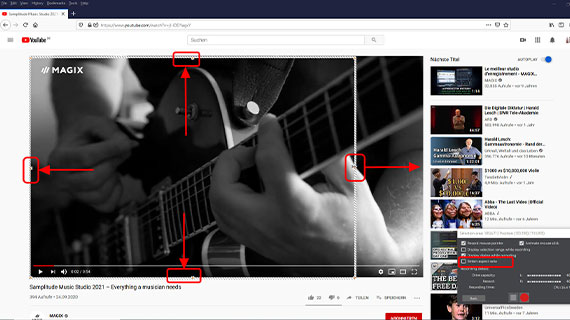
- Start to record your screen by clicking on the record button in the dialog window below right.
Now you can start to record video on screen. If you want to record a video tutorial, your input is required. Tell your audience what you are going to do in the tutorial and move the mouse with slow movements to areas that you want to explain. Circle buttons with the mouse before clicking on them, to make things clearer for your viewers. Give viewers enough time to take things in.
If recording a video player, things are a lot simpler. All you need to to do here is wait until the action has ended on screen.
- Click at the end on the stop button below right in the dialog window.
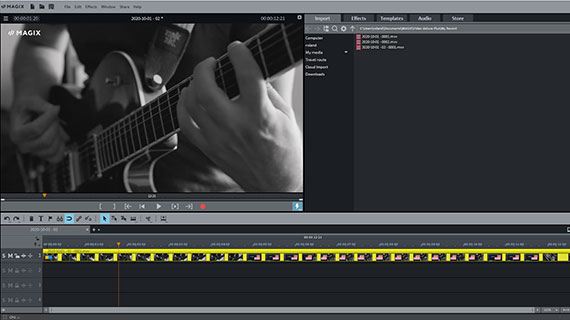
- After you do the screen recording, you'll be directed back to Movie Studio. Your new video will be added to the project and appear in the top track.
Step 2: Edit your screen recording
When you video your screen, in most cases you will have to edit the recording afterwards. If you want to create a video tutorial, there are usually sections of the recording that need to be removed. For a stream, you only have to trim the beginning and end of the recording. However, you might have to cut out advertisements or similar content as well.
Movie Studio offers a range of options for video editing. The following two methods are the most straightforward:
- Place the playback marker at the beginning of the part you want to cut and press "T" on your keyboard. The video will then be cut at this position. Make a cut before and after a screen recording sequence that you want to remove. Click on the cut passage and delete it from the track with the Del key. Then, move the material on the track to the left in order to close the gaps.
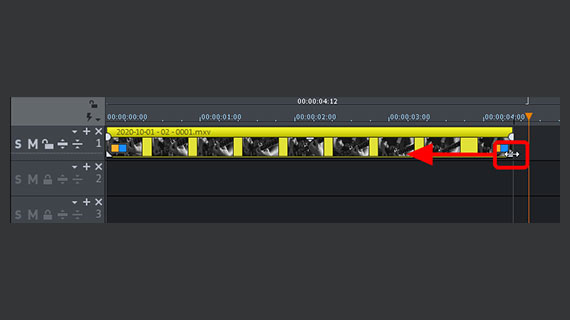
- To trim the beginning or end of the video recording of your screen, move the mouse pointer to the left or right object border until it turns into a double arrow. Now click and drag in the object border to trim the video. Trim the borders so that your screen capturing video starts and ends at exactly the right position.
In some cases, you might just want to cut the audio recording. You need to make the audio track visible to do this.
- Right-click on the video in the track and select "Audio functions" > "Video/Audio on separate tracks" in the context menu.
- Select the corresponding icon on the toolbar to ungroup audio from the video.
- Click on the bottom object with the audio track to select it only. You can now cut the audio independently of the video track.
Maybe your screen recording could do with some optimization, or other effects?
- Play around with the video effects in the Media Pool, to adjust the video in terms of brightness, contrast, gamma or color. Many of the effect dialog boxes contain options for automatic 1-click optimization, which makes video editing even faster.
- The Media Pool also includes effects for customizing the audio track. For instance, you can remove noise, crackling or other interference, or improve the clarity of speech.
Want to add background music, titles or overlays to your screen recording?
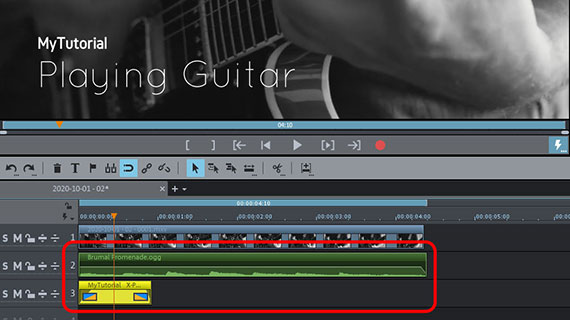
- If you require background music, go to the "Audio" tab to find a selection of royalty free music that you can use at no extra cost. You can use your own audio files too. Drag your audio material to a free track e.g. track 2. To set length, use the bottom object handle to adjust the object edges on the left and right. The object handles above can be used to fade the music in and out.
- To add a title, see the Title Templates area in the Media Pool. To use a title template, drag it into the track and then add some title text. This way you can produce subtitles for your tutorial videos if you wish.
- For an overlay object, load a photo or a graphic to a free track. In the Media Pool, select the effect Size/Position and then drag out the overlay object on the preview monitor to the required size. Then move the object to the position in the video where you want it to appear. The concept for overlays is simple: Objects on the bottom tracks overlay the objects on the top tracks.
Step 3: Exporting videos of your screen
Finally, now that you have done the screen recording and it looks good when you play it back in Movie Studio, you can export it in a number of ways:
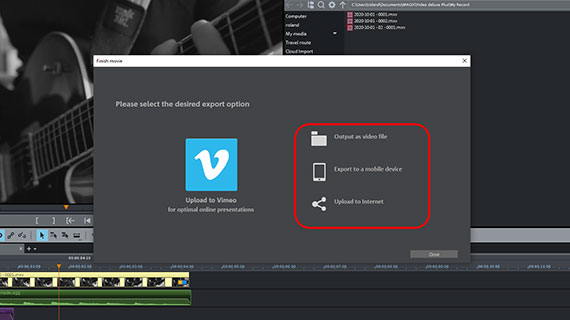
- Under "File" > "Export movie", you'll see the full list of formats for file export supported by Movie Studio. The option "Video as MPEG-4..." is the best choice for export in general.
- You can render the project directly to your smartphone, upload it to a social media platform or burn it onto a disc via the Options in the upper right-hand corner of the program. Here, you will see the interface for burning discs as well as the dialog "Finish movie".
Movie Studio Platinum: One of a kind – just like your movies.
- Smooth proxy editing in up to 4K quality
- Up to 1,500 effects and music
- Automatic program wizards
- Burn your movies to DVD, AVCHD or Blu-ray


