How to create a wedding video
Follow these steps to create a beautiful wedding films:
- Film with one camera on a tripod as well as one handheld camera and film the couple and guests from as many angles as possible.
- Open Movie Studio Platinum and drag & drop all of your videos and photos from the Media Pool to import them.
- Put all the media in order in the project and delete any parts you don't need. To cut, place the playback marker at a position to cut and press "T". Each cut border can be dragged inwards to shorten a clip.
- Select the master audio track and mute all of the videos by right-clicking them and going to Audio functions > "Mute audio object.".
- Optimize the quality of the video and sound in the Media Pool's "Effects"tab.
- Drag & drop titles, music, intros, outros and additional elements such as photos or graphics onto separate tracks. For this, use content from the "Templates" tab in the Media Pool.
- Select the effect ""Position/size"" to create overlays and collages. Reduce the overlay in the preview monitor to the desired size and drag it to a suitable position in the frame.
- Finally, burn the wedding video to a DVD, AVCHD, or Blu-ray Disc. To do so, click the disc button in the top right, choose a selection menu and start burning the disc.
Creating wedding videos using Movie Studio Platinum, the software for downright amazing movies:
- Supports all standard video and photo formats and cameras
- Intuitive and easy-to-use editing tools
- Virtual control console for multicam recordings
- Image and sound optimization
- Insert overlays and titles
- 1-click templates for professional, cinematic aesthetics
- Helpful program wizards
- Burn wedding videos straight onto a DVD, AVCHD or Blu-ray Disc
Wedding video editing software
Start download
Creating and editing a wedding video
with the proper software
Almost every videographer will have the chance to film a wedding at some point. Between guests and the happy couple, there is an audience interested in the exciting story which is present: the happenings of the wedding.
However, this means that you can't film any opportunity missed. Check to be sure that there isn't a second camera operator who would be willing to help while filming.
It is good advice to plan a wedding video as a short summary of the couple's celebrations. The most important events should be discussed in advance. And hold back from joining the party until the morning after, because even during the late hours, some funny moments are still guaranteed to happen.
The film shot ("footage") can be reviewed later in peace on your PC and with the right video editing software and edited. Store the footage on a separate disk drive and give it to the newlyweds together with the wedding DVD. Then, the bride and groom can enjoy the entire show once again – maybe even at their silver anniversary.
Naturally, the wedding day is the day of truth for your film. But if the time and possibility is available, you can also film the events beforehand. Accompany bride or groom during their shopping. Film while they choose the venue for their wedding. How they choose their rings, tuxedo and wedding dress. How conversations go, hopes are expressed and problems solved.
Film as much footage as possible so that you'll have plenty to work with when it comes time to start editing on your computer.
In addition to one or more high-quality cameras, you'll need a PC and a powerful video editing program for your wedding video. With this software, you should know that it is not usually enough to make a few cuts and add a little music. Your video editing software should "be able to do more". Shaky footage should be smoothed with powerful image stabilization, poorly lit passages should be optimized, titles should be added in stylish fonts, the audio track and background music should be cut and mixed.
The video and audio editing software Movie Studio Platinum provides everything you need to edit your wedding videos deftly in post-production and then subsequently burn them to a DVD, AVCHD or Blu-ray Disc.
In the following, we provide a step-by-step guide for how to help document a couple's wedding day perfectly in your new job as a videographer.
As with any film production, there are two stages in the production of wedding videos: the shoot and post-production. Let's begin with the shoot.
Filming a wedding video
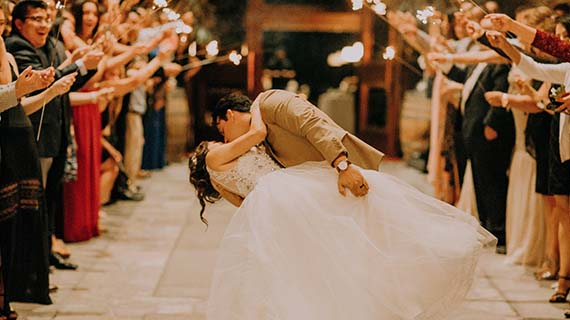
Filming wedding videos: Preparations
- Meet the couple to be wed beforehand and discuss their wishes and expectations for your wedding video.
- Draw up a schedule for the wedding day and where the different events will take place.
- Scout out the locations in advance to see what the lighting conditions are and where the camera would be placed best.
- Ideally, you should use at least two cameras: one camera on a tripod and one handheld camera. If you only have one camera, don't only film tripod shots because they might end up looking too static and boring. Mix tripod images with handheld footage.
- Make sure all camera batteries are fully charged. And always take spare batteries with you.
Filming wedding videos: On the day of the shoot & wedding
- Start in the morning as the wedding couple begins to prepare for their big day, if possible. Be sure to film the parents of the bride and groom, the wedding party and any other important people at the ceremony. Use a small, handheld camera that will distract less from the ceremony and provide more lifelike, dynamic footage.
- Film the venue for the ceremony from the outside on a tripod. Slowly pan across the scene, but only horizontally or vertically – never diagonally or in round movements.
- Take close-ups of the guests' faces. The wedding couple will appreciate the memory of the guests in attendance later on. It is advisable to create a guest list with the most important members of the family and friends and check them off if you have had them "in the frame". Your goal should be to "capture" as many guests as possible in close-ups.
- And naturally, be sure to film the happy couple often, from many, different angles and as much as possible. From the front, back, right, left, above and at a low angle. They are the stars of your movie.
- Plan your camera movements before panning or zooming. For example, film inside the venue at the beginning and zoom out a window to the outside, then zoom into the venue from outside, as well as pan the camera over the seated guests and then zoom in on the couple.
- Also try to get close to your subjects with the camera instead of just zooming. Don't swing the camera back and forth if you're afraid you'll miss things at the same time. Stay in control of your camera. Make calm, purpose-driven movements. Always focus on one specific subject.
- Don't miss the most important moments: the bride on the father of the bride's arm, the "I do", the exchange of rings, the kiss to seal the marriage, the toss of the bouquet, etc.
- Film the complete ceremony in a medium shot from a tripod. Let this recording run without interruption during the ceremony. Make sure that sound is recorded in the highest possible and consistent quality.
- Simultaneously, document the details of the wedding with your handheld camera, e.g., of the couple's faces or when guests touchingly wipe a tear from the corner of their eyes...
- Do not miss when rice is thrown, the cheering guests or anything else that happens outside when the couple come out after the ceremony.
- Make a number of changes to your position, preferably with the handheld camera and to follow on the side of the bride and groom.
- Film the cutting of the wedding cake and show exactly what kind of cake it is.
- Don't miss the games that the wedding party has arranged.
- Lovingly film the wedding buffet and the meal at the reception in detail.
- Record all of the speeches and toasts.
- In the evening, at the wedding reception, film the guests dancing, any show, musical or other performances for the couple and, especially, any unexpected moments.
Cutting and editing wedding videos with software
The acutal wedding video is brought to life afterwards on your computer during "post-production".
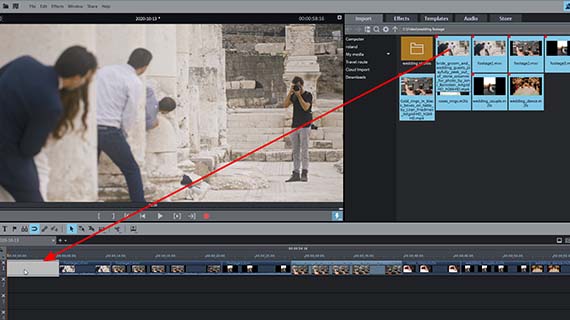
Editing wedding videos:
Importing footage
- Copy all the video files you want to use into a separate directory on your hard disk.
- Open Movie Studio Platinum and create a new project in the start dialog.
- Import all of the videos you want to use in your wedding video into the project. You can also use photos and present them as overlays or slideshow passages. Drag & drop all files from the Media Pool into the project window.
Tip: If you want to load a lot of files, click on the first and then click on the last file holding the Shift key. This will select all files. Then drag and drop the selected files together into the project. They will be arranged one after the other on the first track.
- Press the spacebar on your keyboard to play back and stop the video.
- You can move the playback marker by clicking in the marker bar above the first track at any time.
This will help you keep an overview of the footage.
- Arrange the videos and photos in the desired order. Videos are usually sorted chronologically in a wedding video. This means that videos should be dragged to the beginning to show earlier events and footage from later events should be dragged back.
- If you also want to show photos, you should consider when these images will work best. Each photo can be used as a still or can be made smaller and displayed as an overlay object with a background video. We'll show you how to do this later.
Next, sort all the footage sequentially. You can also use several tracks to do this.
Then, consider which passages shouldn't be used because they are shown elsewhere or too long, for example. Then, you'll need to edit.
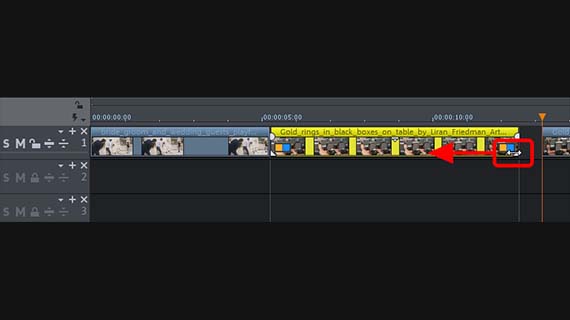
Editing wedding videos:
Cutting videos
- Place the playback marker where you want to cut.
- Click on the video that you wish to cut to select it and and press the "T" key on your keyboard. This cuts the video object in the track into two separate objects.
- You can easily delete cut objects from the track with the "Del" key. Make sure you don't leave any gaps in the footage. You can drag the scenes that follow the cut section of the video forward to fill any spaces.
- To trim the first and last images of each scene frame by frame, use the front and back object handles. To do this, move the mouse to one edge of the scroll bar until the mouse pointer turns into a double arrow. Now, click and hold the mouse button and shorten the object by simply dragging the edge inwards. For exact trimming to the frame, use the zoom buttons at the bottom right of the track window to enlarge the display.
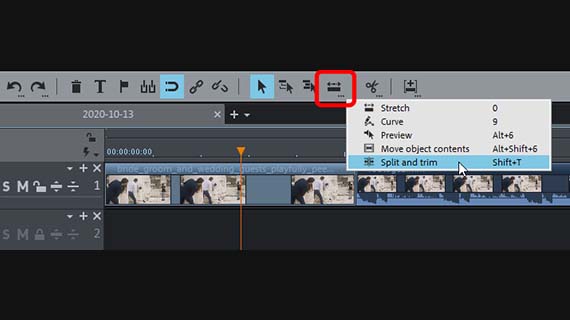
- Use the mouse mode "Split and trim" to scrub through your video footage quickly. This mode can be activated by right-clicking the mouse mode button in the toolbar. Drag the mouse over the video in the track while following the video image in the preview monitor. Click on all the locations where you want to cut. At the same time, click and hold the mouse button and "trim" the footage where you'd like the cut.
Editing wedding video:
The audio track
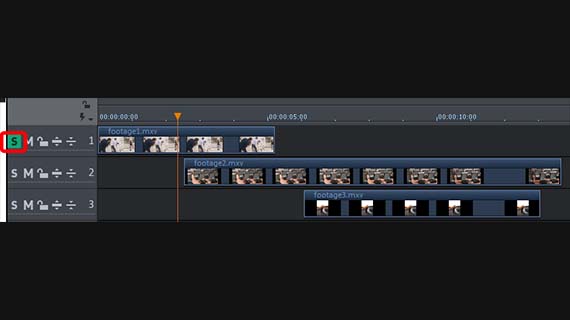
If you have shot several videos from the wedding ceremony, choose one audio track and mute all the others.
- Listen to all the videos with the same sound recording separately, for example, by moving them to their own track and pressing the S button on the far left on the track header.
This will solo the track so that you can easily preview it without any other material from any other track disturbing you.
- Now select a "sound track".. To do this, right-click on the other videos and select the option "Audio functions" >> "Mute audio object" for each undesired track.
Then, you'll have a video with the selected "sound track" and a number of muted videos with synchronized video of the same scene. Now, you can begin mixing the different source videos together.
Editing wedding videos:
the video track
- The audio track of the video you want to use is best placed at the top on track 1.
This way, you'll always know where to find your master audio track.
- The videos with alternative video tracks can be arranged on the tracks below.
In general, the lower a track will cover any tracks positioned above it.
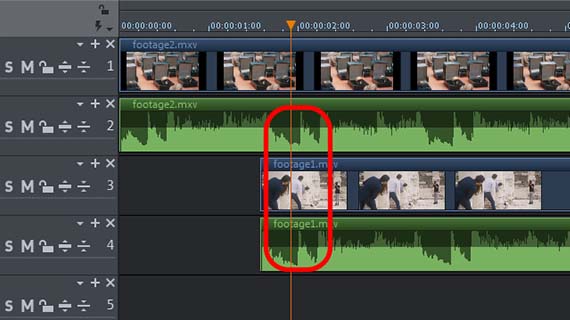
Videos that show the same scene need be synchronized, so that the picture always matches the sound on the audio track. This can easily be done by simply muting unwanted audio tracks. You'll need to make the video's audio track visible to do this:
- Right-click on the other videos and select "Audio functions" > "Display waveform" and then select "Video/Audio on separate tracks".
The waveform display allows you to visually guess what can be heard on the respective audio track.
- Find a distinctive sound in the audio tracks to help synchronize them and move the videos on top of each other so that the sound is positioned exactly the same in all the videos or directly on top of each other in the waveform display. If you'd like to unmute a track for a while, right-click on the audio object and select "Set volume" > "Turn sound on".
Once the videos are synchronized, you can cut the video footage from the videos using the process described above.
Editing two wedding videos
in multicam mode
A more easy-to-use alternative to the aforementioned process is multicam mode in Movie Studio Platinum. You can use this specialized mode like a control console to cut two videos together:
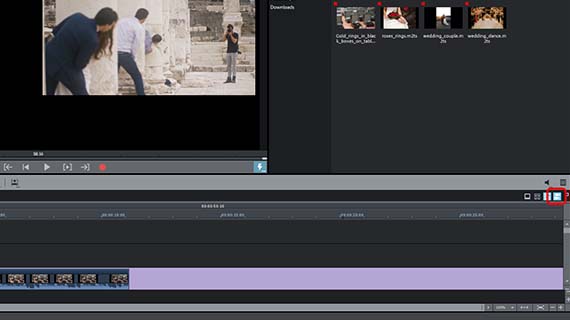
- Move both of the videos you want to edit onto separate tracks underneath one another. Leave the first two tracks empty.
- Enable multicam mode by clicking the button below and to the right in the toolbar.
Now the two videos will appear in small preview pictures in the left area of the preview monitor. On the right, you'll see the larger context from the master track.
- Click on one of the two images on the left side to apply it to the target track. The footage you have selected will now appear in the right-hand area of the preview monitor.
- To switch the camera, click on the left area on the other preview picture.
You can either start playback and edit live by clicking with the mouse on one of the two preview pictures, or you can move the playback marker manually to the next cut and place your edits at your own pace.
Click by click, a target track consisting of the respective sections from the two videos will result.
Tip: If you want to cut more than two videos together using a multicam editing, you'll need to get MAGIX Video Pro X. This program works essentially like Movie Studio Platinum, but it provides a advanced features in additional areas.
Next, you'll need to perform some fixes for more detailed edits.
- When you place your mouse over a cut, the mouse pointer will change. Now click and move the cut freely.
- Finally, disable multicam mode.
Editing wedding videos:
Collages, photo fades, overlays, title
The wedding video can now be enhanced with additional media. Would you like to add a split screen, for example, a video with the groom on the left and one with the bride on the right? It's easiest to use one of the numerous templates included.
- Arrange the videos you want to combine in order and select the first video.
- Open the Media pool and then go to "Templates" > "Design elements" > "Picture-in-Picture Basic" and select the desired template using the preview function.
- Then, drag the template onto the first video.
The following videos (or photos) will then automatically be merged into a split-screen collage.
What about an overlay, for example, a photo that appears in a specific area of the video?
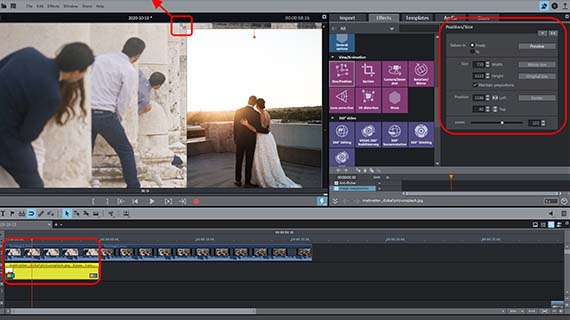
- Drag the object to be overlaid onto a track below the video.
Because all objects in the lower tracks cover those in upper tracks, only the overlaid object can be seen in full-screen at this point.
- Under "Effects" in the Media Pool, select the effect "Position & Size".
This will make a frame appear in the preview monitor.
- Click on the handles of the frame corners and resize the overlay.
The top-most video will become visible in the margin areas you reveal.
- To move the smaller overlay, for example, to the corner of the frame, click in the middle of its preview image and drag it to the desired position.
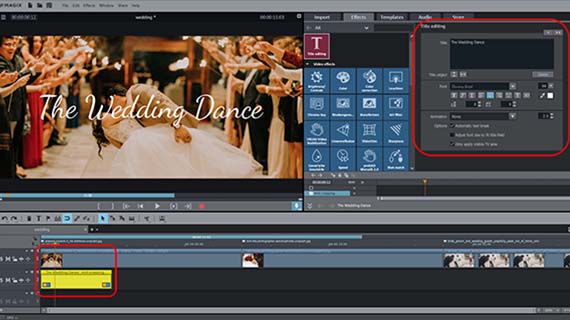
You can best create titles and text by using the title templates provided.
- Open "Templates" again in the Media Pool and select the desired template from the "Title templates".
- Drag the template into the Project window and enter your title text in the "Title editing" dialog.
Movie Studio provides a wide range of professionally designed templates for intros and outros.
- Open the directory "Intros/Outros Basic" under "Templates" the Media Pool.
Here, you will find a number of romantically-themed templates, for example "Wedding (Intro)" and "Wedding (Outro). If you load on of these templates, the accompanying media will be placed at the beginning or end of the project. Now, all you have to do is add your own custom text.
Editing wedding videos:
Video quality and cinematic effects
Last, it's time to work on the visuals of your wedding videos and optimize the video quality as necessary.
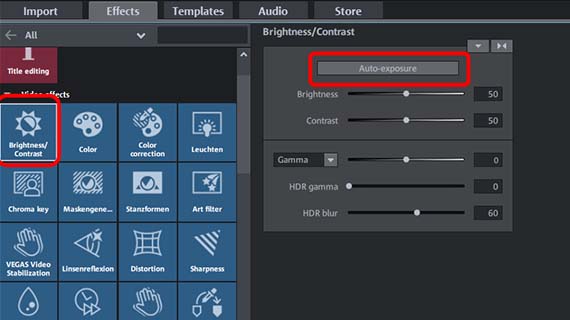
- Select a video or photo in your project window, open the Effects tab in the Media Pool and search for a suitable effect to use. Use the convenient 1-click optimization tools "Brightness/contrast" and "Color" in the effects.
- You can fix jittery and shaky footage using "VEGAS video stabilization". This video stabilization can also be found in the video effects.
Do you want all your clips to have the same look? Perhaps you want specific footage to be in black-and-white. Consider which aesthetic effects might be suitable for the video. Try a number of different options. Place all of the scenes you want to have the same look on separate tracks and then open the effects dialog for one video or photo.
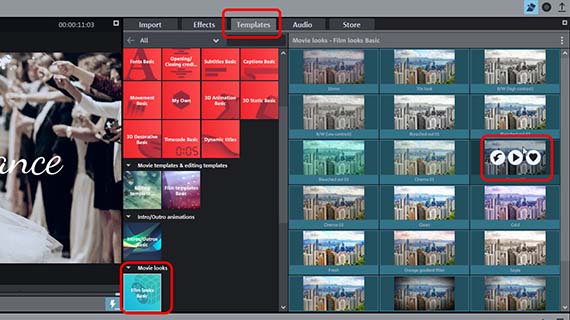
- Be sure to try the film looks included with the program. These can be found under the Effects tab. Here, you'll also find lookup tables which can be used to give your wedding video a professional cinematic look. To apply the film looks or lookup tables, simply drag them onto the videos in the track.
- To apply the current effect settings for the video object to all video and photo objects in the track, click the triangle button in the upper right-hand corner of the effect dialog and select "Apply video effects to all of the following objects".
Burning a wedding video
on a disc with a menu
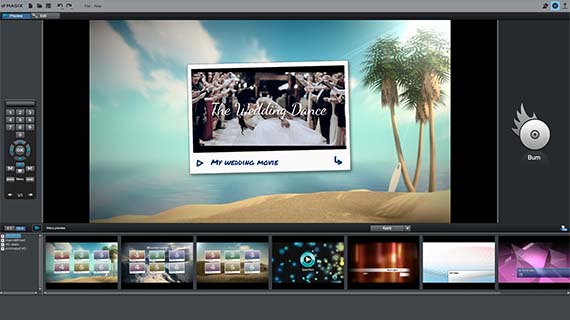
Finally, if everything plays back in Movie Studio Platinum as desired, burn the wedding video on a disc, along with a custom-designed selection menu.
- Above right, click on the button with the disc.
This will switch to the burn interface.
If you haven't set any chapter markers yet, you'll be asked whether you would like to set these manually or automatically. Using chapter markers, the audience can use the remote control to jump between different chapters and scenes of your video
If you want to set chapter markers in specific locations, you should stay in the main view. Place the playback marker in the places where you want a chapter marker and go to "Editing" > "Marker" > "Set chapter markers". Once all chapter markers have been placed, switch to the burning interface.
- At the bottom of the burning interface, select a menu layout.
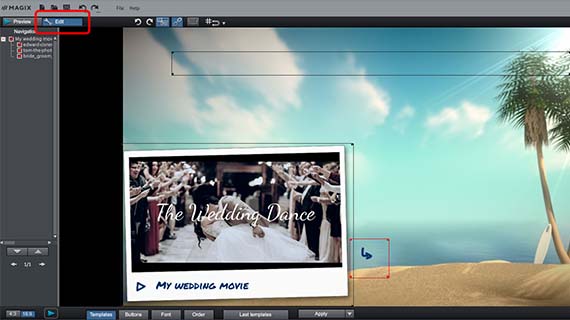
You can also combine individual menu elements with one another, for example, the font from one template with the layout in another template..
Menu text can be changed simply by double-clicking on an entry. If you want to modify the menu even more, switch to the "editing" mode. Here you can make any desired adjustments, e.g., creating new buttons, moving or deleting graphic elements and even importing Photoshop files as menu layouts.
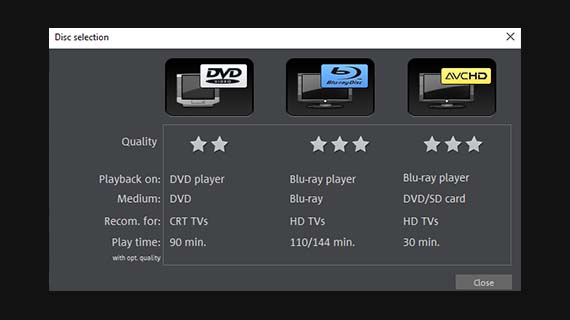
- Once your selection menu is finish, click the Burn button and select the disc type you wish to burn (e.g., DVD, AVCHD or Blu-ray Disc).
- For a matching cover, click on the printer icon in the burning interface.
This will open the MAGIX Cover & Label helper tool. You can use it to design and print stylish covers, inlays and disc labels.
- To copy all data in your project, i.e. all video files, photos and audio material, to a separate disk, select the "Copy project media to folder" under "File" > "Backup". For example, you can use this option to copy all the files used to a USB stick.
Then, you can give the USB stick and disc to the newlyweds and enjoy your hard-earned salary.
Wedding videos with Movie Studio Platinum, the software for downright amazing movies:
- Import & export for all relevant formats
- Quick cut & detail cut
- Automatic wizards
- Up to 900 effects & music
- Intuitive templates for intros, outros, subtitles, transitions, opening credits and much more
- Burn videos to DVD & Blu-ray (and design your own menus)
Wedding video editing software
Start download


