Create 3D videos
– here's how!
Follow these steps to create 3D videos:
- Start Movie Studio Platinum and drag & drop your 3D videos from the Media Pool to import it into the project window. This will create two video objects on track 1 and track 2 respectively.
- Select the two video objects by dragging a rectangle over both objects with the mouse.
- Open the effects in the Media Pool and select the "Properties" option in the "Stereo3D" category. Select the 3D mode you want to use. If you don't know which setting you should choose, try the "Stereo3D pair (left image first)" option first.
- Put on your 3D glasses, click on the menu icon in the upper left corner of the preview monitor and switch the preview monitor to "Anaglyph display".
- Verify that you have selected the correct 3D option and change the setting, if necessary. If the video still needs correction, use the options for adjust provided in the "Stereo3D alignment" dialog until you are satisfied with the picture.
- Now, you can edit your Stereo3D video as desired and add music, voice-over commentaries or 3D subtitles. To insert normal 2D titles and overlay objects into the 3D picture, select the option "Stereo depth for 2D object".
- Finally, go to "File" > "Export movie" and select an export format in the sub-menu (e.g. MP4) to export a 3D video file in different formats. Alternatively, use the buttons in the top right hand corner of the program interface to burn your 3D video to DVD, transfer to a social media platform or copy to a smartphone.
3D videos using Movie Studio Platinum, the video editing software for downright amazing movies:
- Import all types of 3D video footage (anaglyph, active shutter 3D system, side-by-side display...)
- Numerous options for the perfect 3D video
- Insert normal 2D overlays and titles into 3D videos
- Design your own 3D intros and 3D effects
- Helpful program wizards
- Convert files to 3D MP4 and all essential formats, upload videos to the Internet, burn them to disc, and transfer them to your smartphone
How to create and edit 3D videos on your PC!
3D videos offer the illusion of a third dimension. They usually consist of two separate video pictures, which are colored in red or cyan and blended together. As a viewer, you will need 3D glasses with red and cyan colored lenses. There are also other 3D methods such as the active shutter 3D system, in which viewers put on special shutter glasses. All techniques have the same principle in common that two separate images are sent to different eyes.
This exploits the biological fact that spatial vision is produced by both eyes, which are located at a certain distance from one another. The two partial images are merged in our perception to form a uniform spatial image. Accordingly, the two 3D videos are shot from two closely adjacent perspectives. With the aid of 3D glasses, each partial image is only visible to one eye and is filtered out by the other. This way, the eyes see two different images, which are then combined by the brain to form one complete spatial image.
To generate 3D videos, it is best to get a 3D camera where two lenses are mounted side by side. In principle, it is possible to use two normal cameras and place them next to each other. You will additionally need a powerful video editing program with which you can combine the two video recordings into a Stereo3D pair, adjust them if necessary and then export them as a Stereo3D video file, for example in MP4 format.
The comprehensive video editing software Movie Studio Platinum offers all the tools you need for this task. Using this software, you are perfectly equipped to create normal videos and 3D videos, add titles, music and effects to them and export them as 3D videos as well as in other formats. It is also possible to upload 3D movies to the Internet or burn the 3D videos to AVCHD, Blu-Ray disc or DVD.
Our step-by-step guide below will tell you everything you need to know about creating 3D videos with Movie Studio Platinum.
Create 3D videos with Movie Studio Platinum
Importing 3D video
As mentioned before, each 3D video consists of two videos, either recorded with two different cameras or a 3D camera with two lenses. Usually the recordings are located in two separate video files. However, there are some 3D cameras that only create one video file that contains both partial pictures.
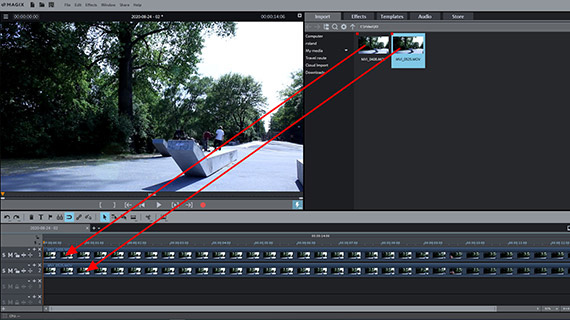
First, load the 3D video footage into a new Movie Studio project:
- Open Movie Studio Platinum and create a new project in the start dialog.
- You can access and drag the 3D video files into your project via the Media Pool. If you have two separate files, drag the first file onto track 1 and the second file below it onto track 2.
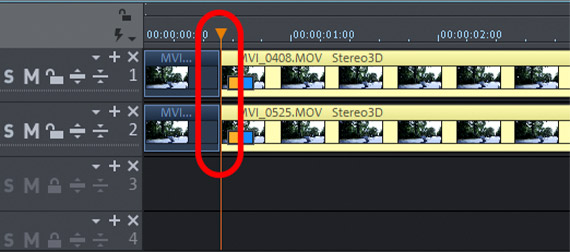
If the material was taken by a 3D camera, the videos are synchronized and you won't need to do anything else. If you have videos from two different recording devices, you may need to synchronize the videos first so that both recordings are aligned without any time offset. You should proceed as follows:
- By pressing the "S" (= solo) button at the very beginning, you can temporarily switch the preview to solo track 1, so that only this video can be seen. Otherwise, it will be covered by the video on track 2. This enables you to compare both 3D videos.
- Move the 3D videos within the tracks in such a way that the individual frames are exactly under each other without any time offset.
Create Stereo3D
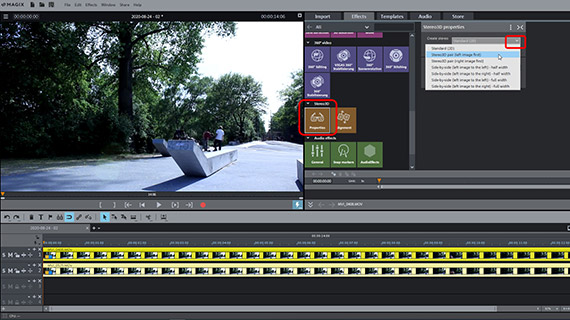
Select the synchronized 3D videos by dragging a rectangle over both objects with the mouse.
- In the Media Pool, open the Effects tab and click on the icon "Properties" in the effects category "Stereo3D".
- Open the "Create Stereo3D" dropdown menu and choose the appropriate setting for your videos. If you don't know which setting is correct, try the "Stereo3D pair (left image first)" option first.
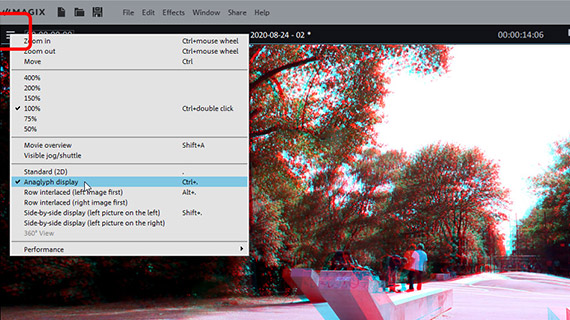
- Put on your 3D glasses and switch the preview monitor to anaglyph mode. Click on the menu icon in the upper left corner of the preview monitor and select the "Anaglyph display" option.
The anaglyph display causes the two 3D videos to be blended and applies a red or cyan filter.
- If the picture does not look correct yet, try a different 3D setting from the Media Pool.
- If it's necessary to further optimize the 3D video image, use the "Alignment" effect dialog. This allows the possibility to adjust the two 3D videos spatially in order to improve the 3D effect.
- Use perspective correction in case the left and right 3D video image haven't been recorded in quite the right perspective in relation to each other in order to join them into a single, clear 3D image.
Cut Stereo3D video
If the 3D video image is displayed correctly, play the 3D video and review the recording.
- Press the spacebar on your keyboard to play the video back. To stop the preview, simply press the space bar a second time.
- To jump to a specific position in the video, click in the timeline above the first track to move the playback marker. This also works during playback while it is "live".
- If you want to cut a specific section out of your 3D video, place the playback marker at the start and end points of the segment to be removed and press the T-key each time. This will place cuts in the object.
- To remove the unwanted parts from the video, click on the areas to be removed and press the Del key.
- A gap will appear in the track after removing the object. You can drag the following second part of the 3D videos forward until it connects with the first to fill this.
Editing Stereo3D videos
Now, you can edit your 3D video in a variety of ways and enhance it with additional material:
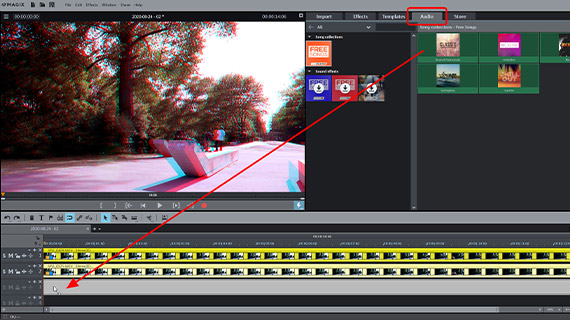
- If you want to create a music track, drag a music file from the Media Pool to any track below the 3D videos, e.g., onto track 3.
- For a voice-over commentary, activate an audio recording by clicking the red record button on the preview monitor. This will automatically play the 3D video, so you can see the video while adding your commentary.
- You can also apply effects from the Media Pool to 3D videos. You can use these to crop the frame or to add a virtual camera pan, for example.
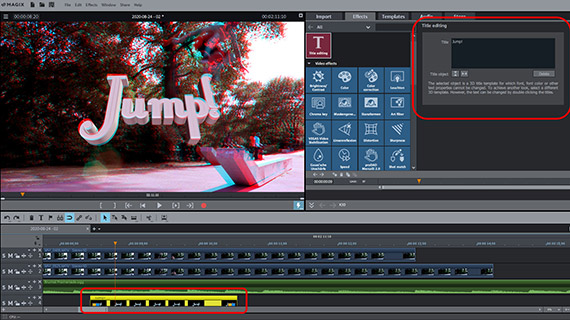
- In the "Templates" tab, you can find title templates among other content. You may use all 2D title templates for your 3D videos, but there are also a number of 3D titles. After importing a title template, the "Title editing" will open.
- Browse in the other categories of the Media Pool as well, because almost everything you will find can also be used for 3D videos.
Export Stereo3D video
Lastly, export your 3D video as follows:
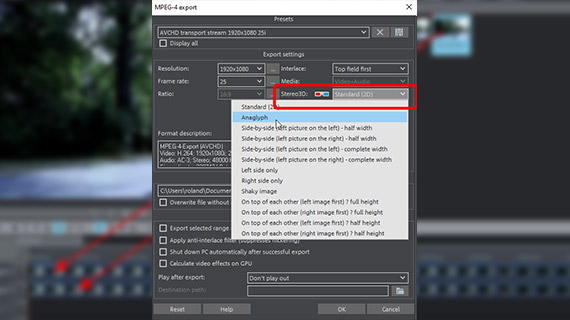
- To export a 3D video file, go to "File" > "Export movie" and select an export format in the sub-menu, for example an "MPEG4" (MP4). In the export dialog, you will find several options for Stereo3D video. The "side-by-side" options are for specific 3D capable playback devices. "Anaglyph" is usually the correct option and appropriate for playback on ordinary TV sets and computer monitors. Spectators will need standard red-cyan 3D glasses and will be able to enjoy the 3D video without any other requirements.
- To render the 3D video directly to your smartphone, upload it to a social media platform or burn it onto a disc via the Options in the upper right-hand corner of the program. Here, you will see a separate interface for burning discs as well as the dialog "Finish movie".
3D videos with Movie Studio Platinum, the video audio editor for downright amazing movies:
- Import & export for all relevant formats
- Quick cut & detail cut
- Automatic wizards
- Up to 900 effects & music
- Intuitive templates for intros, outros, subtitles, transitions, opening credits and much more
- Burn videos to DVD & Blu-ray (and design your own menus)


