Adding subtitles to video – here's how!
To add fitting subtitles to your video, follow these steps:
- Open Movie Studio Platinum and drag & drop your video from the Media Pool to import it.
- Place the playback marker where you want to add your subtitles.
- In the Media Pool, go to "Templates" and click on an icon under "Title templates", such as "Subtitles Basic".
- Select a template by moving your mouse over it and clicking the central arrow button to view a preview of it.
- To add the template, click the button on the left. When you do this, the template will be inserted into the video at the position of the playback marker, and the "Title editing" dialog will open.
- Enter the text for your subtitle.
- Adjust the template to your liking. For example, you can select a different font or font size.
- To add the modified template to other parts of your video, click on the subtitle in the track and hold down CTRL to create a copy. Drag the copy to a new location in the video and double-click it to modify it.
- Lastly, go to "File" > "Export movie" and select an export format in the sub-menu (e.g. MP4). Your video and all your subtitles will be converted into a new video. Alternatively you can burn your video, along with all of your subtitles, directly to DVD, or you can transfer it to your smartphone. The options for this can be found in the top right corner of the program interface.
Insert subtitles in video using Movie Studio Platinum, the video editing software for downright amazing movies:
- Import all common video formats
- 1-Click subtitle templates ready for immediate use
- Create your own subtitles in all standard fonts, font sizes and screen positions.
- Create moving text with subtitle animations
- Helpful program wizards
- Convert files to all essential formats, upload videos to the Internet, burn them to disc, and transfer them directly to your smartphone.
Adding subtitles to video – what you need to know
Subtitles are text that appear on the screen to tell you what is being said in a video. This is an easy way to translate spoken dialog from one language to another, and makes it possible to make the video available in other countries and languages without the need for expensive and time-consuming voice-over work.
Subtitles can also be used to provide information in addition to what is being said. For example, you can use them to tell the viewer that the location in the video has changed, or you can add information about individual scenes. Or you can use them to introduce jumps forward or backward in time, or to introduce a new sub-section of your video.
Subtitles generally also make your video more barrier-free, since the on-screen text allows hearing-impaired or deaf persons to follow the plot more easily. And in some situations people also appreciate being able to watch a video without sound and still understand it thanks to subtitles.
So there are many reasons to insert subtitles in your video, and there are just as many ways to do it. You don't have to settle for white letters at the bottom of the screen. For a wedding video, for example, festive animated subtitles that float elegantly across the screen are a much better fit than stationary, matter-of-fact text in Arial.
As you can see, adding subtitles to video can easily turn into a pretty complicated affair. But don't worry: Movie Studio Platinum makes it easy to create and insert subtitles. Movie Studio Platinum is a comprehensive program for editing video picture and sound, and provides you with everything you need to create and add subtitles.
It's super easy to use: Simply select one of the included templates and add your own text to it, or create your own subtitles from scratch in just a few clicks.
Our step-by-step guide below will tell you everything you need to know about creating and adding professional subtitles to video with Movie Studio Platinum. At the end, we'll give you a pro tip for creating flying subtitles which can be made to follow any animation path you want.
Inserting subtitles in video using Movie Studio Platinum
Inserting subtitles in video: Import your video into the program
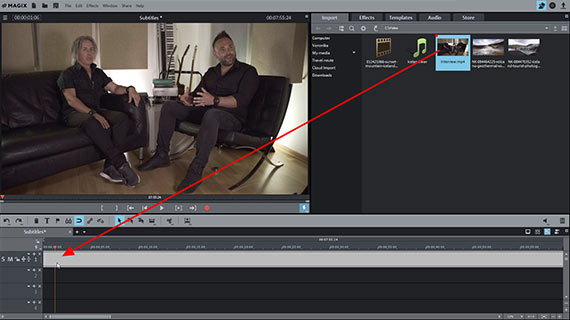
- First, import the video you want to add subtitles to.
To do this, navigate to the folder containing your video in the Media Pool in the top right section of Movie Studio Platinum. Click the file and, while holding down the mouse button, drag and drop it into the project window.
It will appear there as a long video object. If you want to combine multiple videos, arrange them one after the other on the uppermost track.
- Press the spacebar to play the project.
The playback marker will move from left to right through the project window and show the current position in the video. The playback marker can be moved to any position by clicking the timeline above Track 1.
- To stop playback, press the spacebar again.
Inserting subtitles in video: Selecting a subtitle template
To add your first subtitle:
- Place the playback marker where you want to add your subtitle.
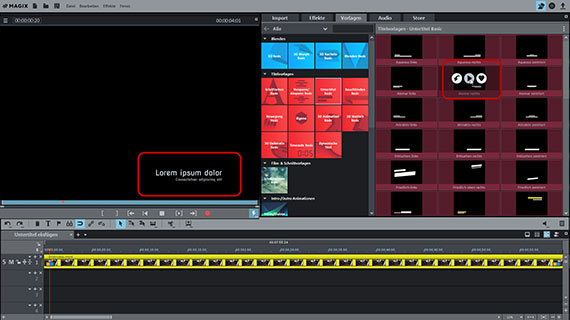
- In the Media Pool, open the "Templates" tab and click the "Subtitles Basic" icon under "Title templates".
All of the templates included with the program will appear on the right side of the Media Pool.
- Briefly place your mouse cursor over a template.
A pop-up window with three buttons should appear.
- Click the central button with the right-facing arrow to view a preview of the template.
The preview will appear in the preview monitor. You will see a Lorem ipsom (fake Latin) placeholder on a black background. This will allow you to see how all of the available subtitle templates look and to choose the best one for your video.
"Subtitles Basic" contains decorative text panels for short subtitles. If you can't find what you're looking for in "Subtitles Basic", have a look in the other subfolders. "Fonts Basic" contains plain and simple subtitles in a variety of fonts. These are suitable for subtitling continuous spoken dialog. The animated templates in "Movement Basic" and "Dynamic Titles" are especially good for captions.
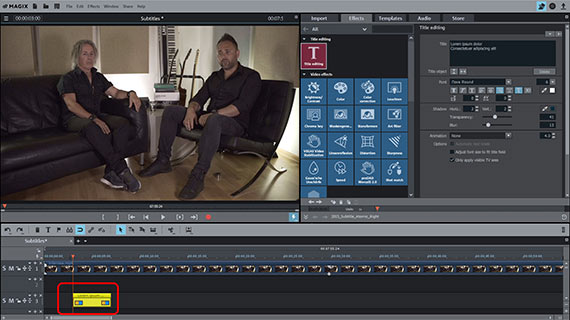
- When you've found a template you want to use, place your mouse cursor over the template in the Media Pool again to open the pop-up window.
- In the pop-up window, click the button on the left with the downward-facing arrow.
This will add the template to the project at the position of the playback marker. Alternatively, you can also drag and drop the template from the Media Pool onto any empty track.
Inserting subtitles in video: Modifying a subtitle template
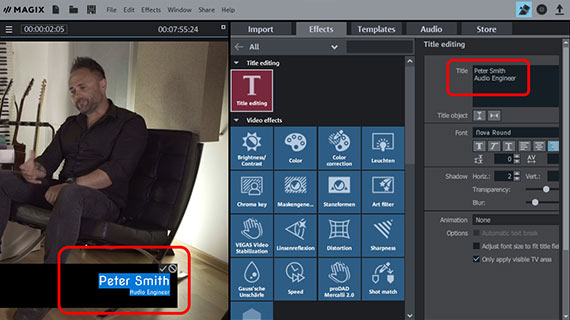
When you load a subtitle template, a different part of the Media Pool will open. You will now be in the "Effects" tab, and the "Title editing" dialog will appear. In the preview monitor, there will be a text input field with a black background and the dummy text placeholder "lorem ipsum dolor".
There are two ways to replace the placeholder with your own subtitles:
- You can click the input field in the preview monitor, enter your text, and then click the checkmark to finish.
- Or you can use the "Title editing" dialog in the Media Pool. Entering text in the "Title" field in the dialog will replace the placeholder.
You can also change how the subtitle text looks. The "Title editing" dialog contains all of the settings you need to change the font, font size and font color of your subtitle, as well as text formatting options to make the text bold, italic, underscored, left-aligned, centered, right-aligned or three-dimensional.
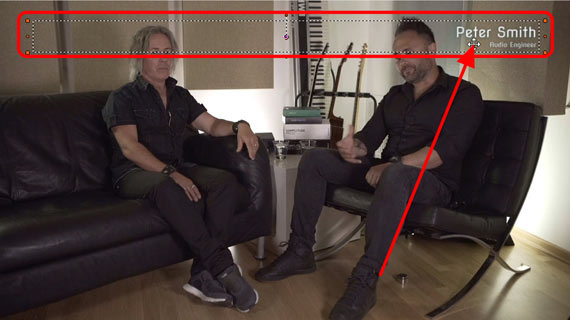
You might want to have your subtitles appear in the lower right area of the screen instead of the lower left area. You can modify the position of the text directly in the preview monitor.
- Click the checkmark on the text field in the preview monitor to accept the modified text.
- Then, click on the subtitle in the preview monitor and move it to a new position.
The subtitle will have a dash border around it. You can move this border and the subtitle it contains to any position within the video picture.
If the subtitle jumps back to its original position after you move it, or if the program won't allow you to place it in certain areas of the picture, this is because of the template's individual effects settings. To disable these settings, right-click the subtitle object in the track and select "Video effects" > "Reset video effects". All of the positional settings for the subtitle will be reset. However, the subtitle's text and formatting settings will remain unaffected.
Duplicating subtitles
Once you have an initial subtitle you're happy with, you can use it as a template for other subtitles.
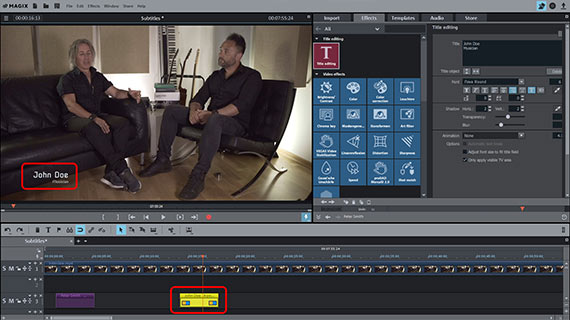
- Hold down the CTRL key, click the subtitle in the track and drag the mouse to create a duplicate.
Some subtitles contain more than one title object. Creating a duplicate in this manner will duplicate the entire subtitle group.
- Drag the duplicate to where you want the next subtitle to appear.
- Double-click the title object in the track to open the "Title editing" dialog.
- Enter the text for the subtitle and accept your changes by clicking the checkmark in the preview monitor.
This is a quick way to insert new subtitles with the same design in different parts of your video.
Inserting subtitles in video: Creating your own subtitles
Sometimes you might not be able to find the right subtitle template for your needs and will want to create your own subtitles instead. If this is the case, proceed as follows:
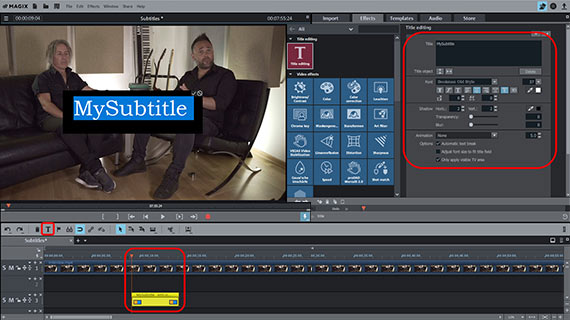
- Place the playback marker where you want to add your subtitles. Make sure that no other title object is selected.
- Click the "T" button in the toolbar.
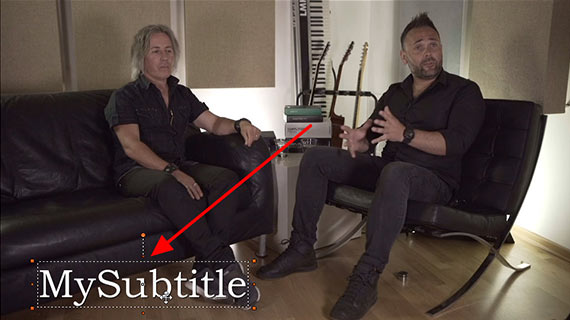
A standard title in 12-point Arial will appear at the position of the playback marker.
- In the "Title editing" dialog, make any changes you want to the text and font.
- To format individual letters, select the letter in the "Title" field (or in the preview monitor) and then select the settings you want to use for that letter.
Tip: Movie Studio Suite contains even more options for creating cinematic titles, as well as the NewBlue Titler Pro6 plug-in (a value of €256).
Pro tip: Animation paths for subtitles
The "Animation" drop-down menu in the "Title editing" dialog contains a few easy ways to create text that moves on-screen. You can also find sophisticated title animation templates under "Movement Basic".
However, it's also possible to create your own subtitle animations. You can define whatever animation path and speed you want. Here's how to do it:
- First, follow the instructions above to create a subtitle.
- Click the title object in the track to select it.
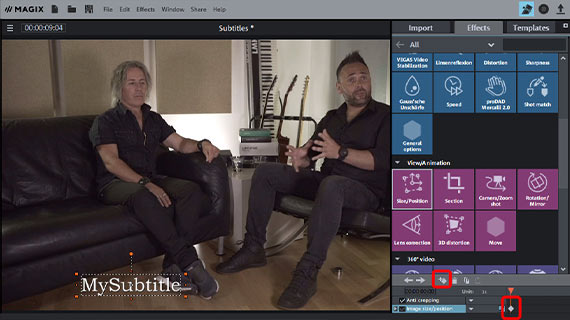
- In the Media Pool, open the "Effects" tab and under "View/Animation" select the effect "Size & Position".
- Place the playback marker at the location where you want the animation to start.
- Then, click on the subtitle in the preview monitor and move it to its starting position in the video picture.
Tip: You can also move subtitles entirely outside of the video picture. Doing this lets you create animations where the subtitles fly in from off-screen To do this, shrink the preview monitor by holding CTRL and scrolling with the mouse wheel until you see the borders of the preview area. Move the subtitle into the area outside of the preview border.
- In the Effects dialog, place your first keyframe. If you need to, first drag the keyframe animation area up.
- Place the playback marker somewhat further along in the video (i.e. to the first position where the title's "animation path" should change).
- In the preview monitor, drag the title to the position you want it to "fly" to after it has left the starting position. The program will automatically set the right keyframe.
Repeat these steps to create as many additional positions as you want and create any imaginable movement pattern. The idea here is to first place the playback marker further long in the video and then move the subtitle to a new position.
When the rough animation path is finished, you can start editing it in more detail. You can click on any keyframe and move it in the timeline at any time. If you find positioning the subtitles in the preview monitor to be too approximate, you can modify the animated effect parameters numerically in the dialog.
Tip: You can also animate letters individually and make them rain down from above, for example. To do this, you need to create a separate title object for each letter and animate them individually. At the end of the animation, arrange the title objects one after another so that together they produce the subtitle.
Exporting videos with subtitles
When you are finished making subtitles and are happy with the rest of the video, you can export the project. All of the subtitles will be added to the picture track of the video and, along with the audio track, exported as a video file. You can also transfer the video to your smartphone or burn it to disc.
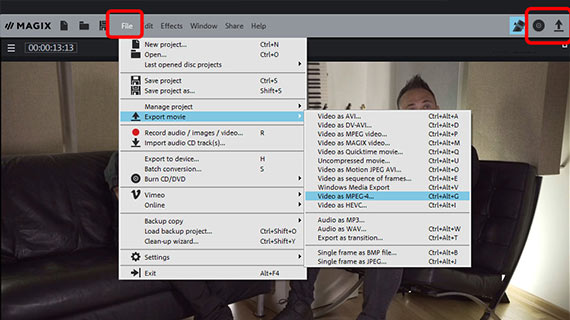
- Create video file: Go to "File" > "Export movie" to create a new video file, e.g. in MP4 or MOV format. There are a range of codec settings and presets available in the Export dialog.
- Burn to disc: You can also burn your video to disc. To open the "Burn" interface, click on the button with the disc icon in the upper right corner of the program. Pick a selection menu and a disc type (DVD, AVCHD or Blu-ray Disc), then start the burn process.
- Upload to the Internet: Vimeo and YouTube are directly connected to the program. Click on the arrow symbol in the top right to open the dialog "Finish movie" and upload the video.
- Transfer to smartphone: In the "Finish movie" dialog you will see the option "Export to mobile device". Select a device here, and Movie Studio Platinum will handle the rest. The video will be exported first in the correct format, and then transferred to your device.
Adding subtitles to video using Movie Studio Platinum, the video editing software for downright amazing movies:
- Import & export for all relevant formats
- Quick cut & detail cut
- Automatic wizards
- Up to 900 effects & music
- Intuitive templates for intros, outros, subtitles, transitions, opening credits and much more
- Burn videos to DVD & Blu-ray (and design your own menus)


