Create the Ken Burns effect – here's how!
Follow these steps to add the zoom effect (a.k.a the Ken Burns effect) to a video:
- Start Movie Studio Platinum and drag & drop your video from the Media Pool to import it into the project window.
- If you don't want to apply the zoom effect to the entire video, place the playback marker at the beginning of the video section that you want to zoom in on and then press "T" on your keyboard.
- Click to select the following object to which you want to apply pan and zoom.
- In the Media Pool, open the "Effects" tab and select the "Size/Position" effect under "Movement templates". This folder also contains templates for video zoom effects.
- Place your mouse cursor over the zoom template and in the pop-up window, click the middle button with the arrow right to display a preview.
- This way you can try out and play around with different video zoom effect templates. To use a video zoom effect, click on the left arrow symbol in the pop-up window that appears. The template will then be applied to the selected object.
- To set the zoom effect more precisely, move the keyframes in the lower section of the effect dialog and play the passage to check the result. The closer the keyframes are moved together, the faster the zoom effect.
- Go to "File" > "Export movie" and select an export format in the sub-menu (e.g. MP4) to export the video with the Ken Burns effect as a video file in different formats. Alternatively, use the buttons in the top right hand corner of the program interface to burn your video to DVD, transfer to a social media platform or copy to a smartphone.
Video zoom effect using Movie Studio Platinum, the video editing software for downright amazing movies:
- Import all conventional video, photo and graphics formats
- 1-click zoom templates
- Designing your own zoom effects
- Virtual pan and zoom: How to make image detail zoom in video
- Helpful program wizards
- Convert files to all essential formats, upload videos to the Internet, burn them to disc, and transfer them to your smartphone
Discover video editing software that lets you easily zoom in on a video and create virtual pans!
The video zoom effect, sometimes known as the Ken Burns effect, creates the impression that the camera moves or zooms in on a video subject, or zooms out from it. Video zoom effects can be added to any video or photo after it has been created. When you want to zoom in on a video or photo, the image gradually increases in size until the right display section is reached. When zooming out, it's the other way round. The start of the zoomed in picture section appears in fullscreen, then the section range is increased in size until the entire image can be seen.
When you make zoom in video, you need to know how to set a high resolution for the source material so that the zoomed in section is not too pixelated. In addition to the zoom section, the output format is an important factor to consider, since displaying a video with zoom effect in a YouTube player window requires a lower resolution than on a Full HD or 4k monitor.
Also, when creating pan and zoom in a video, you don't have to rely on preconfigured effect presets. While zoom effect presets are a practical way to save time and effort, they can limit your options if you have higher creative demands. Maybe you want to zoom into a specific part of the image, or change the direction of movement while zooming to follow the main subject in the video. There are no tailor-made presets for custom pan and zoom video effects, so you need to be able to freely define display section, speed and movement of the zoom effect.
The video zoom effect is very similar to virtual tracking shots (a.k.a. camera panning). In these, the image is zoomed in on from the beginning, and the viewer only sees part of the entire image as a result. A section of the image moves through the material to create the effect of camera panning when the video is played back.
Virtual tracking shots are always combined with a video zoom effect. The viewers can see a fullscreen image at all times, which creates the impression that the camera is moving. Basic zoom video editing software does not offer options for custom video zoom and pan effects. Instead, you're better off using a comprehensive video editor such as Movie Studio Platinum.
A huge range of professional presets for all essential zooms and image movements are included in Movie Studio Platinum and can all be effortlessly applied at the click of a button. You also have a whole lot of options for creating your own video zoom effects and virtual camera pans. Finally, export your video in any output format: In fullscreen in high resolution for FullHD or 4k monitors, or in smaller image size and reduced resolution for displaying it on a smartphone or a player window. You can also transfer the video to your smartphone or burn it to DVD. Practical presets are available for all output formats and can be used even if you're not familiar with them.
Our step-by-step guide below outlines everything you need to know about creating virtual pan and zoom and the Ken Burns effect with Movie Studio Platinum.
Zoom in on a video with Movie Studio Platinum
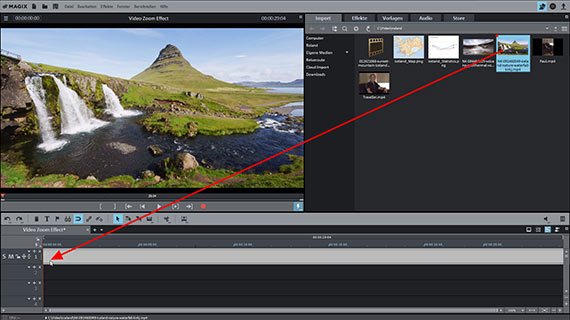
Import video for Ken Burns effect
- In the start dialog in Movie Studio Platinum, open up a new project.
- Drag & drop the video into the top track.
- Press the spacebar to play back the video.
During playback a red playback marker will move across the project window to display the current position. The playback marker can be moved to any position by clicking the timeline above the track section. This lets you navigate through your video.
- Click the text object in the track to select it.
You can now edit it and apply effects and templates.
Apply video zoom effect templates
Movie Studio Platinum delivers a ton of pan and zoom templates that you can use right away.
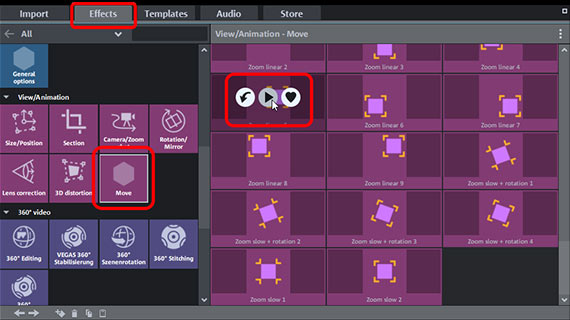
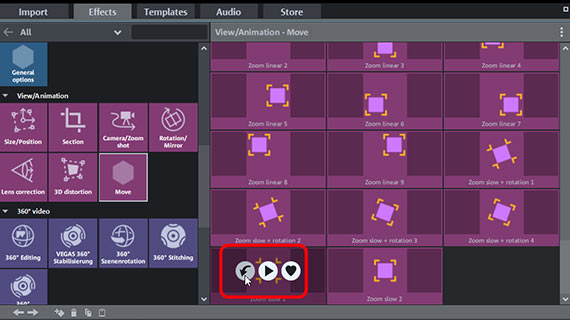
- In the Media Pool, open the "Effects" tab and select the "Size/Position" effect under "Movement templates".
- Scroll down to view the templates for the video zoom effects.
- Place your mouse cursor over a zoom template to open the little pop-up window.
- In the pop-up window, click the button in the middle with the right-facing arrow.
A preview of the template will appear. This way you can try out and play around with different video zoom effect templates.
- To apply a template, in the pop-up window, click the button on the left with the downward-facing arrow.
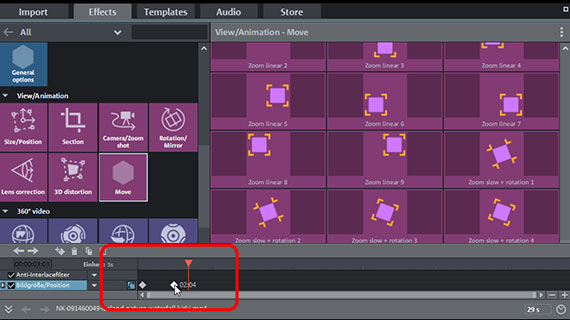
The template will then be applied to the selected object in the track. After applying a zoom effect template, several light squares will appear at the lower end of the Media Pool. Here, you'll find an additional timeline with keyframes, which can be used for applying the zoom effect from the effect template in a precise way.
To modify zoom speed, change the position of the keyframe in the timeline. When two keyframes are moved closer together, the image between them speeds up.
- To make the zoom in even faster in your video, drag the right keyframe more to the left.
- Or, for a slower zoom effect, move the two keyframes further apart.
Some templates ("Zoom linear") affect the entire video object. This means that the speed of the zoom effect depends on how long the video is. The zoom effect lasts longer in longer-length videos than shorter ones.
To edit zoom in video and adjust speed for the effect templates, cut the video into multiple objects and apply the template to one of the short sections.
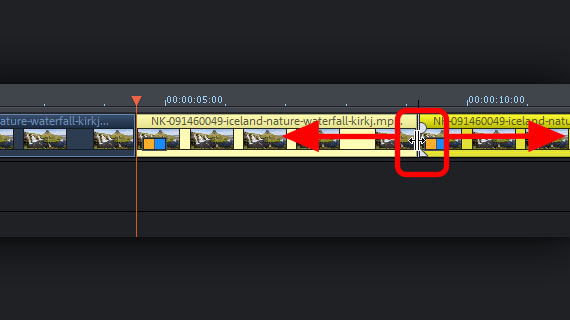
- Place the playback marker at the beginning of the part you want to cut and press "T" on your keyboard.
- You can easily move the cut point afterwards to make the object with the zoom effect longer or shorter. By moving the cut point, you're either slowing down or speeding up the video zoom effect.
Create your own zoom effects
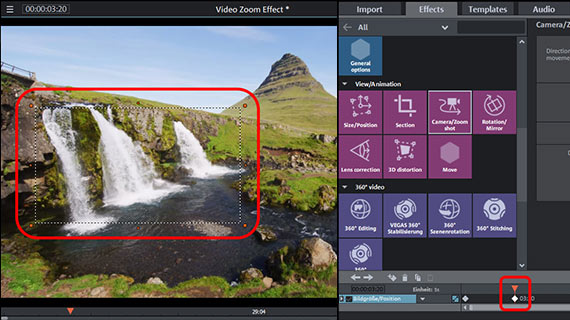
Movie Studio Platinum enables you to create your own pan and zoom effects. This means you don't have to depend on effect templates. You can define a section of the video to zoom in on or zoom out of.
- Select the video in the track that you want to apply the Ken Burns effect to.
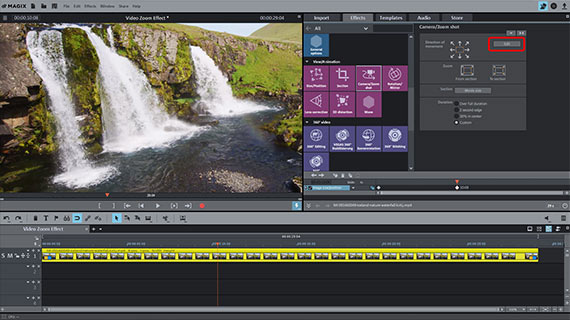
- In the "Movement effects" section, open the "Camera/zoom shot" effect.
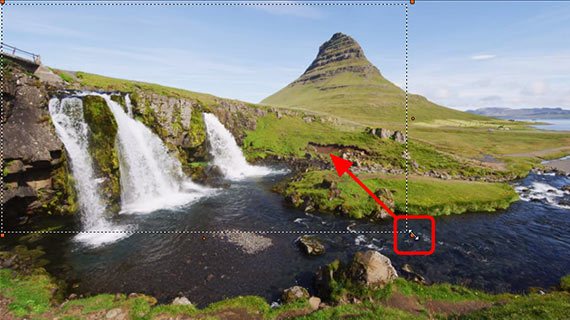
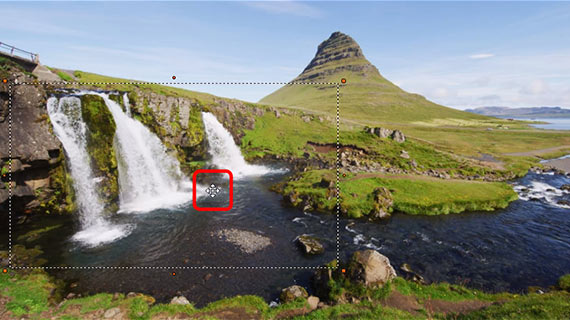
Now, inside the thumbnail, you'll see a frame with a dashed line. This frame indicates the section that the software will zoom in on or out of. You can shrink the frame and move it to any position in the image.
- To shrink the frame, move the orange-colored handles until the desired size is reached.
The aspect ratio remains in proportion, so the image section can be displayed in fullscreen without black borders.
- To move the section in the image, click inside the section and move it to the position where you want the zoom effect to begin or end.
- To make sure everything looks ok, click "Preview" in the dialog to only view the image section than contains the effect. To edit zoom in your video, click on "Edit".
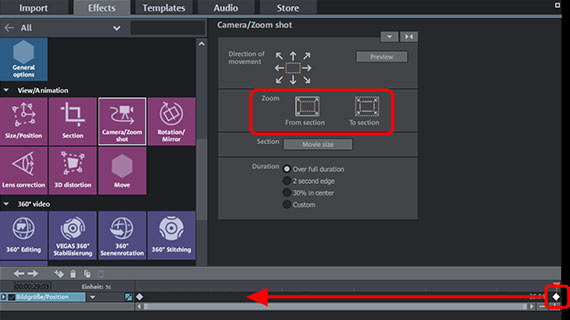
Then define whether you want to zoom in on a video, or zoom out of it.
- In the effect dialog, click the option "To section" to zoom in on video, or "From section" to zoom out.
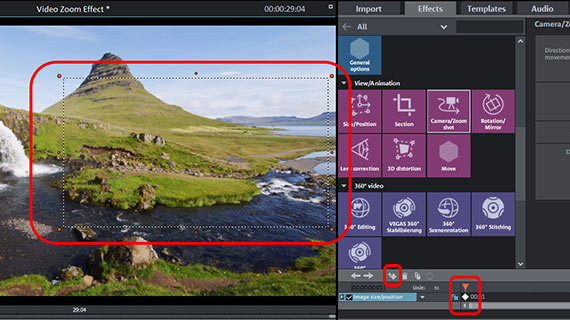
This will place a second keyframe at the end in the bottom section of the dialog. The zoom shot will then be applied to the entire video from beginning to end. You don't have to cut the object if you want to modify this – simply move the keyframe on the right further to the left instead. This will make the pan and zoom shot shorter and faster.
- Play back the sequence and if necessary, modify the section and keyframe further until you're satisfied with the results.
Video zoom effects & virtual camera pans
Movie Studio Platinum includes a virtual mixer that offers a wide range of options for professional audio editing. It essentially allows you to mix different audio tracks together and adjust their volume. So if you for instance want to combine background music with the sound of the original video recording and perhaps add a voice-over too, the audio mixer is what you need.
It's great for editing single audio tracks too. Before, we looked at how you can use the peak meter display for identify clipping.
Every project track in the mixer contains its own volume fader. Master volume can be set in the "Master section". The master section includes two faders for adjusting levels for the left and the right channel of the stereo master signal separately.
To combine several audio tracks or videos from different sources with one another, first move all videos and audio objects one below the other on a single track. By holding down the shift key, you can adjust the videos horizontally so that the cuts don't get mixed up.
You should now have all acoustic recordings from the same source lying on their own dedicated tracks – for instance the original video sound on track 2, background music on track 3 and a voice commentary on track 4. Or in the case of multiple videos, assign all videos from camera 1 to tracks 1 + 2, videos from camera 2 to tracks 3 + 4, and so on.
- During playback, follow the peak meter display in the audio mixer. You can check volume for any track and for the overall output in this way.
- The "FX" buttons are located above on the channel strip. Via these buttons you can access all the track-based editing effects – for instance, a compressor and an equalizer.
- Via "Mastering" on the right you can open the effects for the overall sound. Here, you'll find a limiter for preventing clipping. The limiter analyzes signal peaks and eliminates distortion by bringing any levels set to over 0 db down to 0 db. With the "MultiMax" multiband compressor you can split the frequency spectrum into three ranges. Use this to keep all deeper sounds uncompressed and work only on higher frequencies by using precise compression to give them higher volume and more presence.
The effects in the audio mixer offer many options for volume and sound optimization and are another great feature in Movie Studio Platinum zoom video editing software.
Exporting a video with Ken Burns effect
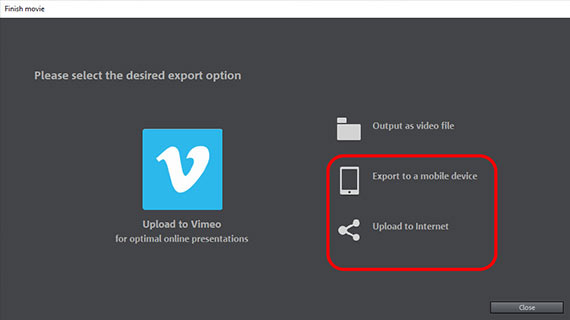
To finish, you can export the project together with the video zoom effect:
- To export a video file, go to "File" > "Export movie" and select an export format in the sub-menu, for example a "Quicktime Movie" (MOV) or "MPEG4" (MP4).
- To render the video directly to your smartphone, upload it to a social media platform or burn it onto a disc via the Options in the upper right-hand corner of the program. Here, you will see the interface for burning discs as well as the dialog "Finish movie".


Create video zoom effects with Movie Studio Platinum, the video editor for downright amazing movies:
- Import & export for all relevant formats
- Quick cut & detail cut
- Automatic wizards
- Up to 900 effects & music
- Intuitive templates for intros, outros, subtitles, transitions, opening credits and much more
- Burn videos to DVD & Blu-ray (and design your own menus)

