Insert text in video - here's how!
To add text to your video, follow these steps:
- Open Video deluxe Plus, navigate to the folder containing the video you want to use, and drag & drop the video onto the project window to import it.
- Place the playback marker where you want to insert text. To position the playback marker, click inside the timeline above Track 1.
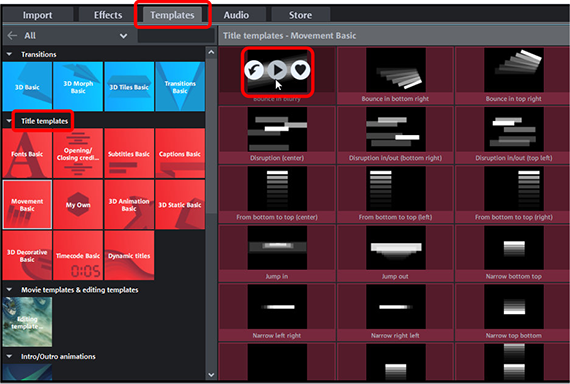
- In the Media Pool, open the "Templates" tab and select a text template from under "Title templates". Here you will find templates for various fonts, animated subtitles and captions, as well as opening and closing credits. Place your mouse over one of the templates. A small pop-up window will appear. Click on the center arrow button in the pop-up window to see a preview of the template. To add the template to your video, click the button on the left.
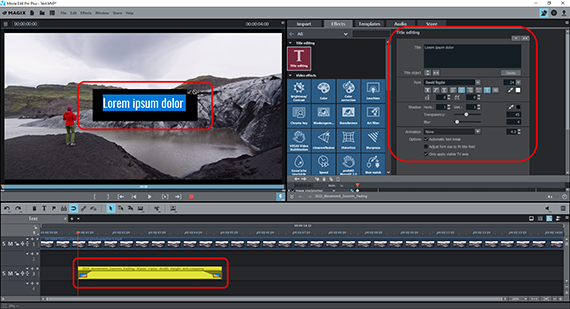
- In the integrated video text editor, replace the template's dummy text with your own text. You can change the font, font size and font style here if you need to. If you want to change the on-screen position of the text, click the text in the preview monitor and move it.
- Go to "File" > "Export movie" and select an export format in the sub-menu (e.g. MP4). This will create a new video file which contains the text you added. You can also burn the video, along with the text, to DVD or transfer it to your smartphone. To do this, use the buttons in the top right corner of the program interface.
Add text to video using Video deluxe Plus, the video editing software for downright amazing movies:
- Import all common video formats
- 1-Click text templates – simply add and edit
- Add text to videos in all standard fonts, font sizes and screen positions.
- Text animations for creating moving fonts with freely customizable animation paths
- Helpful program wizards
- Convert files to all essential formats, upload videos to the Internet, burn them to disc, and transfer them to your smartphone
Adding text to video – what you need to know
Text adds a third, linguistic component to the visual and aural language of video. Text lets you add extra information about locations, people and other visual content to your videos. Text also allows you to translate your video into other languages and to add subtitles to make your video more accessible to the hearing-impaired. And for those who need to watch your video without sound, adding text makes it possible for them to read instead of listen.
Text inserts don't have to be just static rows of letters. In wedding videos, for example, a light and buoyant font is often a better choice. Text can also be animated, and hence transformed into a cinematic experience. Opening and closing credits typically use text which scrolls from bottom to top. Slight text movements grab the viewer's attention and give the text an interesting and harmonious effect.
Adding text to videos requires the right software. For simple text overlays with ready-made templates, all you need is a simple video text editor or video app. However, you will find that products such as these quite limited when it comes to making more elaborate text overlays. In this case, we recommend using a comprehensive video editing program such as Video deluxe Plus. This gives you all of the tools and design options you need to add text to your videos.
Despite its wide range of features, Video deluxe Plus is easy to understand and a breeze to use. Simply choose from an extensive selection of included templates, and add your own text them. Or you can create your own text from scratch with just a few clicks.
Our step-by-step guide below will tell you everything you need to know about creating and adding text to video with Video deluxe Plus. At the end, we'll give you a pro tip to show you how to animate text yourself and make your text fly through the screen on customized paths.
Inserting text in video using Video deluxe Plus
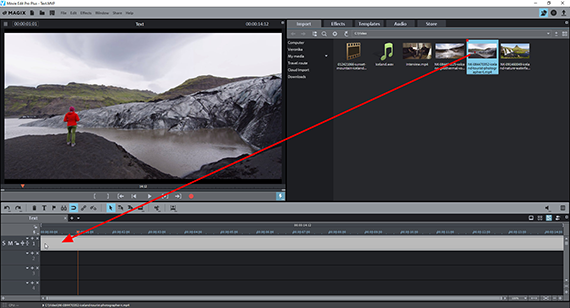
Inserting text in video: Import your video into the program
- Import the video you want to add text to.
To do this, navigate to the folder containing your video in the Media Pool in the top right section of Video deluxe Plus. Click the file and, while holding down the mouse button, drag and drop it into the project window.
It will appear there as a long video object. To combine multiple videos, arrange them one after the other on the uppermost track.
- To play the project, press the spacebar.
The red playback marker will move from left to right through the project window. The playback marker can be moved to any position by clicking the timeline above the track section.
- To stop playback, press the spacebar again. The playback marker will jump back to the position it was in when playback was started.
Inserting text in video: Use a text template
To add text, follow these steps:
- Place the playback marker where you want to add your text.
- In the Media Pool, open the "Templates" tab and click on one of the icons under "Title templates".
All of the text templates included with the program will now appear on the right side of the Media Pool.
- Briefly place your mouse cursor over a text template. A pop-up window with three buttons should appear.
- Click the central button with the right-facing arrow to view a preview of the text template.
"Subtitles Basic" contains decorative text for short subtitles. "Fonts Basic" contains plain and simple text in a variety of fonts. These are suitable for subtitling continuous spoken dialog. The animated text templates in "Movement Basic" and "Dynamic Titles" are especially good for making section separators.
Tip: Many additional text templates are available for purchase under the "Store" tab. These can be added directly to your video. : Video deluxe Premium contains even more options for creating cinematic text, as well as the NewBlue Titler Pro6 plug-in (a value of €256).
- When you've found a template you want to use, place your mouse cursor over the template again and, in the pop-up window, click the button on the left with the downward-facing arrow.
The text will be inserted into the video at the position of the playback marker. Alternatively, you can also drag and drop the text template onto any empty track below your video.
Editing text with the video text editor
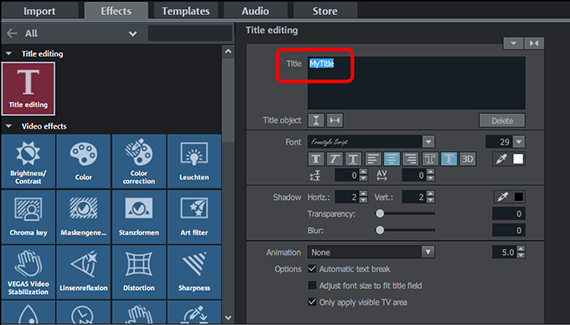
When you load a text template, a different part of the Media Pool will open. You will now see the "Title editing" dialog. This is Video deluxe Plus' internal video text editor, which lets you write and format text.
- Click inside the "Title" dialog field and replace the text there. You can also modify the text directly in the preview monitor.
You can also adjust the text template in the video text editor if it isn't entirely to your liking. The "Title editing" dialog provides all of the settings you need to change the font, font size and font color of your text, as well as text formatting options to make the text bold, italic, underscored, left-aligned, centered, right-aligned or three-dimensional.
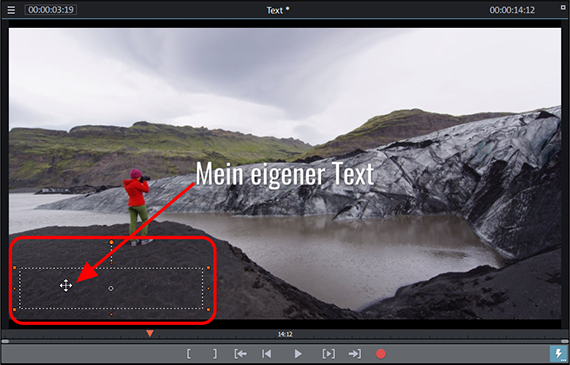
If you want the text to appear in a different part of the screen, you can modify the position of the text directly in the preview monitor.
- Click the checkmark on the text field in the preview monitor to accept the modified text.
- Then, click on the text in the preview monitor and move it to a new position.
If the text jumps back to its original position after you move it, or if the program won't allow you to place it in certain areas of the picture, this is because of the text template's individual position settings. To disable these settings, right-click the text object in the track and select "Video effects" > "Reset video effects". All of the positional settings for the subtitle will be reset. However, the text and its formatting settings will remain unaffected. You should now be able to freely move the text around in the screen area.
Creating your own text and adding it to the video
If you want to create and insert your own text without using a template, follow these steps:
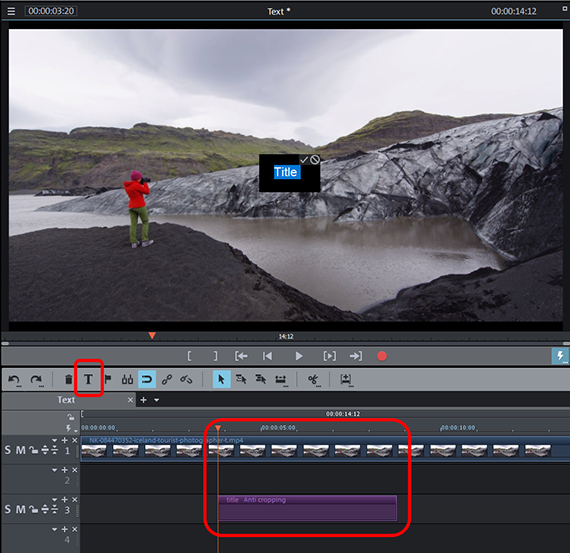
- Place the playback marker where you want to add your text. Make sure that no other text object is selected.
- Click the "T" button in the toolbar.
A standard title in 12-point Arial will appear at the position of the playback marker.
- In the video text editor, adjust the text and the font settings.
To format individual letters, select the letter first and then select the settings you want to use for that letter.
Once you're happy with the text you've added, you can use it as a template for other text.
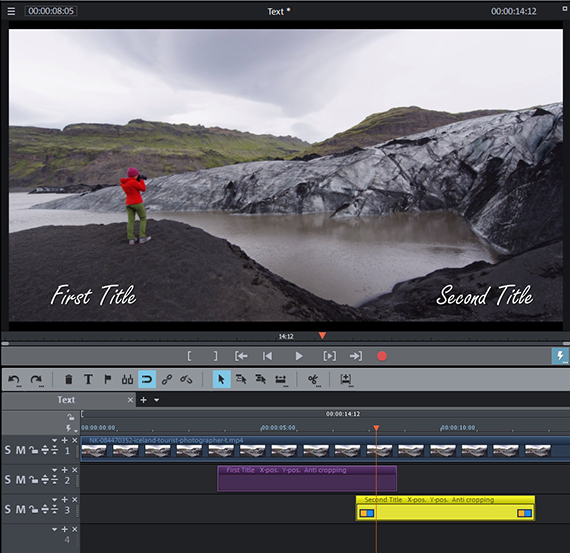
- Hold down the CTRL key, click the text object in the track and drag the mouse to create a duplicate.
- Drag the duplicate to where you want to insert the next text object. If you want two text objects to appear on-screen at the same time, you need to overlap them. To do this, move the second text object to its own track.
- Double-click the text object in the track to open the "Title editing" dialog.
- Enter the new text and accept your changes by clicking the checkmark in the preview monitor.
This is a quick way to insert new text with the same design in different parts of your video.
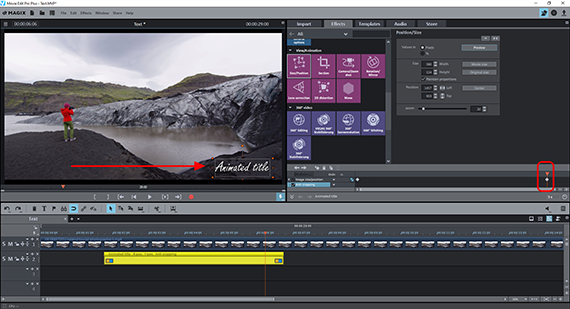
Pro tip: Adding moving text to videos
Video deluxe Plus also lets you create your own text animations. You can define whatever animation path and speed you want. In the next section we'll show you how to do this.
- First, follow the instructions above to add text to your video.
- Click the text object in the track to select it.
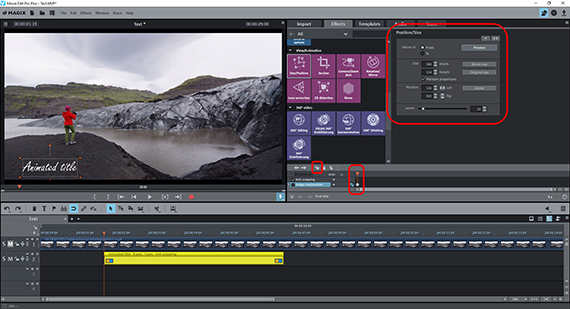
- In the Media Pool, open the "Effects" tab and select the "Size/Position" effect under "View/Animation".
- Place the playback marker where you want the text animation to start. Normally this would be the beginning of the text object in the track.
- Click on the text in the preview monitor and drag it to the start position for the animation.
You can also move the text to a position outside of the screen area and make the text fly in from off-screen. To do this, first shrink the preview monitor by holding CTRL and scrolling with the mouse wheel until you see the borders of the screen area. Move the text into the area outside of the screen area border.
- If it isn't already open, open the keyframe animation in the Media Pool and add an initial keyframe.
- Move the playback marker to the right and place it where you want the text animation to end.
- Drag the text in the preview monitor to the end position for the animation.
If you play the animation now, you will see the text move from the start position to the end position.
You can use the same method to create text movements which all kinds of subtle text movements:
- Place the playback marker where you want the text to change direction.
- In the preview monitor, drag the text to the position you want it to "fly" to after the current keyframe. The program will automatically set the new keyframe.
You can add as many additional positions as you want and create any imaginable movement pattern. The idea here is to first place the playback marker further long in the video and then move the text to a new position in the preview monitor.
When the animation path is finished, you can start editing it in more detail. You can click on any keyframe and move it (or delete it) in the keyframe animation timeline at any time. You can easily modify the corresponding effect parameters in the preview monitor, or numerically in the dialog.
You can also use this method to animate letters individually and make them rain down onto the screen from above, for example. To do this, you need to create a separate text object for each letter and animate them individually. At the end of the animation, arrange the letters one after another so that together they produce the title text.
Exporting videos with inserted text
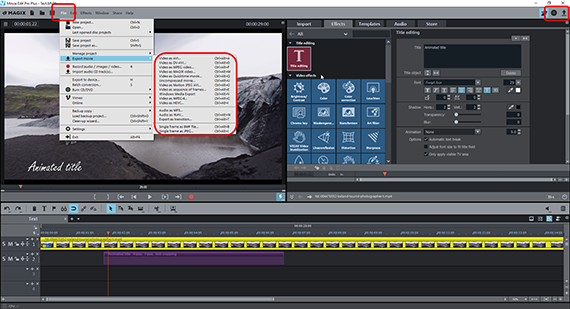
Once your text has been added and edited, you can export your video and inserted text to create a new video file. Doing this will not affect the original video. The following options are available:
- Create video file: Go to "File" > "Export movie" to create a new video file e.g. in MP4 or MOV format. There are a range of codec settings and presets available in the Export dialog.
- Burn to disc: You can also burn your video to disc. To open the "Burn" interface, click on the button with the disc icon in the upper right corner of the program. Pick a selection menu and a disc type (DVD, AVCHD or Blu-ray Disc), then start the burn process.
- Upload to the Internet: Vimeo and YouTube are directly connected to the program. Click on the arrow symbol in the top right to open the dialog "Finish movie" and upload the video.
- Transfer to smartphone: In the "Finish movie" dialog you will see the option "Export to mobile device". Select a device here, and Video deluxe Plus will handle the rest. The video will be exported first in the correct format, and then output to your device.


Add text to video using Video deluxe Plus, the video editing software for downright amazing movies:
- Import & export for all relevant formats
- Quick cut & detail cut
- Automatic wizards
- Up to 900 effects & music
- Intuitive templates for intros, outros, subtitles, transitions, opening credits and much more
- Burn videos to DVD & Blu-ray (and design your own menus)


