NEW
Samplitude Elements – Quickstart Guide

Starting out in music production can sometimes be a bit of a challenge. In this workshop we’ll take you through the first steps in Samplitude and present the tools you’ll need, so that nothing can hold you back from producing music. From creating your first project and object editing to mouse modes and basic mixing, you’ll learn everything you need to get started with Samplitude.
Common application scenarios
Start Selection
When you start Samplitude you will be greeted by a “Start Selection” dialog in the program interface.

The start selection can be used to add a new multi-track project, load an existing multi-track project, load an audio file and access the options for recording an audio file (recording a “Wave”).
You can also use it to display a demo project, open the Help section, load the most recently opened projects, view the “tip of the day”, or to start the intro video.
Clicking the corresponding check box ensures that the start dialog will always open when the program is started.
Initial navigation in the virtual project (VIP)
- To start playback, press the space bar.
- To end playback, press the space bar, the pause button, or the “0” on the keyboard.
- To set the playback marker, click on the desired position in the timeline.
- To move the playback marker, use the left and right arrow keys.
- In order to jump to the most recent position, press the backspace key
- To move the VIP under the play cursor, use the keyboard shortcut Alt + Left Arrow / Alt + Right Arrow.
- To create a range, drag with the mouse in the grid list.
- To move a range, move it with the mouse while holding down the Shift key.
- To increase the size of a range, drag the end of the range using the mouse.
- To reactivate a deactivated range, use the shortcut keys “Shift + Back Space”.
- To move an object, click on the lower half and drag it into its new position.
- To jump to the object edges with the playback cursor, select the shortcut keys Ctrl + Q / Ctrl + W.
- To create markers at the playback marker position, select “Shift + 1…0” in the letter key block on your keyboard.
- To jump to a marker position with the playback marker, select the corresponding number 1…0 in the letter key block of your keyboard.
Cutting and editing objects
Position the playback marker at the position where you want to make a cut. Now click the object to be cut and press the “T” key on the keyboard.

If “Auto crossfade” mode is activated (Edit > Crossfade > Auto Crossfade active), Samplitude will create a crossfade between the two newly created objects.

Each object now has its own object editor that you can use for detailed object editing. The object editor can be opened by double-clicking on the object.
Arranging an example song
Now we’ll show you how to edit and arrange audio material in Samplitude and introduce you to all of the basic functions involved in the editing process.
Loading projects
Go to “File” > “Open” > “Virtual Project” to open the project file “WS1.VIP” which is required for this workshop.

The file is located in the folder “ProgramData” > “MAGIX” > “Samplitude Pro X2” > “_Demo” > “Workshop_Edit_Arrange” > “WS1.VIP”.
Playing projects
Press the play button and listen to the source audio material as a loop. To do this, press the “Loop” button in the transport console and highlight the grid/marker bar by double-clicking between marker 1 and 2. You can also start and stop playback using the space bar.

Copying objects
As you can hear, the bass only plays for two bars. Activate the bass object by clicking on the lower half of the “funky1” object. The color of the object changes to orange.

Copying & pasting ranges
The next thing to do is duplicate both of the first bars. To do this, drag out a new range to the start of the third bar in the grid and marker bar.

Here the grid and snap function should be switched on in the project options (shortcut: I) and the beat grid and bar/beats should be selected.

Bars and beats should also be selected in the transport window beside the play position display.

Now double-click in the selected area twice. The first double-click selects the range in the currently selected track. By double-clicking again, all tracks in this range will be highlighted.

Now go to “Edit” > “Copy” > “Copy” (Ctrl + C) to save the selected range to the clipboard ...

... and then go to “Edit” > “Paste” > “Paste with Time/Ripple” (Ctrl + Alt + V) to insert it to the right.

The part of the arrangement that follows it will be moved two bars forward.
Now use the mouse to move marker “1” back to the beginning of the project.

Duplicate the range between the seventh and ninth bars in the same way.

Now if you double-click on the grid and marker bar between marker “1” and marker “2” while the “Loop” buttonin the transport console is activated, you can play back your new arrangement in Loop mode again by pressing the space bar.
Muting Objects
To make the intro sound a bit more interesting, we’ll introduce the bass later on. To do this we’ll mute the first bass object using Ctrl + M.

Zooming in and out of the project
Now click on the object beside the bass object. For the following editing function, we’ll increase the display size of the activated object. You can quickly and easily zoom in by clicking on the grid/ marker bar at the position of the current object, holding down the mouse button and dragging down vertically.

This helps you work very precisely in the waveform display. If you press and hold the Ctrl key before letting go, you will return to the original zoom level.
Splitting objects
Now move the playback marker to the position 4:03. At this position in the bass track, you can split theobject with the shortcut key “T”.

The cut will create two objects. Zoom out of the detailed display slightly (to do this you can drag on the right end of the scroll bar) and mute the longer object in front by going to “Object” > “Edit” > “Mute Objects” or using the keyboard shortcut Ctrl + M.
Fading objects in and out
The remaining bass part ends the intro. You can add a fade in by dragging the top left handle of the bass object to the right.

At the beginning of the chorus, create a copy of the Wah guitar by dragging the mouse while holding down the Ctrl button.

We want to let this fade out right after it is played. We can do this by dragging the object handle – a small square on the upper right edge of the object – all the way to the object start on the left. This is how you edit the fade out phase of the object.

Setting and naming markers
Now we want to set new markers. First we have to delete all of the old markers by clicking on the marker button beside the grid and marker bar and selecting “Delete all Markers”.

Then move the playback marker to the beginning of the arrangement by pressing the “Home” key on your keyboard. Right-click on the marker button again and go to “Set Marker” > “Marker with name…” (keyboard shortcut: ?).

Give the name “Intro” to the marker at the beginning of the song and give the name “1st Verse” to the marker you want to create at the beginning of the first verse at the song position 005:01:000 by following the same procedure.

Creating and naming tracks
To make the intro into the verse a bit more smooth, insert an additional bass part and assign it its own track. To do this, click on the existing bass track, then right-click on the track header and select “Insert/Delete Tracks > Insert Track(s)” from the context menu.

Double-click on the name field of the new track and enter the track name “Bass2”. Confirm by pressing Enter.

Naming audio files and integrating them into the arrangement
Now move the playback marker to the beat position 003:01:000 and open the audio import dialog by going to “File > Import > Load Audio file” (keyboard shortcut: “W”).

Click on the file “work_1.wav” in the “Workshop_Edit_Arrange” folder.

When you click on “Open”, the bass object will appear on the new track at the position of the playback marker. Now create a “fade in” for the inserted object and listen to the result.

Copying multiple objects
To expand the song structure, copy the objects in the first six tracks of the first verse. To do this, position the mouse pointer in the lower part of the first drum loop object of “1st verse” in track 1 and select “Ctrl + Alt + L” to activate the object lasso. Now drag the mouse to the right and down to open the object lasso. All objects in the lasso are selected when the mouse button is released.

You can duplicate the objects you selected by going to “Object” > “Edit” > “Duplicate Objects multiple…”.
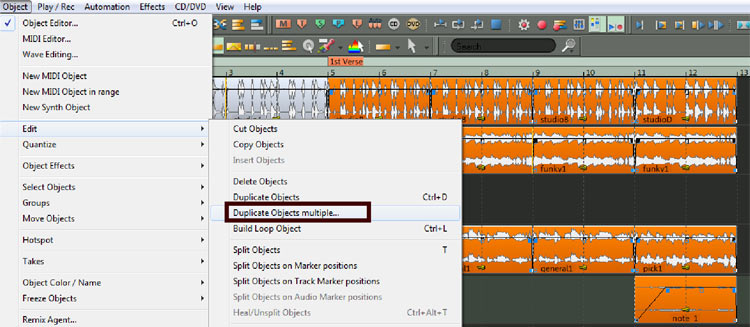
In the dialog that follows, enter “3” as the number of objects.

The newly created duplicates now link up with the existing objects. To display an overview of all the objects, you can use the keyboard shortcut “Ctrl + Alt + Up Arrow”.

Now copy a conga object to the start of the 13th bar. Go to “Object” > “Edit” “Build Loop Object” (Ctrl+L). The handle at the bottom right of the selected object becomes colored. By dragging this handle to the right with the mouse, you can create loop object which you can set to any length you want. Lengthen the conga loop this way until you reach bar 37.

Adding multiple tracks
Now create three new tracks at the end of the arrangement by going to "Track" > "Insert New Tracks" > "Add Several Tracks" ...

... and entering "3" as the number of tracks you want to insert.

To continue viewing all objects in the overview vertically, click on the “Overview Mode” button on the lower toolbar.

Positioning audio files in the arrangement
Using the keyboard shortcut “W”, first load the audio files “soloB1”, “solo1” and “soloA1” one after the other into track 8 at beat positions 25, 29 and 33. Change the track name to “GuitSolo”.

Similarly you can change the name of track 9 to “AdLib”, load the audio file “2adlib1.wav”,
and move copies of the object to beat starts 20, 28, 35, and 36.

Finally, name track 10 “Organ” and load the audio file “66organ_1.wav”. Now build a looped object in track 10 with Ctrl + L and place the loop on bars 21 to 36 of the VIP project.

Adjusting object volume
The final step is to adjust the volume of the vocals, guitars, and keyboard using the upper middle handles of the respective object or setting the volume of the corresponding track with the volume fader in the track header or the track editor.

Try experimenting with the arrangement even further by extending the chorus, middle eight and outro or adding effects and automation.
More information about the program can be found here. Have fun arranging with Samplitude!
Next Post >
The new SOUND FORGE Pro Mac 3
< Previous Post
From Music Maker to Samplitude Music Studio
Related Posts

From Music Maker to Samplitude Music Studio
Use your Music Maker skills in Samplitude Music Studio. Here we tell all why you won’t regret an upgrade!

The new Samplitude Music Studio
Samplitude Music Studio – the entry level DAW that gives musicians everything they need. We'll show you all news.
2 million new beat producers in only 15 months
The number of Music Maker downloads has hit the 2 million mark! Learn everything you need to know about the free version here.

Artist Interview: Bill Evans
Bill Evans` Interview about SpectraLayers Pro, performance restoration and his work with virtuoso artists.