Create your own Holiday video – here's how!
Follow these steps to create beautiful Christmas films:
- Record as many different scenes as possible, not only the Christmas party itself, but also the preparations during holiday season.
- Open Video deluxe Plus and drag & drop all of your videos or photos from the Media Pool to import them.
- Arrange the media in the correct order. While arranging, delete any footage you don't need. To cut, place the playback marker at a position to cut and press "T". You can delete any objects you don't need simply from the track by pressing the Del key Every cut can be shortened by dragging the lower object handle inward.
- Optimize the quality of the video and sound using the video and audio effects in the Media Pool. Click on the video that should be optimized, open an effect dialog (e.g., "Brightness/Contrast") and simply click on the auto-correction button or adjust the effect's parameters manually.
- Add some Christmas music. Drag audio files with Christmas music from the Media Pool into the project window and shorten them if necessary.
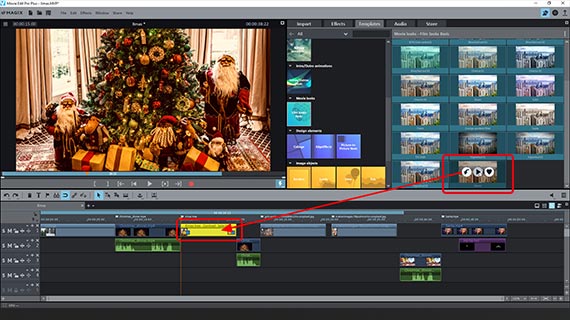
- Fade in titles with festive fonts and include opening and closing credits to enhance your Christmas video. To do this, use content from the "Templates" tab in the Media Pool. Simply drag & drop the templates onto a track underneath the video footage and customize them.
- Create split-screen collages and fade in overlays. For collages, arrange the videos or photos one after another on a track and drag a collage template from the templates folder onto the first video or photo. This will arrange all images in a single split-screen. To make overlays, drag the videos or photos onto a track underneath the video in the background. Apply the "Position/size" effect, then reduce the overlay in the preview monitor to the desired size and drag it to a suitable position in the frame.
- Burn the project as a Christmas video to a DVD, AVCHD, or Blu-ray Disc. To do so, click the disc button in the top right, choose a selection menu and start burning the disc.
Creating Christmas videos using Video deluxe Plus, the software for downright amazing movies:
- Supports all standard video and photo formats and cameras
- Intuitive and easy-to-use editing tools
- 1-click auto-exposure and auto-color
- Sound optimization with audio cleaning
- 1-click templates for professional, cinematic aesthetics
- Helpful program wizards
- Burn Christmas videos straight onto a DVD, AVCHD or Blu-ray Disc
Creating and editing a Christmas video
with the proper software
Christmas is a festival of love and a tranquil highlight of the bustling holiday season in the middle of winter. One takes time on Christmas to retreat, to meet family and close friends, to give each other presents, to eat and drink heartily and to enjoy company during celebrations...
Often there is a desire to document this shared experience as a Christmas video and perhaps give it as a gift on DVD the following year. Every year countless Christmas videos are produced, but unfortunately they frequently don't do the memories of the holiday justice and gather dust in the closet. We'd like to offer a few tips and tricks on how to create amazing Christmas videos worth watching that will bring joy to your family and friends.
Usually, it is a good idea to film not only Christmas festivities, but also the holiday preparations leading up to Christmas. After all, the Advent season sets Christmas apart from all other holiday celebrations in the year. Christmas itself is the centerpiece of a longer story, so to speak, and you might want to tell your version of this story with your Christmas video.
Frame your Christmas festivities with establishing scenes: for example, the decorations in the streets of your neighborhood and houses illuminated with Christmas lights, the first snow of the year falling, how Christmas items are already on display in the stores in late summer and then the arrival of the annual Christmas stress suddenly breaking out in December.
A Christmas video shouldn't just consist of heartfelt and pleasant sequences. On the contrary, the get-together at Christmas is all the more thought-provoking when reflecting on how stressful the season can be. Don't be afraid to shoot hectic scenes of people shopping, show the mishaps that are part of Christmas every year. Make sure you have a realistic, interesting mix of scenes instead of only stringing together Christmas clichés.
Then, Christmas Day will be the exhausting, yet shining highlight. It is best to find out the ideal position for a tripod camera beforehand, which can record the festivities the whole time. During the party, you may want to use an inconspicuous handheld camera to occasionally film detailed shots of the guests, the food or other happenings. This way your recordings won't bother anyone.
The film shot ("footage") can be reviewed after the Christmas party in peace on your PC and with the right video editing software and edited. With this software, you should know that it is not usually enough to make a few cuts and add "Jingle Bells" as background music. Shaky footage should be smoothed with powerful image stabilization, underexposed sequences should be brightened, titles should be added in stylish fonts, the audio track and background music should be cut and mixed.
The video and audio editing software Video deluxe Plus provides everything you need to edit your Christmas videos deftly in post-production and then subsequently burn them to a DVD, AVCHD or Blu-ray Disc.
In the following, we provide a step-by-step guide and helpful tips for how to help you produce an amazing Christmas video.
Like with any film production, there are two stages during production: the shoot and post-production. Let's begin with the shoot.
Make your own Christmas video
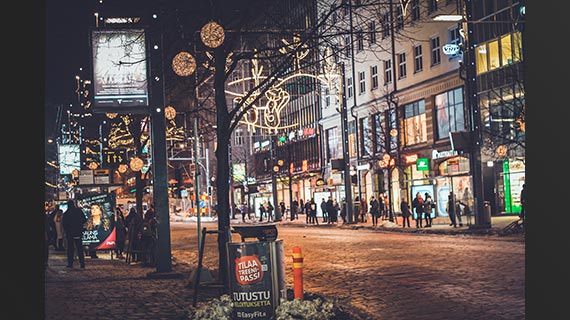
Make your own Christmas video:
Christmas season preparations
- Ideally, the subjects of any Christmas season pre-roll should relate to later scenes during the Christmas festivities. For example, you could film the presents under the Christmas tree being passed out and then unwrapped.
- Ensure the right atmosphere. Shoot typical Christmas motifs: street lights, displays in store windows, snow...
- Take a few interviews with guests and hosts and capture not only the anticipation, but also the work that goes into Christmas celebrations.
- Draw up a schedule for the Christmas Day and where the different events will take place.
- Scout out the location in advance to see what the lighting conditions are and where the camera would be placed best.
- Ideally, you should use at least two cameras: one camera on a tripod and one handheld camera. If you only have one camera, don't only film tripod shots because they might end up looking too static and boring. Mix tripod images with handheld footage.
- Make sure all camera batteries are fully charged.

Make your own Christmas video:
The Christmas party
- If possible, start filming in the morning. At a private gathering, for example, you could film the preparation of the holiday meal or the decorating of the tree. At a public event, you could record the stage being set up or the conversations at the dress rehearsal. Use a small, handheld camera that will distract less from the goings-on and provide more lifelike, dynamic footage.
- Film the entire event with a tripod camera and use a handheld camera for focusing in on details.
- Film close-ups of the guests. Film the guests as they come in through the door from outside. Your goal should be to "offer" each guest with their own close-up.
- Don't miss any important events: the greeting, the joy of unwrapping presents, interesting conversations, meaningful looks...
- Slowly pan across the room, but only horizontally or vertically – never diagonally or in round movements. Plan your camera movements before panning or zooming. For example, begin by zooming from inside out a window, then zoom into the your location from the outside, then pan the camera slowly over to the seated guests and then zoom in on the Christmas tree.
- Always make sure that sound is also recorded in the highest possible and consistent quality.
Cutting and editing
Christmas videos with software
The actual Christmas video is brought to life afterwards on your computer during "post-production".
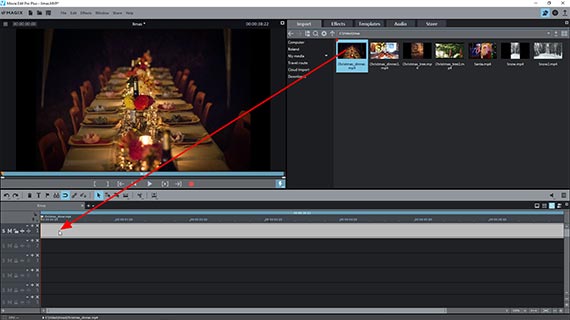
Editing a Christmas video:
Importing footage
- Copy all the video files you want to use into a separate directory on your hard disk.
- Open Video deluxe Plus and create a new project in the start dialog.
- Import all of the videos you want to use in your Christmas video into the project. You can also use photos and present them as overlays or slideshow passages. Drag & drop all files from the Media Pool into the project window.
Tip: If you want to load a lot of files, click on the first and then click on the last file while holding the Shift key. This will select all files. Then drag and drop the selected files together into the project. They will be arranged one after the other on the first track.
- Press the spacebar on your keyboard to play back and stop the video.
- You can move the playback marker by clicking in the marker bar above the first track at any time.
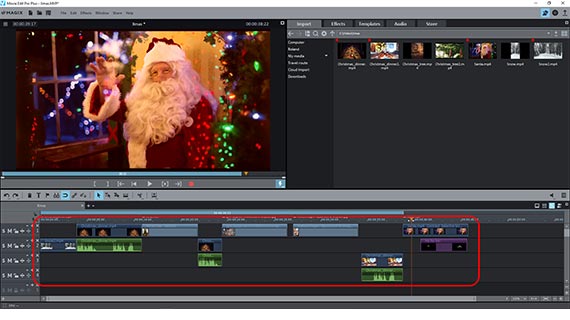
This will help you keep an overview of the footage.
- Arrange the videos and photos in the desired order. Videos are usually sorted chronologically in a Christmas video. This means you should drag footage from before Christmas to the front and the footage of the Christmas party to the back.
- If you want to show photos, you should consider when these images will work best. Each photo can be used as a still or can be made smaller and displayed as an overlay object with a background video. We'll show you how to do this later.
Next, sort all the footage sequentially. You can also use several tracks to do this.
Then, consider which passages shouldn't be kept because they are shown elsewhere or too long, for example. Then, you'll need to edit.
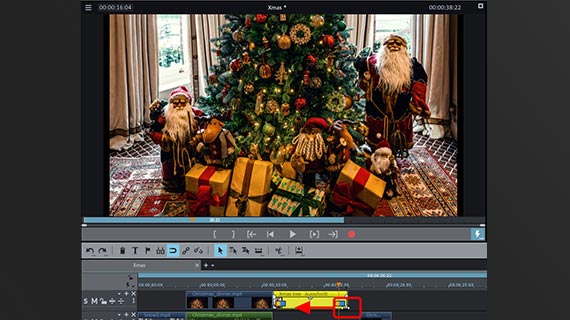
Editing a Christmas video:
Cutting videos
- Place the playback marker where you want to cut.
- Click on the video that you wish to cut to select it.
- Press the "T" key on your keyboard.
This cuts the video object in the track into two separate objects. You can easily delete cut objects from the track with the "Del" key. Make sure you don't leave any gaps in the footage. You can drag the scenes that follow the cut section of the video forward to fill any spaces.
- To trim the first and last images of each scene frame by frame, use the front and back object handles at the bottom of the object. Move the mouse to the bottom corner of the scroll bar until the mouse pointer turns into a double arrow. Now, click and hold the mouse button and shorten the object by simply dragging it inwards. For exact trimming to the frame, use the zoom buttons at the bottom right of the track window to enlarge the display.
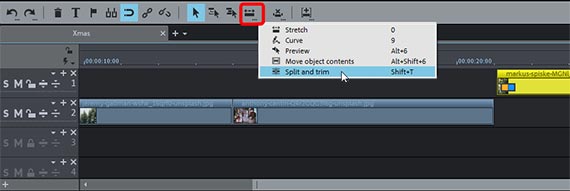
- Use the mouse mode "Split and trim" to scrub through your video footage quickly. This mode can be activated by right-clicking the mouse mode button in the toolbar. Drag the mouse over the video in the track while following the video image in the preview monitor. Click on all the locations where you want to cut. At the same time, click and hold the mouse button and "trim" the footage where you'd like the cut.
Editing a Christmas video:
Arranging videos
If you have a number of simultaneous videos, you will have multiple audio tracks with the same content. Choose one of the audio tracks and mute all the others.
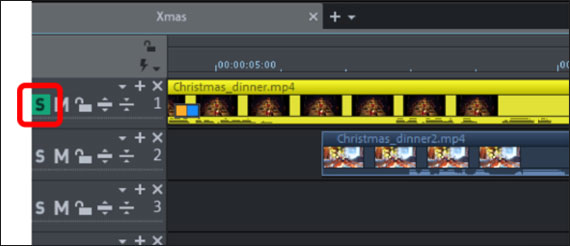
- Listen to all the videos with the same sound recording separately, for example, by moving them to their own track and pressing the S button on the far left on the track header.
This will "solo" the track so that you can easily preview it without any other material from any other track disturbing you.
- Now select a "sound track". To do this, right-click on the other videos and select the option "Audio functions" >> "Mute audio object" for each undesired track.
Now, you'll have a video with the selected "master audio track" and a number of muted videos with synchronized video. Now, you can begin mixing the different source videos together.
- The audio track of the video you want to use is best placed at the top on track 1.
This way, you'll always know where to find your master audio track.
- The videos with alternative video tracks can be arranged on the tracks below.
In general, the lower a track will cover any tracks positioned above it. Videos that show the same scene need be synchronized, so that the picture matches the sound on the audio track. This can easily be done by simply muting unwanted audio tracks. You'll need to make the video's audio track visible to do this:
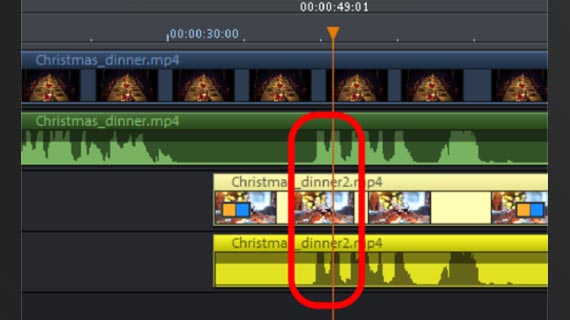
- Right-click on the other videos and select "Audio functions" > "Display waveform" and then select "Video/Audio on separate tracks".
The waveform display allows you to visually guess what can be heard on the respective audio track.
- Find a distinctive sound in the audio tracks to help synchronize them and move the videos on top of each other so that the sound is positioned exactly the same in all the videos or directly on top of each other in the waveform display. If you'd like to unmute a track for a while, right-click on the audio object and select "Set volume" > "Turn sound on".
Once the videos are synchronized, you can cut the video footage from the videos using the process described above.
Editing a Christmas video:
Adding sounds & Foley
In general, a little Christmas music in the background always adds to a Christmas video. This could be an clip from "The Christmas Oratorio" or one of the popular Christmas hits like "Jingle Bells" or "Silent Night". But there's also no hard and fast rule about using heavy metal, if you would prefer it.
Whatever music or soundtrack you find fits best, you can import the audio files in the same way to combine them creatively:
- Locate the audio file you want to use in the Media Pool.
- Drag the videos into the project by holding down the mouse button like before and place it preferably on an empty track.
- Edit the music into suitable passages and move these sound snippets under scenes to which you want to add music.
Last, here's a tip on how you can improve the sound of your audio recordings:
- Click on the video or audio recording with the sound you want to improve.
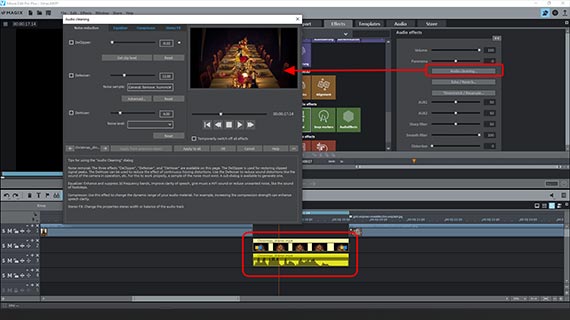
- Go to the Effects tab in the Media Pool, then find "Audio effects" and click on "General".
- Open the "Audio Cleaning" effect. Here, you will find a number of professional special effects like the DeClipper, DeNoiser, DeHisser, Compressor, Equalizer and Stereo FX, which can be used to perfect noisy, overly quiet or unintelligible audio tracks.
Editing a Christmas video:
Collages, overlays, titles, opening and closing credits
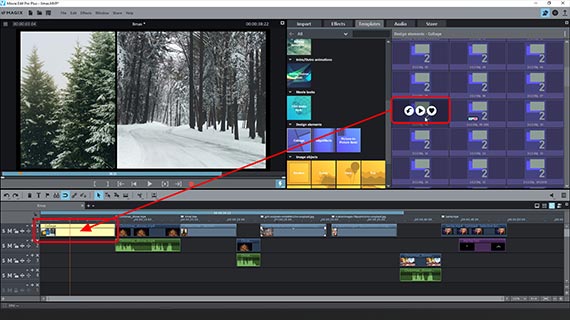
The Christmas video can now be enhanced with additional media. Would you like to add a split screen, for example, a video with the Christmas tree on the left and one with a choir on the right? It's easiest to use one of the numerous templates included.
- Arrange the videos you want to combine in order and select the first video.
- Open the Media pool and then go to "Templates" > "Design elements" > "Picture-in-Picture Basic" and select the desired template using the preview function.
- Then, drag the template onto the first video.
The following videos (or photos) will then automatically be merged into a split-screen collage.
What about an overlay, for example, a photo that appears in a specific area of the video?
- Drag the object to be overlaid onto a track below the video.
Because all objects in the lower tracks cover those in upper tracks, only the overlaid object can be seen in full-screen at this point.
- Under "Effects" in the Media Pool, select the effect "Position & Size".
This will make a frame appear in the preview monitor.
- Click on the handles of the frame corners and resize the overlay.
The top-most video will become visible in the margin areas you reveal.
- To move the smaller overlay, for example, to the corner of the frame, click in the middle of its preview image and drag it to the desired position.
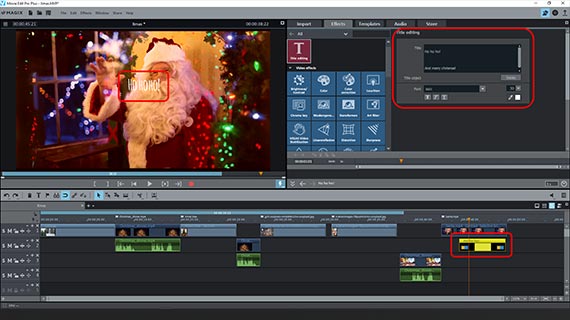
You can best create titles and text by using the title templates provided.
- Open "Templates" again in the Media Pool and select the desired template from the "Title templates".
- Drag the template into the Project window and enter your title text in the "Title editing" dialog.
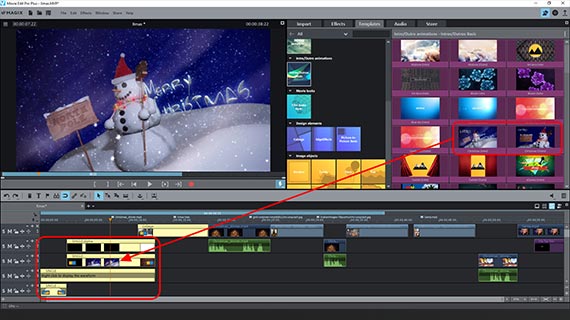
Video deluxe Plus provides a wide range of professionally designed templates for intros and outros.
- Open the directory "Intros/Outros Basic" under "Templates" the Media Pool.
Here, you will find a number of templates, for example "Christmas (Intro)" and "Christmas (Outro). If you load on of these templates, the accompanying media will be placed at the beginning or end of the project. Now, all you have to do is add your own custom text.
Editing Christmas videos:
Video quality and cinematic effects
Last, it's time to work on the visuals of your wedding videos and optimize the video quality as necessary.
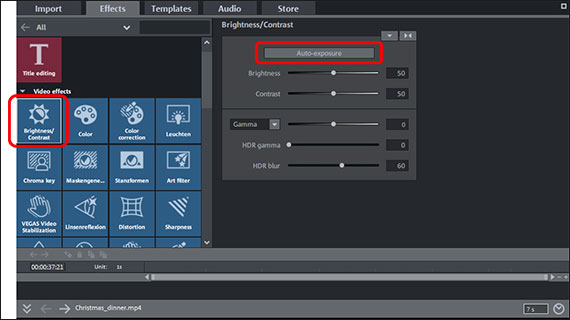
- Select a video or photo in your project window, open the Effects tab in the Media Pool and search for a suitable effect to use. Use the convenient 1-click optimization tools "Brightness/contrast" and "Color" in the effects.
- You can fix jittery and shaky footage using "VEGAS video stabilization". This video stabilization can also be found in the video effects.
Do you want all your clips to have the same look? Perhaps you want specific footage to be in black-and-white. Consider which aesthetic effects might be suitable for the video. Try a number of different options. Place all of the scenes you want to have the same look on separate tracks and then open the effects dialog for one video or photo.
- Be sure to try the film looks included with the program. These can be found under the Effects tab. Here, you'll also find lookup tables which can be used to give your wedding video a professional cinematic look. To apply the film looks or lookup tables, simply drag them onto the videos in the track.
- To apply the current effect settings for the video object to all video and photo objects in the track, click the triangle button in the upper right-hand corner of the effect dialog and select "Apply video effects to all of the following objects".
Burning a Christmas video on a disc
with a selection menu
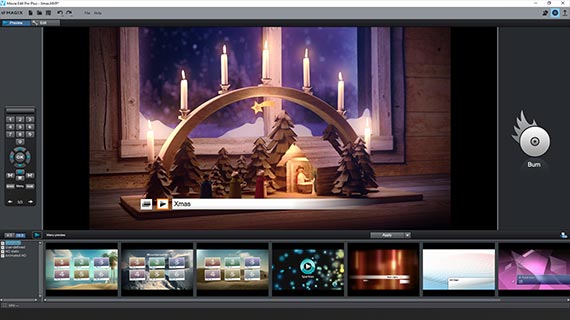
Finally, if everything plays back in Video deluxe Plus as desired, burn the Christmas video on a disc, along with a custom-designed selection menu.
- Above right, click on the button with the disc.
This will switch to the burn interface.
If you haven't set any chapter markers yet, you'll be asked whether you would like to set these manually or automatically. Using chapter markers, your audience can use a remote control to jump between the different chapters and scenes of your video.
If you want to set chapter markers in specific locations, you should stay in the main view. Place the playback marker in the places where you want a chapter marker and go to "Editing" > "Marker" > "Set chapter markers". Once all chapter markers have been placed, switch to the burning interface again.
- At the bottom of the burning interface, select a menu layout.
You can also combine individual menu elements with one another, for example, the font from one template with the layout in another template..
Menu text can be changed simply by double-clicking on an entry. If you want to modify the menu even more, switch to the "editing" mode. Here you can make any desired adjustments, e.g., creating new buttons, moving or deleting graphic elements and even importing Photoshop files as menu layouts.
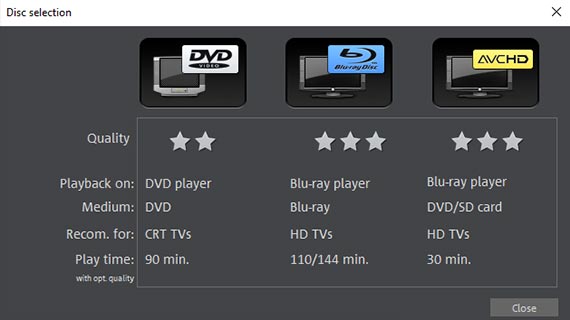
- Once your selection menu is finish, click the Burn button and select the disc type you wish to burn (e.g., DVD, AVCHD or Blu-ray Disc).
- For a matching cover, click on the printer icon in the burning interface.
This will open the MAGIX Cover & Label helper tool. You can use it to design and print stylish covers, inlays and disc labels.
You can either give your Christmas video to your guests on New Year's Eve as a New Year's greeting or you already have a nice present for next year. Once the season is over, the next season is already getting closer. With that in mind, we wish you "Happy holidays and a merry Christmas"!
Christmas videos with Video deluxe Plus, the software for downright amazing movies:
- Import & export for all relevant formats
- Quick cut & detail cut
- Automatic wizards
- Up to 900 effects & music
- Intuitive templates for intros, outros, subtitles, transitions, opening credits and much more
- Burn videos to DVD & Blu-ray (and design your own menus)


