Add a video overlay effect - here's how!
To add overlays to your video, follow these steps:
- Start Video deluxe Plus and drag & drop to import the background video from the Media Pool onto Track 1, the top track.
- Drag one or several transparent video overlays – videos, graphics or photos – to the tracks below. Basically, objects on the bottom tracks overlay the objects on the top tracks.
- Click on a video overlay object in the track to select it.
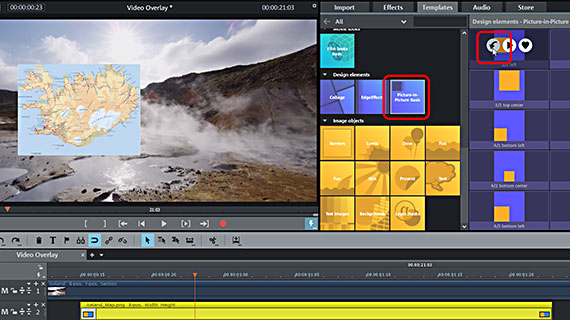
- Open the "Templates" in the Media pool and under "Design elements", click on the "Picture-in-Picture Basic" templates folder.
- Move the mouse over an overlay template in the Media Pool to open a little pop-up window. In the pop-up window, click the button on the left with the downward-facing arrow. This will shrink the video overlay in the track and position it inside the background image.
- You can try out various templates for your transparent video overlay in the same way until you find the right one.
- Go to "File" > "Export movie" and select an export format in the sub-menu (e.g. MP4). You can also burn the video to DVD or transfer it to your smartphone. To do this, use the buttons in the top right corner of the program interface.
Add video overlays using Video deluxe Plus, the video editing software for downright amazing movies:
- Import all conventional video, photo and graphics formats
- 1-click overlay templates
- Create your own overlays and position freely within the image
- Overlay animation: Make overlays "fly in" or move through the picture
- Helpful program wizards
- Convert files to all essential formats, upload videos to the Internet, burn them to disc, and transfer them to your smartphone
Video overlay: Here's how to easily create picture-in-picture effects in your videos.
Video overlays are everywhere in media. Overlays are additional graphics, photos or video content that are integrated into running film and are a ubiquitous presence in YouTube videos, TV reports, docusoaps, news programs and other formats. They make it easier for viewers to connect information from several sources, or follow multiple events at the same time.
Producing your own video overlay for a project is easy. You need a background video to act as a backdrop for your overlays, as well as media content that you will fade in at a certain part of the video image.
You also require the right video editor software to integrate the additional media content as a video overlay into the main video. On this note, it's better to keep your options flexible, and not rely on preconfigured effect presets. While these preconfigured picture-in-picture effects are a practical way to save time and effort, they can limit your options if you have higher creative demands.
So for instance, you might want a very specific effects set-up, but don't have the right preset to hand. Or, you might want your video overlays to fly in from the image border or move through the picture in other ways. Think about the graphic that first appears in the middle of the shot and then moves to the left to let a second graphic take its place.
There are a wide range of options for video overlays. Video and audio editing software Video deluxe Plus lets you make full use of them all. The program includes a huge collection of professional 1-click presets, a well as additional options for creating your own video overlay with or without animation.
The method is easy and straightforward. Our step-by-step guide below will tell you everything you need to know about creating various kinds of video overlay with Video deluxe Plus.
Make video overlays with Video deluxe Plus
Import background video and video overlays
- Open Video deluxe Plus by double-clicking on the program icon.
- Create a new project in the start dialog.
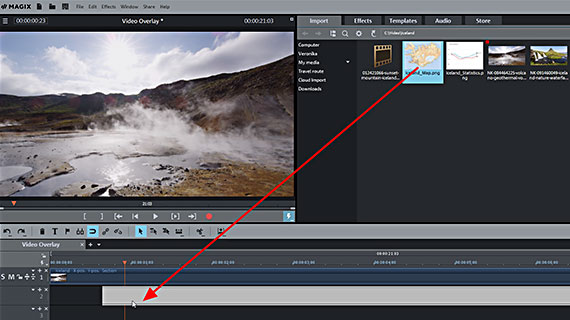
- Drag & drop the background video in the top track.
Start with the main video to which you want to apply overlays. The video serves as the background for the transparent overlays. In the Media Pool in the upper right, locate the folder containing your video file and hold down the mouse button and drag the file to track 1.
To play or pause the project, press the spacebar. During playback, the red playback marker will move from left to right through the project window. The playback marker can be moved to any position by clicking the timeline above the track section. This lets you navigate through your project.
Overlay media, whether videos, photos or graphics, is always imported in the same way:
- Open a media file in the Media Pool and drag and drop it in a lower track in the project window.
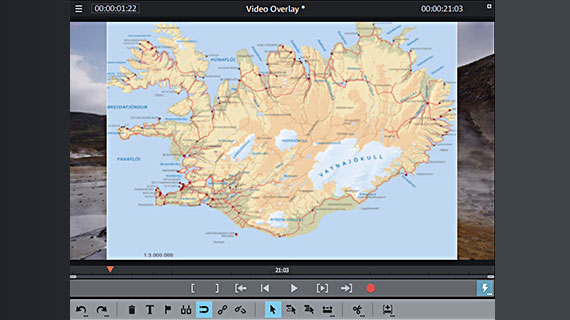
For instance, drag it to Track 2. Once you load the media file the video overlay will display in full screen, and the video overlay on Track 2 will cover the background video on Track 1.
Video overlays with picture-in-picture effects
Next, the overlay object needs to shrink and be positioned inside the frame. To do this we'll used one of the picture-in-picture templates included in the program. These have pre-configured settings for image position and size.
- Click the overlay object in the track to select it.
- Place the playback marker in the timeline of the overlay range so that it displays in the preview monitor.
- In the Media Pool open the "Templates" and place your mouse cursor over a template to open a little pop-up window.
- In the pop-up window, click the button on the left with the downward-facing arrow.
This will shrink the video overlay according to the template settings and position it inside the frame.
To try out another template, press the keyboard shortcut Ctrl + Z – this deletes the settings for the previous template completely. When you've found a template you want to use, place your mouse cursor over the next template and, in the pop-up window, click the button on the left with the downward-facing arrow again. In this way you can search through the entire template folder to find the right template.
- To adjust the time position for the dissolve, move the transparent video overlay sideways in the track.
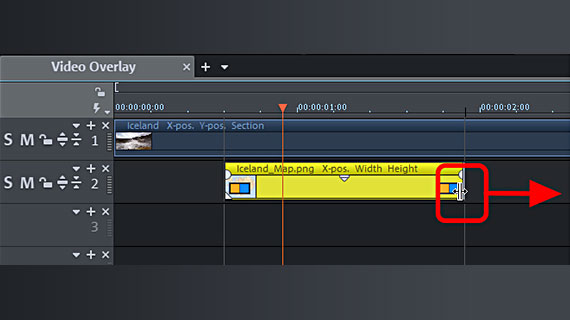
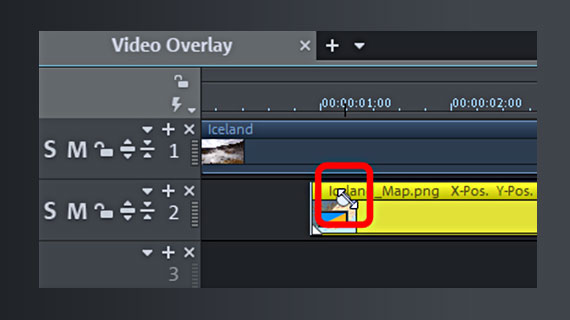
- To make the video overlay shorter or longer, move the mouse to the object border until it becomes a double arrow. Click and drag out the transparent video overlay to the desired size.
This is especially important when setting the duration for fading in photos and graphics.
Multiple video overlays
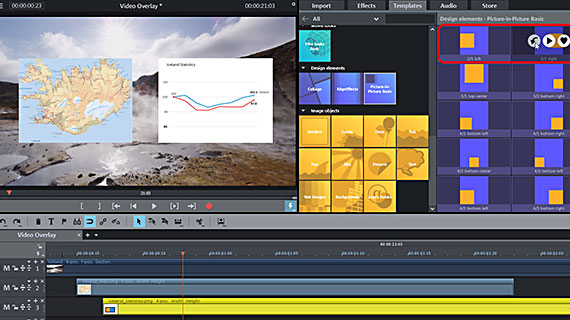
Templates have been designed to be combined with each other – this way you can have several transparent overlay objects fade in simultaneously.
Template combinations stem from their designations: Template "2/1 left" matches template "2/1 right". Both templates can be used as two video overlays that you can blend in simultaneously.
- Load both video overlays to two separate tracks.
For instance, move the first overlay to Track 2 and the second one to Track 3, while Track 1 is occupied by the background video.
- Move the video overlays on the tracks together in a way that they're lying partially or fully on top one another.
All overlapping parts will display simultaneously on the preview monitor. If the second video overlay in the track begins further back, the first video overlay will fade in first and then the second.
- Select the first video overlay and add the template "2/1 left".
- Select the second video overlay and add the template "2/1 right".
Both video overlays will now fade in in positions that complement each other.
The concept is simple: Objects on the bottom tracks overlay the objects on the top tracks.
If you want the video overlays to fade in in different locations, you don't need to worry about what tracks they're lying on. However, if a video overlay is to cover another overlay, having the correct order within the batch is important. Video overlays that appear first must be assigned to the bottom tracks, the video overlays that follow them should lie on the top tracks.
Designing your own video overlay
So far, we've focused on how to create video overlays using the templates included in Video deluxe Plus. One great advantage offered by the software is that it offers lots of additional options. You can really get creative and design any kind of overlay configuration you want. The process is always the same:
- Drag the video overlays onto the tracks below the background video and arrange the batch of overlays so that the overlays that appear first are positioned underneath the ones that follow.
Use effects in the Media Pool to customize your transparent video overlays:
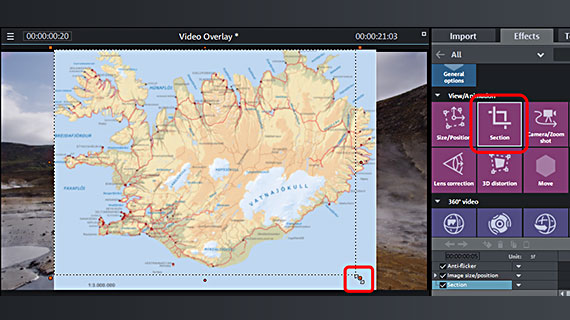
- If you only want to fade in a sectionof a photo or graphic as an overlay effect, use the "Section" effect that can be found under "View/Animation".
This effect creates a frame in the preview monitor. Drag out the frame to capture the desired section of the image. In the effects dialog, you can set the proportions for the section, e.g. "3:2 (landscape"), or "Free proportions" to create random image sections.
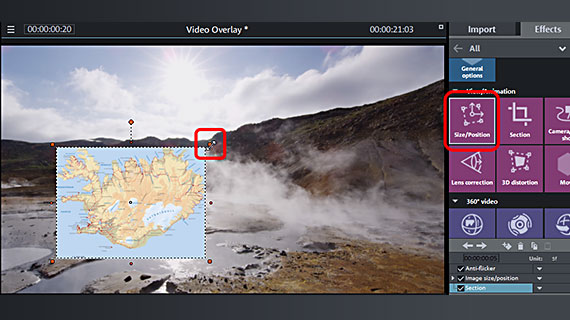
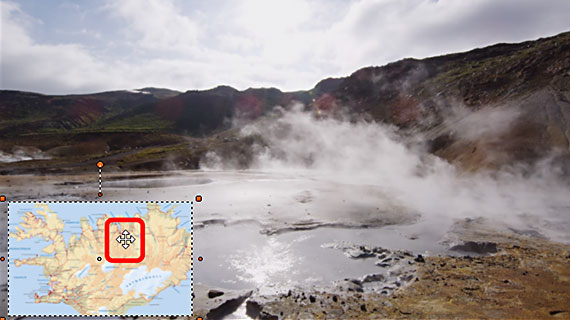
- To shrink the picture and position it inside the background video, use the "Size/Position" effect.
A frame will appear for this option too. Unlike the "Section" effect, it is not used here to crop the image, but to outline the size and position of the image. If you want your video overlay to appear in the lower left, for example, use the frame handles to reduce the image and then move the reduced-scale image to the position you want.
Video overlay: Fades & animations
A professional video overlay usually doesn't just pop up suddenly in an image, but is faded in or out. Sometimes, they "fly into" shot from the side or from below. When creating multiple video overlays that display one after the other, in particular, these kinds of animation effects can be really impressive.
To round things off, we'd like to show you show you can fade in and out your transparent video overlays, and also move them through the video image, or have them "fly into" shot. You can use video overlays with templates for this, or create your own from scratch.
- For a fade-in or fade-out, move the mouse pointer to the left or right object border of the video overlay.
- Click on the fade handle (a round semicircle) and drag it into the middle of the object.
The video overlay will now fade in or out. The more you drag the fade handle inwards, the longer the fade.
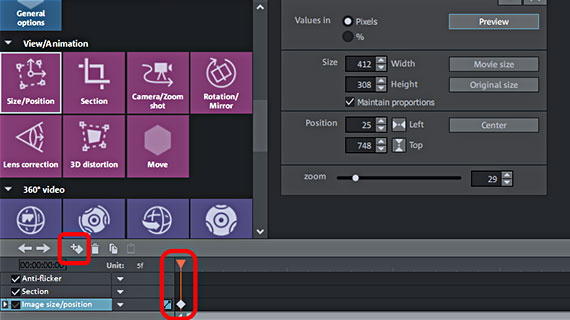
To animate your video overlay effect, use the keyframe animation tool below in the effect dialog "Size/Position". You may have to make this range visible first by dragging down the bottom border of the Media Pool.
Using the keyframe animation, you can create movements in the video image.
- Position the playback marker at the start of the animation and drag the video overlay to its starting position on the preview monitor.
- Open the keyframe animation tool and place an initial keyframe.
- Move the playback marker to the right a bit, then move the video overlay to the position where you want it to appear at this point in time. The program will automatically create the right keyframe as well as the movement of the picture.
If you play the sequence now, you should see the picture move from the first position to the second position.
The closer together you move the two keyframes, the faster the movement. You can adjust the keyframes, as well as the position of the image, at any time in the keyframe animation tool.
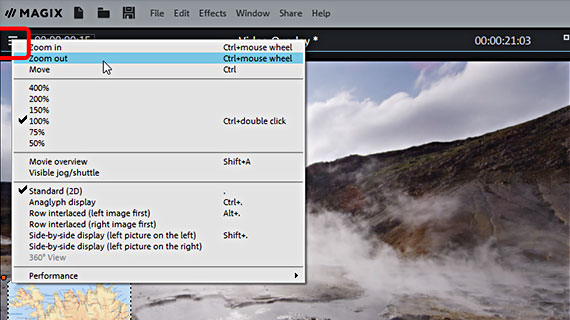
To have a video overlay fly into the image, you will need to move the starting position of the animation outside of the picture. First, you need to shrink the preview monitor until you can see the borders of the screen area.
- Hold Ctrl and scroll with the mouse wheel to shrink the preview monitor. If you don't have a mouse, just use the "zoom out" command in the preview monitor menu.
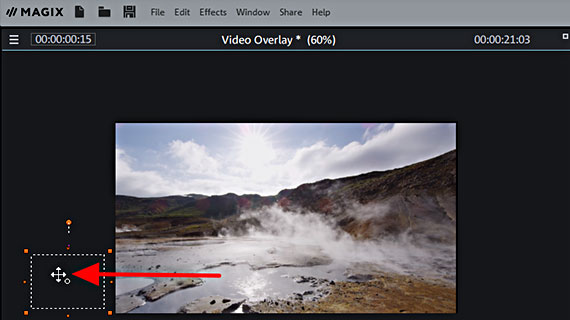
- Place the playback marker at the start of the video overlay and move the image out of the preview monitor onto the black border.
- Place a keyframe.
- Place the playback marker a little further to the right and move the video overlay image to the desired position in the image. The program will automatically set the right keyframe.
If you play the sequence now, you should see the video overlay fly in to its position from outside of the image.
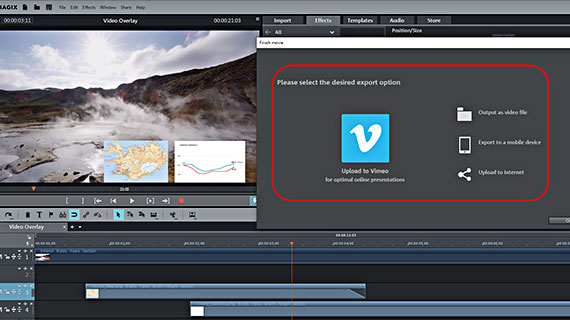
Finally, once you're satisfied with your video overlays, export the project with its background video and all its video overlays:
- To export a video file, go to "File" > "Export movie" and select an export format in the sub-menu, for example a "Quicktime Movie" (MOV) or "MPEG4" (MP4).
- To render the project directly to your smartphone, upload it to a social media platform or burn it onto a disc via the Options in the upper right-hand corner of the program. Here, you will see the interface for burning discs as well as the dialog "Finish movie".
- Import & export for all relevant formats
- Quick cut & detail cut
- Automatic wizards
- Up to 900 effects & music
- Intuitive templates for intros, outros, subtitles, transitions, opening credits and much more
- Burn videos to DVD & Blu-ray (and design your own menus)


