Create 360 degree videos
– here's how it's done.
Follow these steps to create 360 degree videos:
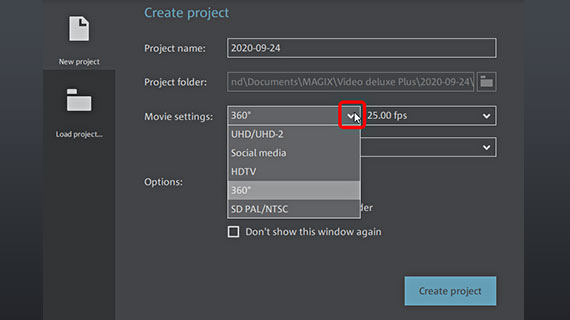
- Open Video deluxe Plus and create a new 360 degree project in the start dialog. The preview monitor will switch to 360 degree view.
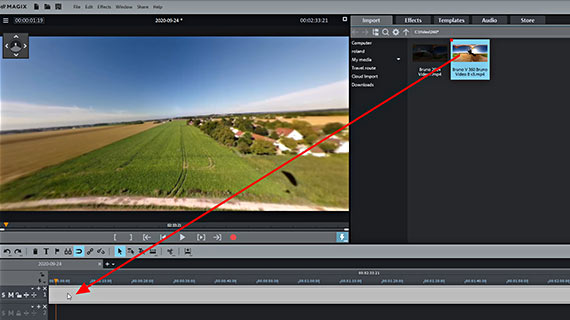
- Drag and drop your 360 video from the Media Pool into the project window.
- You can start and stop the immersive video by pressing the spacebar. Click on the video image in the preview monitor and drag it in any direction while holding down the mouse button.
- If the video clips don't seem to fit well together, open the effects in the Media Pool and activate the "360° stitching" effect. In the effect dialog you can see if your 360 degree camera model has appeared in the selection list. Use the slider in the dialog to combine the video clips in order to create a more homogeneous, undistorted video image.
- To cut, place the playback marker and press the "T" key. If you have any parts left over that you don't need, delete them from the project. Then, move the remaining sections together to close any gaps.
- To position a title or an overlay object in 360 degree space, create a title or load a overlay graphic from the Media Pool to a free track. Open the "360 degree editing" effect dialog in the Media Pool and activate the option for 360 degree editing. Move the direction of view until you reach the position where you want the title or overlay to appear. Click on the button "Orient to perspective".
- To make 360 view video, go to File > Export movie > Video as MPEG-4. Then, in the presets, choose a resolution for your 360 degree video production. /li>
- Exporting a specific viewing angle from your 360 degree video as a normal field of view video is also possible. To do this you create a new project without 360 degree properties in the file menu. Load your 360 video to this project and open the effect dialog "360 degree editing". You can now scrub through your material to pick the viewing angle you want. Your new video with the viewing angle you've chosen can be exported in all standard formats, transferred directly to smartphone, uploaded to a social media platform or burned to DVD or Blu-ray Disc. The options for this can be found in the top right corner of the program interface.
Edit 360 degree videos using Video deluxe Plus, the video editing software for downright amazing movies:
- 360 degree video import
- Stitching function for merging video clips
- Intuitive 360 degree video editing
- Insert 2D overlays and titles into 360 degree videos
- Helpful program wizards
- Export of entire files in 360 degree MP4 format
- Export section as normal field of view in all standard formats
- Upload online, burn function, and direct transfer to smartphone
Create and edit 360 degree videos on your PC – here's how!
360 degree videos offer a complete panoramic view. You can change the field of view at any time by clicking on the video image and dragging it in another direction with the mouse. This way, the viewer can look left, right, up, down, behind or in front within the immersive video.
In contrast to 360 degree photos, in 360 degree videos the viewer can sometimes miss events, because they're being displayed in a part of the 360 view video that the viewer is not currently looking at. But this is precisely what makes 360 view video so appealing. The viewer has full control and can decide what direction they want to look in. While the action is taking place all around, the perspective is not specified.
On the technical side of things, a combination of cameras is used to create the 360 degree panorama experience. Minimum requirements are two fisheye lenses, mounted back to back. Each of the cameras records an 180 degree or semicircle view, that are merged to create the 360 degree view. The distorted effect of the fisheye lenses can make the resulting 360 degree image look a little "artificial", however. A more realistic result can be achieved using six or more spherical cameras.
Whatever way you video 360 panorama footage, it will result in a number of video clips that can be combined to create a seamless immersive video experience. This processes is called "stitching". Spherical cameras often come with their own custom software for stitching video. But in many cases, you will need to stitch 360 video images from the video file yourself on your PC.
To do this you'll need a powerful video editing program that enables you to import, play and edit 360 video files, as well as stitch together individual video images and clips to make an immersive panorama video. In addition, the software should include a 360 video editing mode so that you can work with 360 degree videos directly in the video editor.
It should also offer the option for adding titles or overlay objects to the 360 panorama video so that the viewer can read text snippets in virtual space, or make fun discoveries while wearing the VR headset. Last but not least, 360 video editing software should allow you to export your immersive video as a normal video. Flexibility for combining the two modes – normal 2D view and 360 degree panorama view – is important.
The comprehensive video editing software Video deluxe Plus offers all the tools you need for this task. Using this software, you are perfectly equipped to create 360 videos as well as standard videos, add titles, music and effects to them and export them as 360 degree videos as well as in other formats. After you edit 360 video, you can easily transfer it to your smartphone, upload it to a social media platform or burn to disc.
Our step-by-step guide below will show you how to create and edit 360 degree videos on your PC with Video deluxe Plus. If you'd prefer to watch a tutorial that explains how to make and edit 360 view video, check out this video first:
Create 360 degree video with Video deluxe Plus
360 degree video project setup
To import a 360-degree video, first create a 360-degree project.
- Open Video deluxe Plus and in the drop-down menu "Movie settings", select the option "360°".
- In the drop-down menu, you can choose from three options for resolution for 360 degree videos. If you're not sure about which resolution to use, just click on "Create project".
- When you start the program you will will be asked whether you want to switch the video monitor to an interactive 360 degree display. Click yes.
- In the Media Pool, locate your 360 degree video file and then drag and drop it into the project.
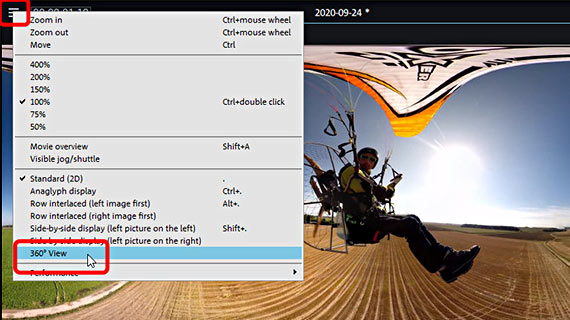
Only a section of the image material is shown in the 360° view. The normal view displays the entire video material. You can switch the 360° display on and off using the video monitor menu top left.
- To play or pause the project, press the spacebar. To set the playback marker, click in the timeline.
If the video clips have been stitched together correctly, you should see a normal video image in the activated 360 degree display. The visible section can be moved on the preview monitor using the mouse. If the video appears distorted, you'll need to stitch it first.
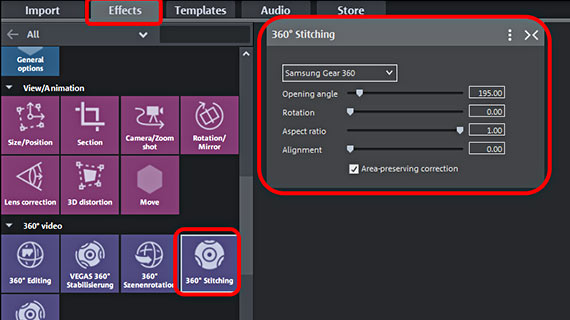
Stitch 360 degree video
360 degree cameras film using multiple lenses simultaneously in order to capture all perspectives. If you load data from a 360° camera, individual image sources must first be mixed. This process is called "stitching". Normally, the source material is already stitched, but if it isn't, you can also stitch 360 video manually.
- To do this, open the "360° stitching" tab in the Media Pool.
Here, you can combine images from the 360 degree video file to create an undistorted image that is not skewed.
- Next, check if there is a suitable preset for your 360 degree camera in the top dropdown menu of the stitching dialog.
- Using the sliders in the dialog, you can manually mix both images until you get a uniform image.
- Click on the image and change the angle by holding the mouse button to check the stitching results from a different perspective.
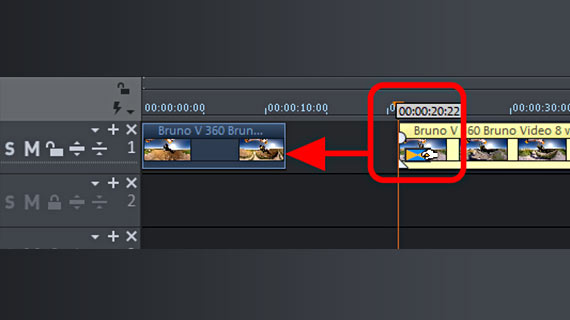
Edit 360 degree video
You can edit a 360 degree video just like any other in the Timeline.
- Place the playback marker at the beginning and end of the section and press the "T" key at both positions.
- Click on the cut passage and delete it from the track with the "Del" key.
- Switch to "Mouse mode for all tracks" and move the rear parts of the video forward to close the gap.
- For more precise editing, move the mouse pointer to the cut borders until it becomes the Cut symbol. You can now compress or stretch the borders.
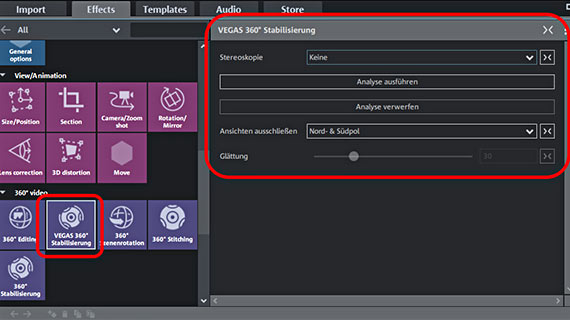
Stabilize 360 degree video
Distorted 360 degree videos can be straightened using video stabilization. However, the normal video stabilization tool cannot be used for immersive videos. The "360 degree video" effect folder includes a special video stabilization tool that can be used for 360 degree videos.
- Open the Effects tab in the Media Pool and click on the "VEGAS 360° Video Stabilization" tile, then activate the effect in the Media Pool on the right.
- Select a stereoscopic mode ("up - down" or "side by side") and click "Run analysis".
Play the 360 degree video to check how it turned out.
- You can use the "smoothness" slider to refine results.
- You can click "Undo analysis" to undo this action and run the analysis again using different settings.
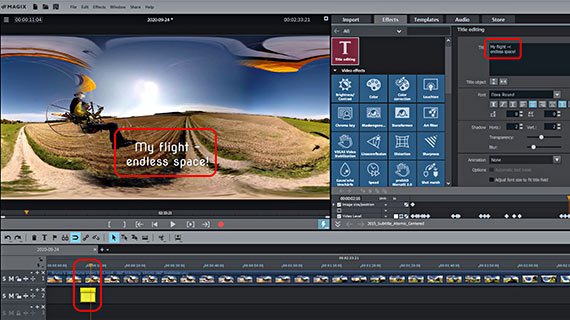
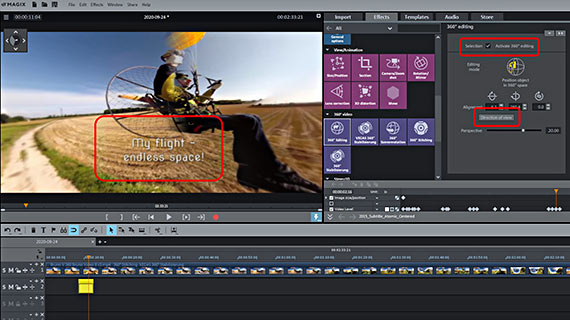
Add titles or overlay objects to 360 video
- To add a title to a specific position in a 360 view panorama, load a title template from the Templates tab in the Media Pool or click the title button in the toolbar above the first track.
For titles, the program automatically switches back to the normal 2D view.
- Write some text for your title and customize the text properties.
Unlike normal titles, 360° titles are not able to be seen in every field of view. We therefore recommend you create titles in larger font size so that they can be seen by viewers.
- Switch back to the 360 degree view using the menu in the preview monitor.
- Click the thumbnail and drag the direction of view to the position where you want the titles to appear.
- Open the "360 degree editing" dialog. Above in the dialog, activate 360 degree video editing and then click on the button "Orient to perspective".
The title should now appear in the viewer's current field of view. If you set another field of view it may either not be visible, or could appear skewed (e.g. at an angle from below or from the side). In this case the viewer has to move the image until they have reached the right view.
In other respects, titles are normal overlay objects which can be positioned in 360 degree space just like any other overlay objects. Here's how to apply overlay objects when you make 360 view video – for instance photos, directional arrows or symbols:
- Drag the overlay object (normally a cropped graphic) onto a track underneath the 360 video.
- Open the "360 degree editing" effect dialog and activate the option for 360 degree editing.
- Now drag the displayed section through the monitor until the image object appears where the title should be positioned.
- In the dialog, click on the button "Orient to perspective".
The object will now be placed at the selected position in 360 degree space.
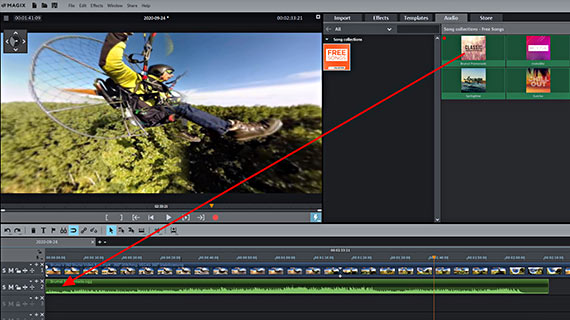
Add music or commentary to 360 degree video
360 degree video also contains an audio track that you can also edit – you can add your own recordings or music to your immersive video just like any other file.
- Drag the audio files that you want to use for the audio track to empty tracks underneath the immersive video and cut and position them here.
- To add a voice-over, connect a compatible microphone and then click on the red record button underneath the preview monitor. Select "Audio" from the selection dialog and start recording. The 360 degree video will be played back during recording, so that you can see directly what you're providing commentary for.
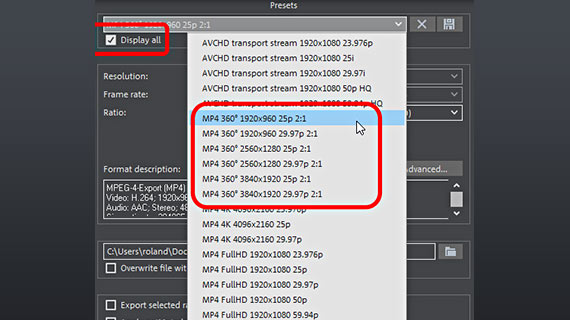
Export project as 360 degree video file
- To export 360 degree video, select the "Video as MPEG-4" option in the "File" menu.
- Activate the "Show all" option in the presets to view all the available export presets for 360 videos.
360 degree videos can contain a lot of image files and this can cause juddery playback on some smartphones. If in doubt, select a lower resolution.
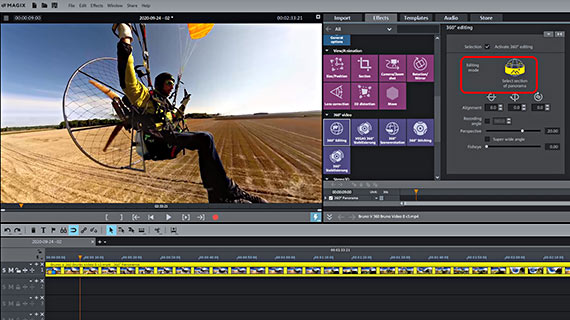
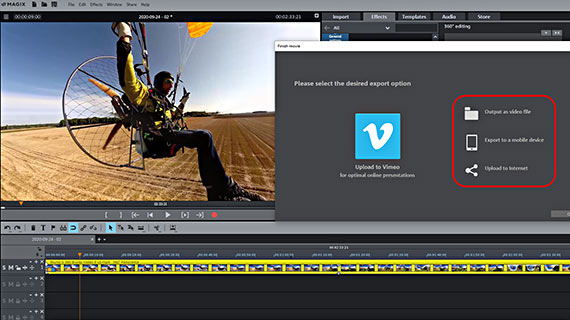
Export 360 degree video as a normal video
360 degree videos can also be used as normal videos. To use your immersive video in this way, choose the direction of view that you want to use.
- Via the File menu, create a new 2D project and then import a 360 degree video into this project.
- You will then be asked if you want to switch the video monitor from 360 degree display to standard display settings. Click yes.
Now that the display has switched, you will see the 360 video again in a distorted view that contains all of the image content. The editing mode will be displayed in the "360 degree editing" effect dialog as "Select section from panorama".
- Activate 360 degree video editing in order to select a section of the image.
- You can change the direction of view using the "Alignment" button.
The dialogs includes other parameters you can use to set the perspective more precisely. For example, you can move the viewer slightly backwards so more details from the image material are visible.
Using the keyframe animation, you can even program the observer's movements. This option is ideal if you want to video 360 panorama landscape recording with a simulated tracking shot.
- When you've finished editing, you can export the 360° film as a normal video via the File menu.
- To transfer the video with the perspective you've chosen directly to smartphone, upload it to a social media platform or burn it onto a disc, go to the Options tab in the upper right-hand corner of the program.
Here, you will see a separate interface for burning discs as well as the dialog "Finish movie".


