Creating animated videos with Video deluxe Plus
– here's how!
Want to add animations to your movies? Keep reading to learn how!
- Open Video deluxe Plus. Import the video files you want to use, as well as the graphic you want to animate. A range of animation graphics are also available for use under the "Templates" tab in the Media Pool.
- Under "Effects" in the Media Pool, select the effect "Size/Position". Position the playback marker at the start and place your first keyframe. In the preview monitor, resize the graphic and position it.
- Move the playback marker to the right a bit, then change the position of the graphic. The program will automatically set a new keyframe. The graphic's movement in between the keyframes will be calculated automatically.
- Repeat step 3 until the animation is finished.
- Lastly, export the animated video, burn it to disc or upload it directly to your Vimeo or YouTube account.
Create animated videos with Video deluxe Plus, the video editing program for ambitious movie makers:
- Simple drag-and-drop controls let you easily add and position animated graphics in videos
- Intuitively combine animations and your own videos right in the program preview monitor
- Use keyframes to animate the size and position of objects
- Create your own animated movies (e.g. with stop-motion)
Create your own animated videos
Animated videos are typically videos which use movement effects to animate graphics or video sequences. But the term animated video can also refer to intros and outros which contain moving text and graphics, as well as to stop-motion movies which bring still objects to life.
Hence, there are many ways to create animated videos. This step-by-step guide describes the most important methods in detail.
We'll start by explaining how to add graphics to video and how to make them move through the video picture. Then we'll show you how to create professional animated intros and outros. And last but not least, we'll take a look at the fine art of "true" animation and show you how to create your own stop-motion movies.
All of the animations in this guide are created using Video deluxe Plus, an affordable all-on-one video editing program which lets you create professional animated videos.
Video animation: Animate graphics
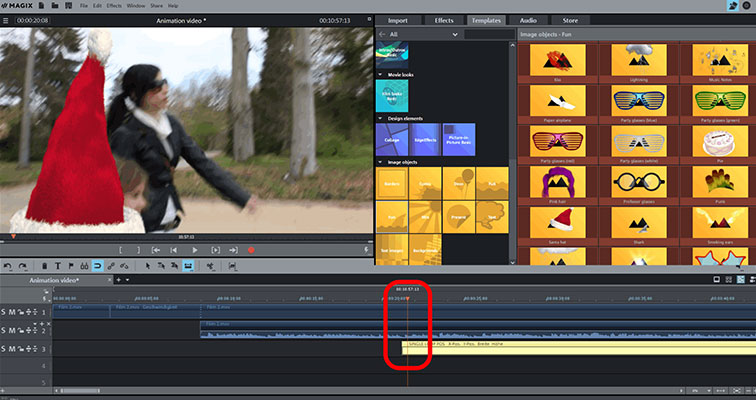
Step 1: Import video and graphic
- Open Video deluxe Plus and import your video into the program by opening the Import tab in the Media Pool and navigating to the folder containing your video. Then, drag and drop the video onto the uppermost track.
- Using the same method, import the graphic (e.g. here: the christmas hat) you want to animate onto an empty track.
You can also use one of the templates included with the program for this. To use a template, open the "Templates" tab and go to "Image Objects" > "Fun". To apply a template, simply drag it onto the video in the uppermost track.
The best graphics to use are ones which do not have a background or were exported with a transparent background (alpha channel). If you are using a graphic with a solid color background, you can make the background transparent yourself by going to the Effects tab, opening the effect "Chroma Key" and selecting the color you want to make transparent.
- If you don't want the animation to start right at the beginning, position the playback cursor where you want the animation to start and then move the graphic to the right until it's in the right position.
If you are using a template included with the program, the graphic will be automatically grouped with the video. To move the graphic, you first need to disable the group by clicking the corresponding icon in the toolbar.
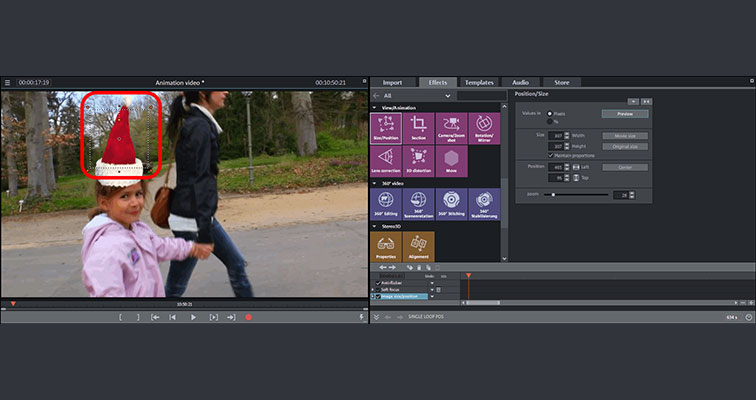
Step 2: Adjust the size and position
- Open the Effects tab and select the &Size/Position" tile under "View/Animation".
You can now resize and reposition the graphic however you want.
- Click on one of the handles in the preview monitor and drag with your mouse to change the size of the graphic.
- In the preview monitor, move the graphic to the position you want it to be in when the animation starts.
If you want the graphic to fly in from outside the picture, position it outside the preview image. To do this, start by making the preview image smaller so that you can see the work area. Place your mouse over the picture on the preview monitor, hold the Ctrl button and scroll with your mouse wheel. Now, move the graphic to the area beside the picture in the preview monitor so that you can add the fly-in animation in the next step.
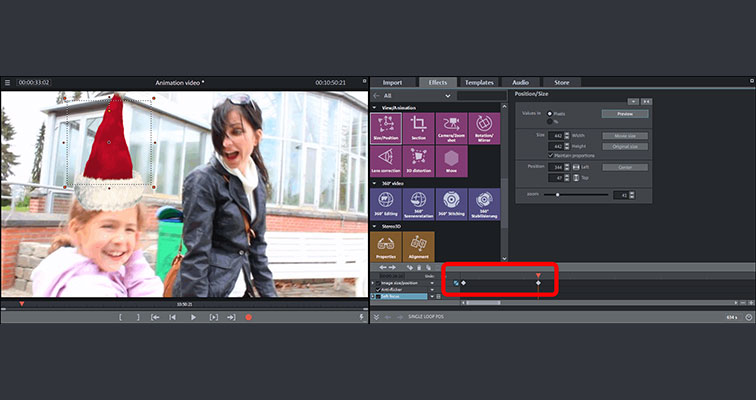
Step 3: Animate the object
- Open the keyframe animation at the bottom of the effect dialog and add an initial keyframe for the start position and size.
- Move the playback marker to the right a bit. When you do this, the video picture should change, since the playback cursor is at a position further along in the video. Reposition the image object. For example, if the object as at the edge of the picture, move it to the center. The program will automatically set a new keyframe when you do this. The program will also automatically calculate how to move the object from the first keyframe to the second. If you play the sequence now, you should see the object move from the first position to the second position in the picture.
- To continue animating the object, proceed through the rest of the video in the same manner, placing the playback marker further to the right and moving the image object. The keyframes for each new movement will be added automatically.
- Play the video sequence to see how it turned out. You can adjust the keyframes, as well as the size and position of the image, at any time to create exactly the animation route you want.
Tip: You can also automatically add animation routes by using the "Attach to picture position" option in the context menu (right-click the graphic). All necessary keyframes will be automatically added.
Video animation:
Use templates to create animated videos
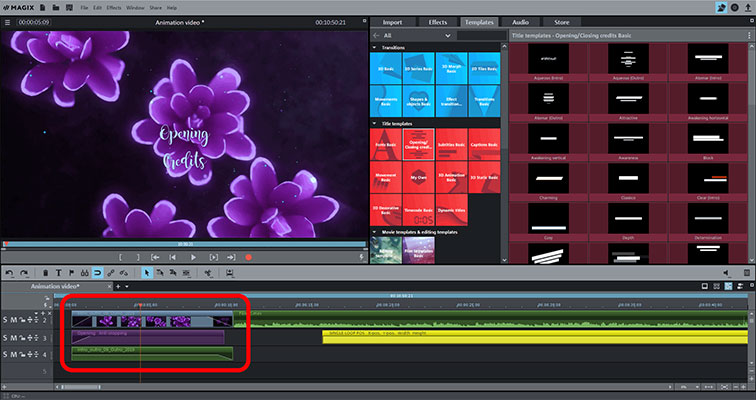
Animated intros and outros look great on nearly any video. Here, the titles are moved through the picture together with background graphics in an opening or closing credit sequence (normally from bottom to top). These kinds of animated videos are easy to make with Video deluxe:
- Open the "Templates" tab and click on the "Intro/Outro animations" tile. Each of the animations here can be previewed before being used.
- Once you've found a suitable intro/outro, position the playback marker where you want to insert the animation.
- Then, click the insert arrow on the template in the Media Pool. The template contents will be added at the position of the playback marker. Everything located to the right of the playback marker will be automatically moved further to the right to make room for the animation.
- Enter the text you want to use in your intro/outro and delete any placeholders you don't need.
Tip: Have a look under "Movie templates and editing templates". Here you'll find a range of templates which can also be used as intros, outros or stand-alone movie trailers. Simply replace the placeholders with your own material. The movie or editing templates will be added to your project as stand-alone movies.
Video animation:
Create your own stop-motion videos
Finally, we have the be-all and end-all of animation videos: the stop-motion movie. Here we'll show you how to make your own animation using the stop-motion method.
With stop motion, you can bring toys and other still objects to life and make them the protagonists in your own animation movie. All stop motion movies consist of a large number of individual photos. In between taking each photo, the objects or figures are moved slightly, so that the entire film plays in a smooth motion and gives the impression that the figures are moving by themselves. This is the same principle used in animation flip books.
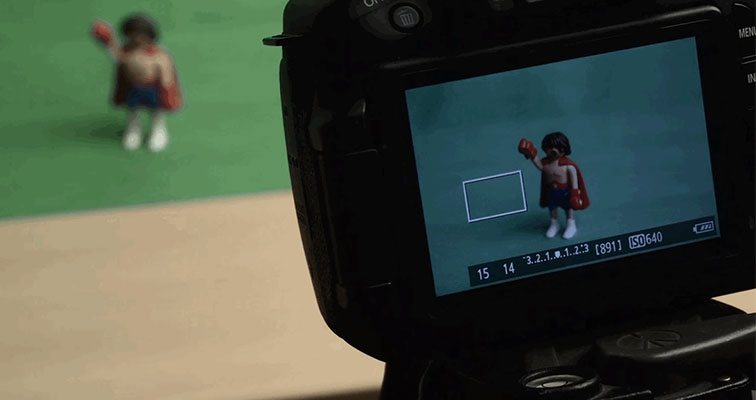
Step 1: Create a photo series
First of all, you'll need a character that you're going to animate. This could be a plastic figurine, a cuddly toy or a toy car or motorbike, for instance. For the background, you want to use a solid color which is not contained in the object your are trying to animate. A plain, monochromatic fabric is ideal for this. Usually, a plain green color is used – hence the name "green screen". This color will then be swapped out later on your computer for a different background.
You'll also need a camera, and ideally also a tripod. Set the camera close enough to the figurine so that it occupies most of the image while leaving enough room for the animation.
- Take the first photo.
- Move the figurine to the next position and take the next photo.
To create a fluid animation, plan for around 12 pictures for each second of your recording.
For static passages without action in your film, you don't need any intermediate frames.
In general, a stop motion animation movie doesn't require as many single frames per second as a real movie. You'll often notice that the movement of the animated figure is a bit jerky: that's what gives stop motion footage its charm.
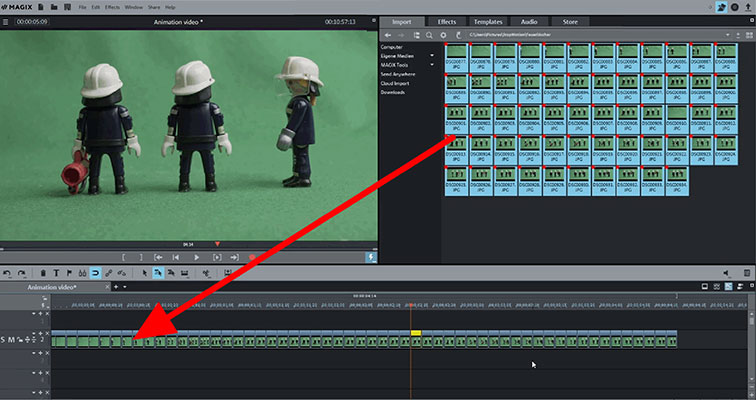
Step 2: Arrange your stop-motion movie
- Import all of the photos you want to use onto your computer, open Video deluxe and browse for the photos in the Media Pool.
- Holding down the shift key, select all the photos and drag them onto track 2 in the project window. The photos will be arranged one after the other on the track.
- If you would like to change the display time for the photos, right-click on a photo and select the option "Change photo length". Set the duration to "2 frames" and then click "Apply to all".
You should now see a fluid movement when you play the movie. Think about whether you want the animations to run without any stops, or whether you want them to pause so that you can display speech bubbles or other objects. Make adjustments to the display duration of the photos as needed.
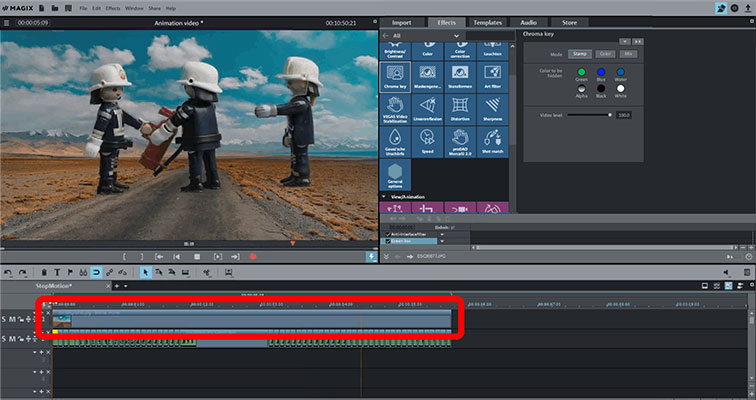
Step 3: Swap out the background
- Load the photo or video that you want to use as a background to the first track above the photo series. You can use any image or video as your background.
- Zoom the project view out so that you can see all the photos on track 2 and extend the background so that it covers the entire animation. To extend the background image to the correct length, simply drag the right edge of it.
You can't see the new background yet because track 1 is fully concealed by the photos on track 2. You can now use the chroma key effect to make the green color areas of the photos permeable so that the background on track 1 can show through in these areas.
- Select a photo and open the chroma key effect in the Media Pool. Select the Color setting and click the background area in the Preview Monitor to make it transparent. You can use the sliders to further adjust the effect until the foreground and background fit and are sharp.
- Apply the effect settings to all the other photos by clicking the arrow button at the top right of the dialog window and selecting the option "Apply video effects to all".
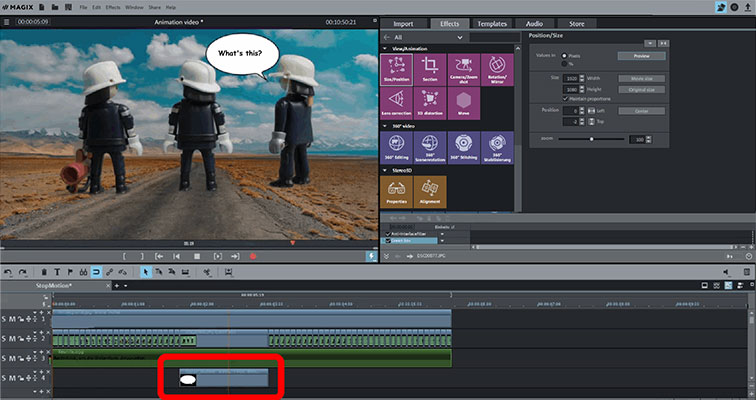
Create animated videos: Additional options
Your stop motion animation is now pretty much finished. You can continue to edit it, however, by adding other elements to your animated film. For example, you can add background music just like photos by dragging and dropping music from the "Import" tab onto an empty track (e.g. Track 3) and then dragging the edges to change the length of the music to match your video.
Or you can create speech bubbles. The templates for these are in the Media Pool. Add a speech bubble by dragging it into the project window, then adjust the text in the preview monitor. Move the speech bubble to the correct position using the "Size/Position" dialog in the Effects tab.
When your animation is finished, you can upload it directly to the Web or export it as a video file using the corresponding options in the "Finish movie" dialog window. Or you can burn it to DVD, AVCHD or Blu-ray Disc by switching to the "Burn" interface and selecting the appropriate disc type.
Video deluxe Plus: One of a kind – just like your movies.
- Smooth proxy editing in up to 4K quality
- Up to 1500 effects and music
- Automatic wizards
- Burn your movies to DVD, AVCHD or Blu-ray


