Color correction with Movie Studio Platinum
– here's how!
Want to optimize your videos with color correction? Keep reading to learn how!
- Open Movie Studio Platinum and import the video files you want to use.
- Open the "Effects" tab and select "Color correction". Use the color wheel to remove tint. Foreground and background can be colorized separately.
- To correct the brightness and contrast levels, select "Brightness/Contrast".
- To match the colors in videos from different sources, use the effect "Shot match".
- Lastly, export the corrected video as an MP4 or HEVC file, burn it to disc or upload it directly to your Vimeo, Facebook or YouTube account.
Color correction and brightness/contrast correction with Movie Studio Platinum, the video editing program for ambitious movie makers:
- Remove tint
- Creative color editing
- Colorize foreground and background separately
- Optimize brightness and contrast
- Match videos by color
Color correction or brightness/contrast correction?
Color correction is first and foremost the process of removing tint from a video, but it can also refer to other forms of color editing performed on the video picture. Brightness/contrast correction obviously refers to adjusting the brightness and contrast of the video picture.
These three parameters – color, brightness and contrast – all rely on each other. For this reason, it's best to perform color corrections and brightness/contrast corrections at the same time.
Below we'll show you step by step how to correct, optimize and even creatively edit your video footage using the color correction and brightness/contrast tools in Movie Studio Platinum. Lastly, we'll show you how you can edit other footage to match the look of your optimized video.
Video color correction and brightness/contrast correction
with Movie Studio Platinum
Step 1: Import video
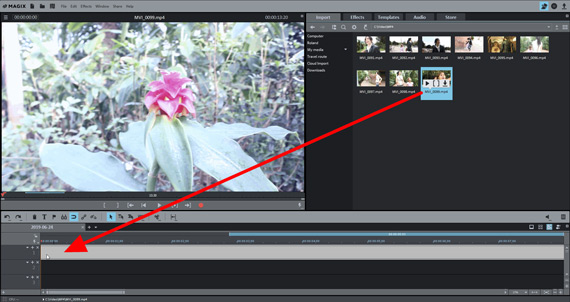
Open Movie Studio Platinum and import your video into the program
by opening the Import tab in the Media Pool and navigating to the folder containing your video. Then, simply drag and drop the video into the program.
Step 2: Open color correction
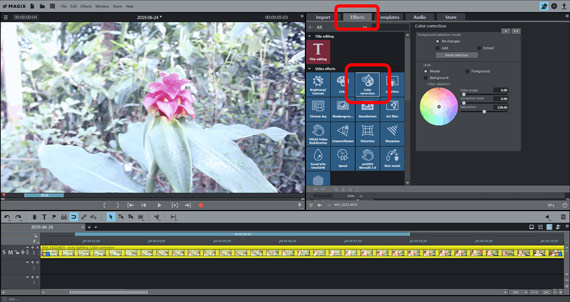
In the Media Pool to the right, open the Effects tab and click on the "Color correction" tile.
The "color correction" editor should now open to the right in the Media Pool. This editor contains everything you need to color correct your videos.
Brightness and contrast are adjusted using a different editor. We'll come to that later (step 4).
Step 3: Correct tint...
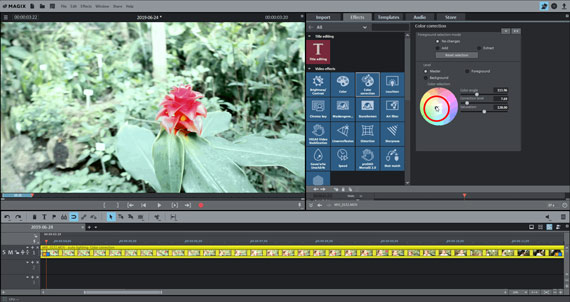
To balance out a specific tint, select the complementary color of the tint in the dialog.
In other words, click the center of the color wheel and drag the slider to the color area that is located on the opposite side of the wheel to the tint in the video picture. For blue tint, select yellow. For green, select violet.
Experiment a bit to achieve the best results. Drag the slider into the different areas of the color wheel to see how the picture color changes. Normally, you want to achieve a balanced picture with natural colors.

...or colorize the video picture...
Sometimes tint is exactly what you want when you're trying to achieve a specific visual aesthetic. In this case, you can use the color wheel to colorize the video picture however you want, using color correction not for optimization purposes, but for a creative effect.
...or colorize the foreground and background separately...
But that's not all you can do with the color correction tools in Movie Studio Platinum. You can also colorize the foreground and background separately to make specific objects in the picture stand out from each other.
Here's how:
- Under "Foreground selection mode", select "Add".
- Place your mouse over the preview image in the video monitor. The mouse cursor should change to a pipette.
- Click the areas of the image that you want to select as the foreground. Selected areas are marked with criss-cross lines. If you select too much, switch to "Extract" mode in the color correction dialog and click on the areas that you want to remove.
- Lastly, activate the "foreground" layer in the color correction dialog and change the color of the selected areas using the color wheel. To change the rest of the image, select the "background" layer.
Step 4: Brightness/contrast correction
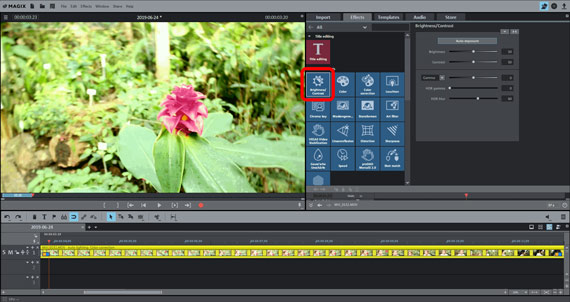
We generally recommend adjusting the brightness/contrast when performing color corrections. All three of these parameters – color, brightness and contrast – work together to define how the video picture looks.
Open the brightness/contrast dialog by clicking the "Brightness/Contrast" tile. This dialog contains two sliders which can be used to adjust the brightness and the contrast. There are also settings for "gamma", "HDR gamma" and "HDR blur".
- "Gamma" is subjective brightness, i.e. brightness as perceived by people. This is different from objective brightness, which deals with the ratio of bright to dark image areas. When you adjust the brightness, all of the pixels in the picture are made brighter or darker; when you adjust the gamma, the ratio is changed.
- "HDR", or "High Dynamic Range", refers to a particularly high range between the brightness and contrast values. This controller regulates how big the range is between the brightness and contrast values.
- "HDR blur" affects the transitions between bright and dark areas.
Rule of thumb: experimentation is the best way to find out what works best. Play around with the controls to see what kinds of results you get, and try to find the optimal settings for your footage.
Step 5: Match the colors of different videos
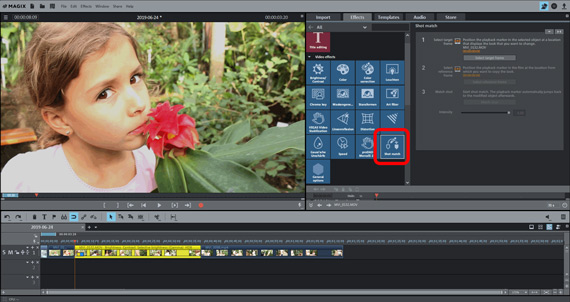
Once you have your video optimized in terms of color and brightness/contrast, you can use it as a template to colorize other videos:
- Load the videos you want to use into the timeline, one after the other.
- Select the target frame by clicking a part of the video that you want to modify.
- Select the reference frame by clicking on a part of the video which has already been optimized.
- Click "Match shot".
- Check the results. If the colors don't match, select different target and reference frames and repeat the shot match.
Step 6: Share the finished video
Once you're satisfied with the results of the color correction, you can use the video in a number of ways.
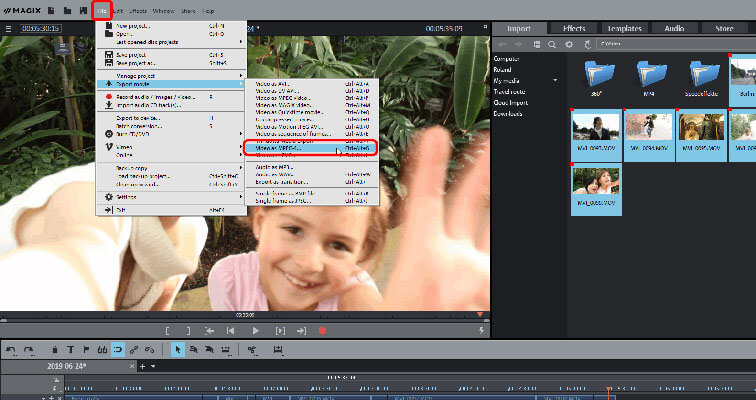
- Export as video file: If you need a file of the video, go the "File" > "Export movie" to export your footage in a range of formats, including MP4 and HEVC.
- Burn direct to disc: You can also burn your footage to DVD, AVCHD or Blu-ray Disc from right within the program. You can then play the burned disc and enjoy your color-corrected movie in the comfort of your own home.
- Upload to online platforms: Vimeo, Facebook and YouTube are directly connected to the program. A click of the mouse is all it takes to upload your color-corrected video to your account.
- Save project: Whatever you decide to do with your video, saving your Movie Studio project is a good idea. This way all of your settings in the "color correction", "brightness/contrast" and "shot match" dialogs will be retained so that you can use them or change them in the future.


