Slow motion video with Video deluxe Plus
– here's how it's done.
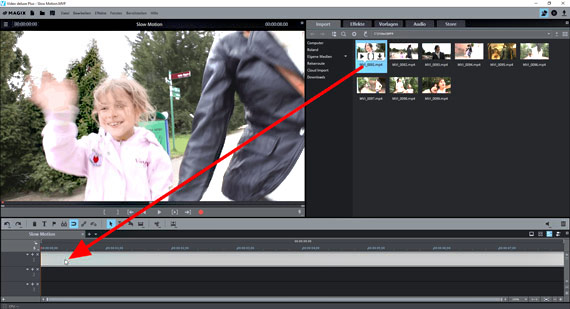
- Open Video deluxe Plus and import your video.
- Cut the scene that you want to slow down, if you're not using all of the footage to make a slow motion video. Place the play cursor at the beginning and end of the part you wish to remove and click on the cut button while at both positions.
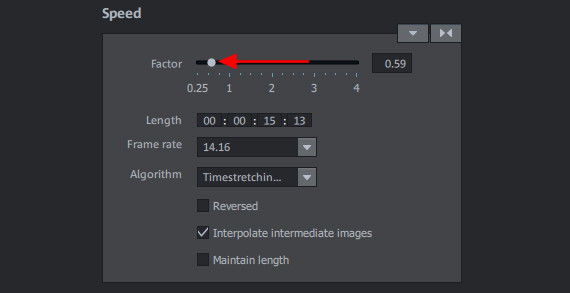
- Open the "Effects" tab and select the effect "Speed". To create a slow motion effect, move the slider to the left.
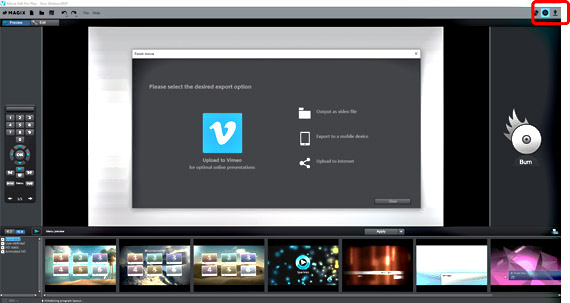
- Export the full video as an MP4 file (via the File menu) or upload it to YouTube or Vimeo (using the "Export"dialog). You can also burn your movie to DVD or Blu-ray Disc (via the burn interface).
Create slow motion with Video deluxe Plus, the video editing program for ambitious movie makers:
- Diverse editing functions
- Intuitive and seamless functions for creating slow motion
- Keyframe animation for transitions in speed and slow motion speed ramps
Video editing with slow motion
The slow motion effect is always used in videos when the film maker wants to slow down the action of a specific scene to place more emphasis on it. Commonly abbreviated as slow-mo or slo-mo, the slow motion effect is often used in a static way, meaning that there is no change in the playback speed of the slow motion sequence.
However, sometimes film makers actually slow down the beginning and then speed up the end of the slow motion scene to bring it back up to normal speed. This effect is called a "speed ramp". Speed ramps work especially well in action scenes, where they can be used to turn fast-paced visuals into a slow motion scene to focus on a crucial moment before allowing the action to continue at normal speed. This lets you take a particular moment from the action and emphasize it in an atmospheric and visual way that doesn't interrupt the flow of the movie.
Keep reading to learn step-by-step how to easily create the slow motion effect and also produce speed ramps for more dynamics in your film.
Slow motion videos – What you need
Since any film comprises a defined number of frames that are displayed within a certain time framework (frames per seconds or FPS), videos cannot be slowed down indefinitely without a visible loss of quality. At some stage motion sequences will begin to blur (known as motion blur), judder and become choppy.
Most videos play at 25 frames per second. The higher the amount of frames that appear per second in the source material, the better your slow motion video will be. If you want to slow down a video sequence using the slow motion effect, video material recorded higher than 25 frames per second is preferable. Recordings with 50-60 frames per second are standard, and enable smooth playback at half the original speed.
This means that during recording, more space is occupied per film minute on the recording medium. In the long run, this pays off, as you'll have more options for creating slow motion effects during the editing process.
Any camera can be used in Video deluxe to create the slow motion effect. 25 FPS video material can also be used. Intermediate frames can also be generated using a special tool to allow for smooth slow motion no matter the playback device. While this gives you the freedom to create slow-mo irrespective of the camera used or the video material, it's better if the camera can record an optimal frame rate.
Most cameras are designed to record at higher FPS rates than the 25 FPS necessary for normal playback speed. Many smartphones, including iPhones older than iPhone 6, can even record at 120 FPS. Action cameras record this way in any event, since they are specialized for the playback of action-packed footage in which the slow motion effect is often deployed. Compact cameras offer at least 60 FPS in HD quality.

Step 1: Import video
You can create a slow motion effect using a smartphone app too. The advantage of using a comprehensive video editor like Video deluxe is that it offers full control: Create and customize the slow motion effect in your film with absolute precision. Plus, you can access powerful editing functions for easily separating the scenes you want to slow down from others. Modifying your slow motion sequences after the fact is also much simpler in Video deluxe.
The first step is importing a video recording. To import your footage to Video deluxe, follow these steps:
- Open the program and create a new project via the Start dialog.
- In the upper right area in the Media Pool, go to the folder containing your videos and drag & drop all the files you want to use into the top track in the project window.

Step 2: Create the slow motion effect
The steps outlines how to create slow motion with the video editor Video deluxe – there are two stages.
First you need to cut the scene that you want to slow down. You don't need to do this if you want make the entire video slow motion, of course.
- Play your footage and find a scene to use for slow motion.
- Place the playback marker at the beginning of the scene and press the "T" key to cut the material at this position.
- Then place the playback marker at the end of the scene you're going to turn into a slow-mo sequence, and press the "T" key again.
You've now cut the scene that you want to slow down – so now you just have to create the slow motion effect. Here's how it's done:
- Click the scene that you want to apply the slow motion effect to.
- In the Media Pool, open the Effects tab and click on the Speed tile.
- In the effect dialog, move the speed factor slider to the left.
You can also type in the factor number yourself. If you're using 25 FPS video material, we recommend enabling the option "Interpolate intermediate images" to ensure that the video plays smoothly if the value drops below 0.75.
The slow motion effect will slow down the video. As a result, the video object will be extended to the right in the timeline. The adjacent objects on the track will be shifted to the right automatically: you don't need to do anything else.

Step 3: Export video
Following editing, there are three options available for customizing your slow motion video further:
- To create a single "proper" video file which contains all of your footage, go to File > Export movie. You'll see a list of available video formats in the submenu. There are a range of codec and format settings as well as presets available in the Export dialog.
- To upload the video directly to YouTube or Vimeo or to transfer to a connected portable device, open the Export dialog above right and select the option you need.
- You can also burn your video to DVD or Blu-ray Disc. To do this, open the burn interface, create a menu for your disc if necessary and then start the burn process.

Speed ramps for a dynamic slow motion effect
Video deluxe now offers even more options for making a slow motion video and creating other dynamic effects. Next, we'll show you how to create "speed ramps". Speed ramps are transitions in speed where the playback tempo of the video slows down or speeds up constantly, producing truly dynamic results.
- In Video deluxe, position the playback marker where you want the first speed ramp with dynamic slow motion effect to begin.
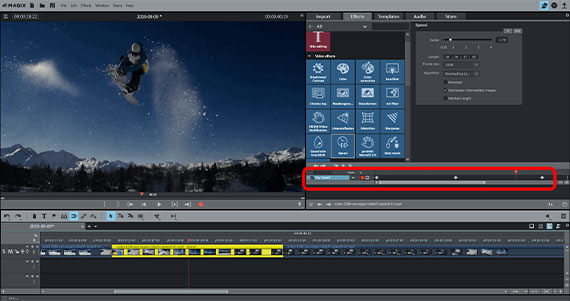
- Move the mouse pointer to the bottom edge of the effect dialog to until it turns into a double arrow. Hold down the mouse button and drag the keyframe animation below. Now click on the button to set a keyframe for the starting position.
- In the keyframe animation, move the playback marker to the right to the position where you want a static slow motion sequence to begin.
- Activate the slow motion effect in the dialog "Speed". The program will automatically set a new keyframe.
- Set the playback marker at the position where you want the slow motion scene to end and then add a third keyframe.
- Then, move the playback marker further back to where you want the movie to return to normal speed.
- Double-click the slider to move it to the neutral position (1.00). A fourth keyframe will be automatically set.
Now, when the video is played back, it will first slow down and then speed up again at the end of the slow motion sequence.


