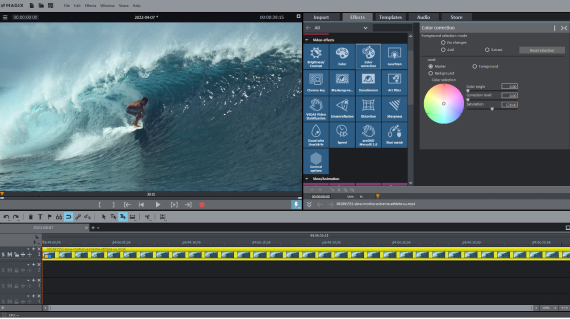
What is video compression?

Video compression is a process that reduces the file size of a video in order to save space or to stream it smoothly. Depending on their length and resolution, videos can grow to several gigabytes in size and take up a lot of space on a hard drive. They're also much too big to send by email or stream on a website. To carry out these tasks, the data within the video must be reduced in size – in other words, compressed.
Why do you need to compress videos?
An uncompressed video would produce an enormous amount of data. A one-minute long HD video with 1920 x 1080 resolution requires 10.5 GB of storage space, while a single uncompressed movie in HD quality would take up more than a terabyte of storage space. 4K videos require about four times more storage space, 8K eight times more.
Video files, such as those filmed with a camcorder, are almost always already compressed. But they're still far too large for streaming online, so they need to be compressed further beforehand.
You first need to load your files into video compression software and export them with the right file format and codec setting. But which file format and codec settings should you choose? And what's the difference between file format and codec, anyway? We explain all this and more below.

Does video compression reduce video quality?
The answer is yes, it can downgrade the quality of your video. However, there is usually no way around reducing the amount of details in your video, because lossless compression simply isn't very effective for videos. The good news is that modern codecs can limit this loss in quality.
The basic rule also applies to modern codecs: The more compression is required, i.e. the smaller you want the file size to be, the greater the effect on video quality.
Lossy vs. lossless
Lossless video codecs are available too – these preserve the original video in full quality. At first, this sounds good. But if you use these codecs, you'll also need significantly more storage space. The purpose of codecs is to reduce the required storage space to make it possible to stream your video, or use it in other ways. As a result, lossless codecs are rarely used for video, simply because they are too inefficient and produce files that are too large.
The situation is different in the audio sector, where the FLAC format (Free Lossless Audio Codec), as well other audio codecs, enable efficient compression without affecting the sound quality.
How video compression works
File format
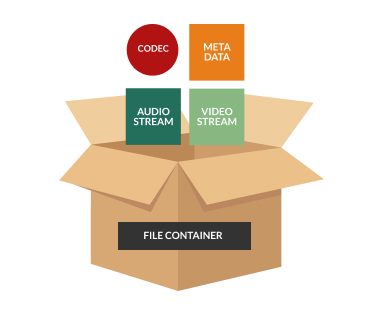
Anyone who edits videos using a computer has to work with different video formats – from older formats such as AVI and MPG or newer MP4 files to WMV, AVI, MOV, FLV, MKV and a thousand other file extensions. Every software or hardware manufacturer develops their own file format – that's why there are so many different video formats and file extensions available. Since most file formats use the same compression methods, however, there aren't a ton of technical differences. This reason for this is that while there are thousands of file formats, there are only a few compression methods.
Many of these file formats are known as containers, because they contain data that can be packaged in various ways. For example, an MP4 file can contain video data with the codecs H.265, H.264 or even MPEG-2 and even MPEG-1, as well as image data with the codecs JPG and PNG and audio with the codecs MPEG-4 Part 3, AAC, MP3, MP2 and MP1. This means that with container formats like MP4 or AVI, you don't know exactly what data is included.
Which file format should you choose? If you want to be able to play a compressed video file on many different devices, we recommend MP4 files with H.265 or H.264 for the video data and AAC or MP3 for the audio. This combination of file format and codecs ensures high video quality and a small file size, and it is currently supported by almost all hardware and software players.
Codec
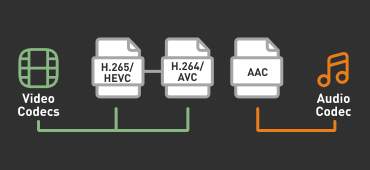
The codec provides the compression method used by the file. The codec is the "language" of the video, which contains the information used to combine bits and bytes into a video image. A major function of codecs is to save space, which is important for streaming. Some codecs offer low encoding and decoding bitrates to saves processor and battery power.
A codec can also be thought of as an engine that is used inside a compressed video file. Codecs mostly used these days for MP4, are the video codec H.265/HEVC or its predecessor H.264/AVC as well as the audio codec AAC for the audio data.
What parameters are important for video compression?
When compressing videos, you need a codec that enables you to compress your video as efficiently as possible. Codec usually come built into software, so to start the compression process, you import your video into your editing program and then choose a file format. After that, select a preset for the codec and the rest happens automatically.
More sophisticated programs such as Video deluxe also provide access to the values and settings for each codec. You can adjust codec settings manually to optimize your results. Your goal here should be to find the best possible compromise between file size and quality.
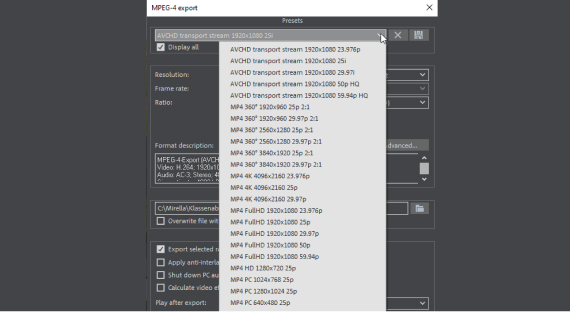
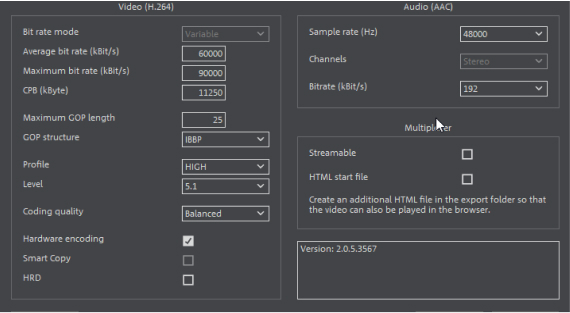
The following parameters are important if you want to set a codec manually:
Resolution
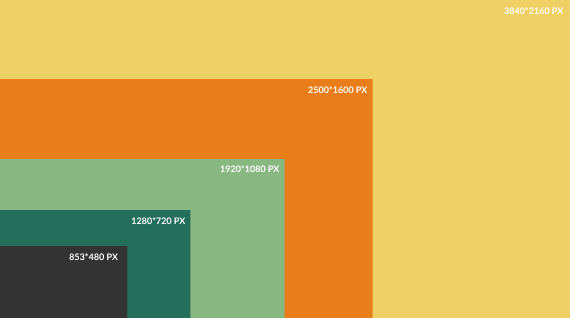
The resolution determines the size of the image. This sets the number of pixels that will be displayed. If you want to display the video on a large HD monitor, you need a higher resolution than the resolution required for a smaller smartphone display. Full HD resolution, for instance, contains 1920 x 1080 pixels, while Ultra HD has 3840 x 2160 pixels.
You need a much lower number of pixels to display video on a normal-sized monitor or even on a small smartphone display. Lowering resolution is the most effective way to reduce video file size. Consider whether the video needs to be shown in full-screen mode on a monitor. Maybe a smaller video is all that's needed?
frame rate
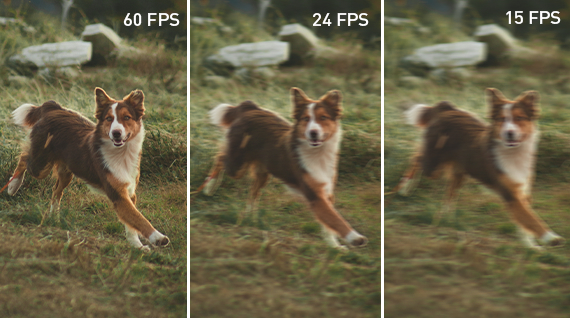
A video works just like a flipbook, by displaying many still images one after the other extremely quickly to create the impression of fluid movement. The frame rate defines the number of images displayed per second. In Europe, 25 frames per second are standard ("PAL").
However, many modern recording devices produce video files at a much higher frame rate, such as 60 frames per second (fps). That's a much higher rate than you actually need. But if you want to add slow motion during video editing, for instance, you'll be glad of this higher fps rate used for recording, since your video will appear smooth even if the playback speed is reduced by half. To keep the file as small as possible, you can adjust the high frame rate.
So if a video file created using a camcorder was filmed at over 25 fps, it's best to lower the fps value to 25 for the purposes of video compression. If you lower this value further, however, there's a risk that movement on screen will no longer look as smooth and your video might become choppy.
Bitrate vs. compression rate
Bitrate refers to the amount of information a video player or video editing program needs to process in order to play back a video. The more information available, the better the video image – but also the more processing power required for playback.
This means that reducing the bitrate compresses your video. The compression rate reflects the ratio between the original amount of data and the reduced amount of data. A low compression rate results in better image quality, but also requires more storage space. So a compression ratio of 1:8 indicates that the original video data has been reduced to 1/8.
But in terms of the quality of different compression methods, compression rate has limited significance. There may well be noticeable differences in image quality between two methods with the same compression rate. This is because some more modern compression methods work more effectively and provide better quality results than other, older ones.
Bitrate is expressed in bits per second (bit/s) Other bitrate units are kilobits per second (kbit/s, often abbreviated as "kbps"), where data transfer rate equals thousands of bits per second or megabits per second (mb/s), which means millions of bits per second. A higher bitrate usually means higher image quality, but also increased file size. Lower bitrates equal smaller file size – but the quality is reduced.
Which is better? It all depends on your needs. If you need the best possible image quality regardless of file size, higher bitrates are better. But if quality is less important than smooth playback – as is the case with streaming – then lower bitrates are better.
Let's take a closer look.
Bitrate vs. frame rate
These two terms look very similar, so let's explain how they're related. As already mentioned, the frame rate is the number of video frames displayed per second. Most countries in Europe broadcast at 25 frames per second as standard, while 30 fps is the norm for North America. The human eye perceives this rapid sequence of frames as a moving image.
Since the video plays through the frames so quickly, only a small part of each image changes, but not the entire image. Most areas in the video do not change every 1/25 of a second – the sky in the background remains the same, the colors and lighting conditions too. Only the position of the objects might change a little.
Compression makes note of these minimal changes from frame to frame. Instead of storing the entire frame, it stores only the changes that it has detected. Since it stores less information, it also ends up reducing the file size. This means that very large videos can be converted into much smaller videos.
Storing less information only affects the bitrate, not the frame rate. You can lower bitrate for static frames without noticeably losing quality, but more fast-paced action frames require higher bitrate because things are changing faster in the frame. In all cases, the frame rate remains the same at 25 fps (in Europe).


Variable bitrate vs. constant bitrate vs. adaptive bitrate
Modern video codecs can automatically detect which bitrate is best for a frame. They set the bitrate higher when there's a lot of motion onscreen, and reduce it for scenes with little or static movement.
This encoding process is called "variable bit rate" (VBR). It works by analyzing source material images first and then dynamically compressing them depending on the content. Footage of a news announcer in front of a stationary background can be scaled down without noticeable loss to a greater extent than action scene on a roller coaster at an amusement park, where there's a lot of motion within a short time. The codec algorithm analyzes changes in the frame and determines the optimal bitrate.
Variable bitrate codecs are particularly effective and produce the highest image quality at a relatively small file size. Even though they work automatically, they can also be operated manually. For instance, you can set the average as well as the maximum bitrate, which will affect file size.
A video codec can usually also be switched to "constant bitrate" (CBR) mode. In this case, it will work like the older codecs MPEG-1 or MPEG-2, by encoding all of the image material in a uniform process. The advantage here is that you can control exactly how big the file will be at the end of the process. With a variable bitrate, the file will vary in size depending on the video.
So if you have to keep to a specific limit for file size, you can use a constant bitrate. It's especially useful for compressing multiple videos. Using CBR makes it easier to gauge the size of your file. In most cases, however, variable bitrate is the better choice.
You may also have heard of "adaptive bitrate" (ABR). This is not a codec setting used for video compression. In fact, ABR is for improving the streaming experience.
When you stream a video, the video file is stored on the server and downloaded on demand. When the video is downloaded, the video player will play it in real time. A fast Internet connection means you can stream larger files without any dropouts.
However, Internet connection speeds vary significantly depending on the end user device and cables or lines. The time of day can also affects Internet speed, with network congestion an issue during peak usage hours. Adaptive bitrate streaming aims to compensate for these issues. It ensures that there are no interruptions when the data connection is slow and to guarantee the best possible video quality when the connection is faster.
For this purpose, the video is kept on standby on the server in different quality levels, i.e. with different bitrates. When the file plays, the version that is suitable for the currently available connection is always selected for ABR.
In short, the adaptive bitrate is used by the website where the video is available for streaming. The video is uploaded just once, at the highest possible level of quality. The website's tools then automatically convert the video to different versions in lower bitrates.

Tips for setting the right bitrate
It's best to use a modern codec that lets you use a variable bitrate. The file format MP4 is an example of a modern codec. You can more precisely define your options when using this format too. You can enter an average bitrate that forms an average value that the codec will keep to.
The bitrate values you should set depend on the individual video material – they're not generally applicable to all footage. That being said, we'd like to mention a useful rule of thumb here: If you lower the maximum bitrate from 24,000 to 6,000 kbps and the average bitrate from 19,000 to 3,800 kbps, you'll save a lot of data volume and (for a resolution of 1280 x 720 pixels) will usually achieve satisfactory results.
Often, you'll need to test things out first. In this case, it's a good idea to create a test project and export sample 10-second clip with different settings. Then, check out the results and project them to the total length to decide which codec setting to use for the complete video.
Audio compression
One more thing to remember: The audio track also plays a role if you want to reduce the video size, of course – even though file size for audio track is much smaller than that of video files.
If you choose an export format for your video, an audio codec will be set in addition to the video codec (for MP4 the audio codec is AAC). You can also change the preset values for audio codecs in the encoder settings. If you're making a music video, for instance, it's good to increase the bitrate from 128 kbps to 192 kbps to achieve better sound quality. This increases the file size too, but not by much.
What tools can you used for video compression?
To compress videos, you need the right PC program for the task. Through examples, we'll show you how to compress videos using Windows Video Editor, VLC media player and MAGIX Video deluxe, and what advantages these three different tools offer.
Windows Video Editor – the simplest solution
Windows 10 and higher Windows versions has a free built-in video editor tool that you can also use to easily compress your video files.
- Start Video Editor and create a new project.
- Above left, click on "Add" to load your video into the project library.
- Then drag & drop it to the storyboard below.
- You can now make some more video edits if you need to. For instance, you can select background music (top right), design a title card, or add text or motion effects (these can be accessed above the storyboard).
- To finish the video compression process, click above right on "Finish video". You can choose from three quality levels: high, medium and low. The video resolution is reduced if this compression method is used.
To sum things up: Of the three tools we look at here, Video Editor is the most limited in scope. But it can be useful for quick compression tasks – especially since it's already available within the operating system and doesn't have to be downloaded and installed.
VLC Player – the free tool for compressing video
VLC media player (often simply known as VLC) is a free tool that offers additional options for video compression.
- Type "VLC media player" into a search engine and download the latest version.
- Install and launch VLC.
- Open the conversion dialog via "Media" > "Convert/Save".
- Click on "Add" and load all the videos you want to compress into the file list.
- Then select a suitable video format under "Profile", e.g. "Video for Android HD".
- You can also click "Edit Selected Profile" (the wrench icon) to select a specific file format or codec.
To sum things up: VLC player allows users to manually set profiles, so it offers many more possibilities for effective video compression. The advantage of using VLC is that it is free of charge. The disadvantage is that aside from compression tasks, it's only suitable for playback and also that it doesn't offer any video editing or processing functions.
MAGIX Video deluxe – the all-around solution for video compression, editing and processing without quality loss
If you are willing to invest a little, video editing program Video deluxe offers a wide range of creative possibilities. Sometimes, compressing existing videos simply isn't enough. In most cases, you need to edit the videos beforehand, merge them with other footage and optimize image and sound quality. You might also want to add subtitles, background music or opening credits.
Video deluxe is a sophisticated video editor that enables you to work on videos without worrying about a loss in quality. For example, if you have imported and edited an AVCHD video, you can use the "AVCHD transport stream" option to export it in its original quality and including all your edits – without losing quality.
Video deluxe also functions as a powerful video compressor:
Batch conversion
To convert multiple videos in one go, open "File" and select "Batch conversion". It works very similarly to VLC media player, but includes several useful extras:
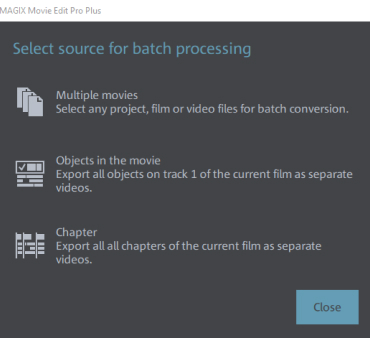
First, select whether you want to convert existing video files, or specific objects or chapters of the currently loaded film. Video deluxe is not just a video file conversion tool, but a sophisticated video editor too.
It enables you to cut your video files into as many objects as you want or even divide them into DVD chapters. Following this step, you have the option during batch processing to select and compress specific objects (i.e. scenes from your video) or movie chapters as separate videos.
- But if you just want to compress some existing video files in the same way as with VLC, click on "Multiple movies".
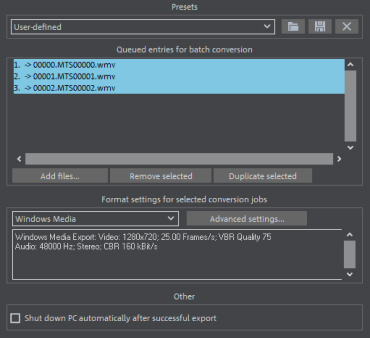
The next step is to choose a format to convert your video to.
- Load all the videos you want to compress into the list for conversion.
- Select a video format.
- If you also want to set the compression method manually, click on "Advanced settings".
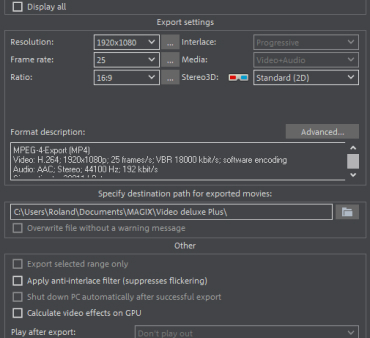
- In the "Advanced settings" you can first select from a preset list with a number of tried-and-true presets.
- Then, you can set specific video and audio codecs if required – with bitrate, frame rate, resolution and all other parameters.
- Close the "Advanced settings" by clicking on "OK" and finally, start converting the selected videos by clicking on "Start processing".
Download video compression software
One thing to keep in mind: The biggest advantage of using Video deluxe over free conversion tools is its extensive editing options – these will help you get the best out of any video file.
Simply load any video into the timeline before the compression process to remove unwanted scenes or image areas and optimize image and sound. To finish, you can export the edited video in a wide range of high-quality video formats via the menu "File" > "Export". Your exported video features the best possible compression results and all your edits, too.
