Adjust white balance manually for videos
– here's how!
Want to learn how to set white balance for a video after filming it? Keep reading to learn how!
- Open Video deluxe Plus and import the video files you want to use.
- In the Media Pool, open the "Effects" tab and click on the icon "Color".
- Activate the "White balance" option in the effect dialog and click on the pipette tool.
- Click with the pipette on the image area that is white in the original image. This balances colors for the image at the white point you have selected.
- You can then export the edited video as an MP4 file, burn it to disc or upload it directly to your Vimeo, Facebook or YouTube account.
Manual white balance with Video deluxe Plus, the video editing software for downright amazing movies:
- Import all conventional video, photo and graphics formats
- One-click white balance
- One-click levels (auto exposure)
- Color wheel for removing tint
- Optimize foreground and background separately
- Helpful program wizards
- Convert files to all essential formats, upload videos to the Internet, burn them to disc, and transfer them to your smartphone
White balance software for video
Start downloadSoftware for manual white balance
The brightness and color temperature of natural lighting conditions change constantly. The evening light brings a warm reddish glow, while the world looks completely different under a cloudy midday sky. The actual contrasts are even greater than it seems to the eye, because our vision balances out different in light. White areas appear white in the most diverse lighting conditions. When shown in photos or videos, these areas, as well as over colors, are clearly cast with color.
This is due to the color temperature of the light, which is measured on the Kelvin scale. Pure white light has a color temperature of 5500 Kelvin, which is the value of full sunlight at midday. In the evening time, the color temperature falls with the duller red spectrum. At 2000 Kelvin the white areas appear reddish. In areas of shade or in cloudy conditions, the value rises again up to 8000 Kelvin, creating a blue color cast.
A camera itself can't identify and balance out color temperature on its own: It's best to do a white balance correction first, before recording. To do this, you can point the camera at a white area such as a instance a sheet of paper and set white balance using the camera functions. White balance definition ensures that all other colors are defined, which means you avoid a color cast in your images.
But you can apply this kind of jpg white balance correction afterwards too. All you need to do is load your recordings – whether photos or videos – to your computer and use the right software to set white balance. Keep in mind, though, that custom balance that is applied after the fact isn't a panacea that will automatically fix each and every aspect of an image. Additional image correction using gamma and tonal values is usually recommended too.
For image correction, it's best to use a program that offers all the optimization functions you need for your images in addition to white balance. For instance, video editing software Video deluxe Plus offers all the tools you need to easily white balance your videos and photos manually after they have been shot. Plus, you have access to all the functions and tools necessary for optimizing your footage or images, for instance high-quality color levels, HDR Gamma correction, red eye correction and tons more.
The step-by-step guide below outlines how to set custom white balance manually for your video using Video deluxe Plus.
Set white balance manually using Video deluxe Plus
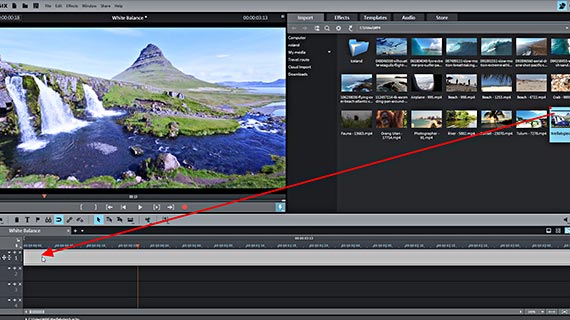
Import video for white balance
- In the start dialog in Video deluxe Plus, open up a new project.
- Drag & drop the video into the top track. You can also load multiple videos in sequence to manually white balance all recordings.
- Press the spacebar to play back the video.
During playback a red playback marker will move across the project window to display the current position. The playback marker can be moved to any position by clicking the timeline.
- Click the text object in the track to select it. If working with several videos, click on the first video.
You can now edit the video and apply white balance.
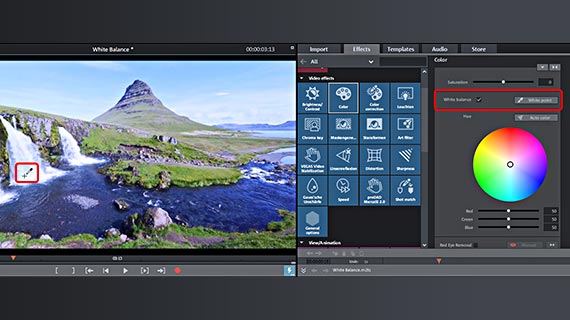
Set white balance
You can access white balance settings via the "Color" effect dialog.
Adjusting it is not always straightforward. With landscape images, finding white areas within the image can be tricky. You might be able to use a cloud, or a white stripe on clothing. Without any white in the image, you can't set white balance. If this is the case, the color cast can only be fixed manually (see below).
An info dialog now appears and explains how to define the white point in the image. Click OK to close the dialog. The mouse cursor should now change to a pipette.
The manual white balance will now be performed and all colors will be recalculated. Additional info about white balance will now appear on the video object with the name of the video file.
- If you see part of the image that should be white, place the playback marker on it.
- Above in the Media Pool, open the Effects section for Video deluxe Plus.
- Click on the "Color" icon to open the color editing dialog.
- Activate the "White balance" option in the effect dialog.
- Click on the symbol for the pipette tool and on "White point".
- In the preview monitor, click on the white part.
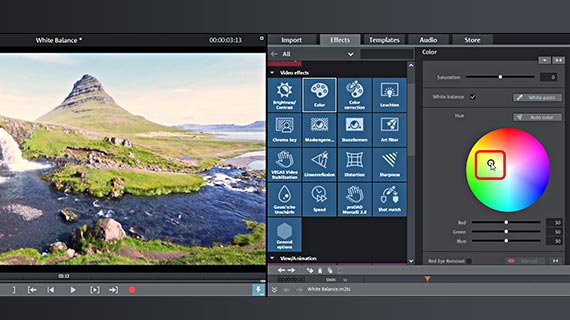
Customize white balance manually
Pure white occurs rarely in videos or photos. This means that the white point you have chosen might not actually enable you to set white balance correctly. The color cast will be optimized, but it will still be visible. You can modify image colors if this happens.
- To balance out the tint, select the complementary color of the tint in the dialog.
In other words, click the center of the color wheel and drag the slider to the color area that is located on the opposite side of the wheel to the tint in the video picture. For red tint, select pale blue. For blue, select yellow red.
Experiment a bit to achieve the best results. Drag the slider into the different areas of the color wheel to see how the picture color changes.
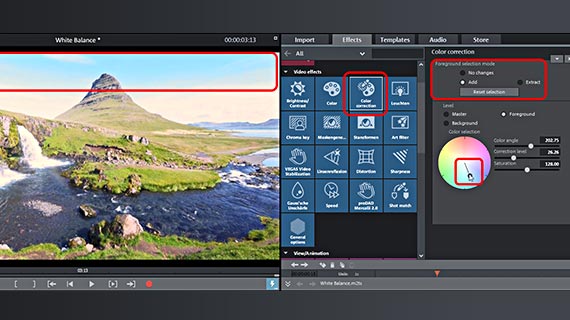
Fix foreground and background separately
You can also adjust colors for the foreground and background separately:
- Switch to the effect for color correction.
- Under "Foreground selection mode", select "Add".
- Place your mouse over the preview image in the video monitor. The mouse cursor should change to a pipette.
- Click on the range that you want to select as the foreground.
Selected areas are marked with criss-cross lines. If you select too much, switch to "Extract" mode in the color correction dialog and click on the areas that you want to remove.
- Activate the "foreground" layer in the color correction dialog and modify the color of the selected areas using the color picker.
- To change the rest of the image, select the "background" layer.
Correct tonal value
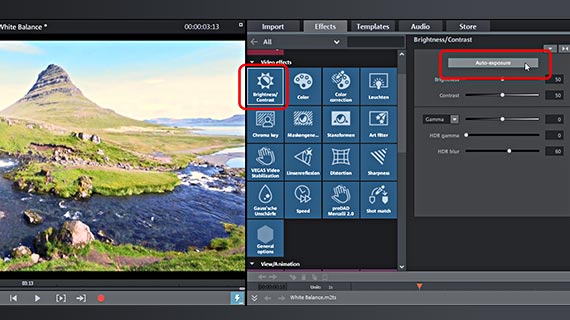
We generally recommend adjusting levels in addition to white balance settings and color editing. The parameters for color, brightness and contrast work together to define how the video picture looks.
- Open the dialog for correcting brightness/contrast levels by clicking the "Brightness/Contrast" tile.
- Click the "Auto-exposure" button for an automatic 1-click optimization.
To manually adjust auto exposure, use the range of sliders.
- "Gamma" is subjective brightness, i.e. brightness as perceived by people. When you adjust the brightness, only all of the pixels in the picture are made brighter or darker; when you adjust the gamma, the ratio is changed.
- "HDR", or "High Dynamic Range", refers to a particularly high range between the brightness and contrast values. This controller regulates how big the range is between the brightness and contrast values.
- "HDR blur" affects the transitions between bright and dark areas.
Rule of thumb: experimentation is the best way to find out what works best. Play around with the controls to see what kinds of results you get, and try to find the optimal settings for your footage.
Transfer white balance settings to another video
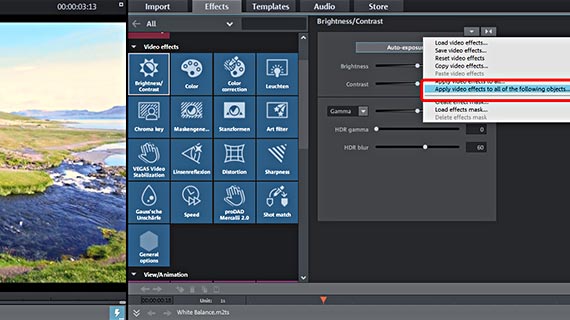
If you have imported multiple videos, you can apply white balance as well as any other effect settings to the other videos too.
- Click in an effect dialog on the button with the downward pointing arrow (this appears top right in the dialog).
- Select "Apply video effects to all of the following objects..."
Export videos with white balance
To finish, export your videos with custom white balance:
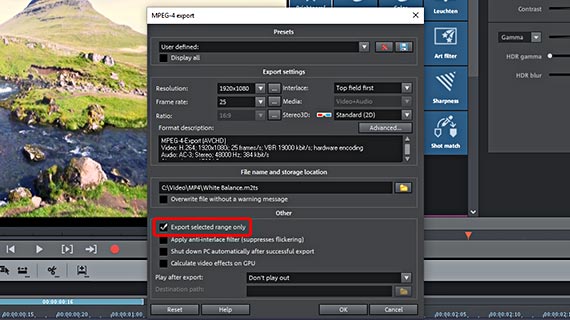
- To export a video file, go to "File" > "Export movie" and select an export format in the sub-menu, for example a "Quicktime Movie" (MOV) or "MPEG4" (MP4).
You can either create a video file that contains all material from the project window, or export the imported videos or selected video sections separately. To do the latter, first set a range by clicking left and right mouse buttons in the range bar above the first track and then in the export dialog, activate "Only export selected range".
- To render the project with all included videos directly to your smartphone, upload it to a social media platform or burn it onto a disc via the Options in the upper right-hand corner of the program.
Here, you will see the interface for burning discs as well as the dialog "Finish movie".
How to set white balance manually using Video deluxe Plus:
- Import & export for all relevant formats
- Quick cut & detail cut
- Automatic wizards
- Up to 900 effects & music
- Intuitive templates for intros, outros, subtitles, transitions, opening credits and much more
- Burn videos to DVD & Blu-ray (and design your own menus)
White balance software for video
Start download


