
Merging Music Recordings
Would you like to join mp3 files of your music and/or other audio files together? This is how it works:
- Download the free version of Music Maker, install the program, and start a new project.
- Open the file manager by clicking on the icon in the toolbar, go to the folder containing your audio files and drag and drop the audio files you want to cut together into the arranger.
- Drag the first audio file to the beginning of the topmost track and the second one to the track below. Arrange the second audio file so that its beginning is at the end of the first.
- Play back the audio files by pressing the spacebar. Press it a second time to stop playback. To move the playback marker, click in the timeline. The yellow bar above the timeline will be played. You can freely adjust it using the mouse.
- To create a crossfade mixing the two recordings into each other, click on the first audio file and drag the crossfade handle at the right edge of the object slightly inward. This will create a fade-out. Then, click on the following audio file and drag the crossfade handle at the beginning of the object slightly inward. Now, the first audio file will fade out smoothly, while the one behind it simultaneously fades in.This will create a crossfade, like in a DJ's mix, which can now be adjusted more precisely by moving the audio files and changing the length of the crossfades until everything fits perfectly.
- To remove an undesired passage, place the playback marker where this passage begins and press the T key. This places a cut at that point and creates two, separate objects. Trim the end of the section too and then delete the cut middle passage from the track by pressing the Del key. Adjust the cuts as necessary by dragging their edges inward or outward. You can trim any other remaining audio in the passage this way, or restore sections that were accidentally deleted. Close the gap created by the cuts you've made by moving both audio objects together on the track.
- To finish, export your project as a WAV file or OGG file in the "File" menu. Here, you can specify whether only the current playback range or all the objects included should be exported. The exported audio file will sound exactly the same as the project when played back in Music Maker.
Using Music & Audio to Create Playlists – or –
How to Cut and Merge Two Audio Files to Make a Single Recording
If you want to throw a party, you'll need music, and to make sure everyone wants to join in the fun, you'll have to join audio files to create an "auto DJ" with automatic playlists. That's why it would be wise to plan everything carefully in advance. For example, intros and outros should be cut, extra long songs have to be shortened and tracks have to be seamlessly mixed into each other in a natural sounding way.
The appropriate editing software is also necessary to mix different sources of audio into a single recording or to cut several versions in succession to make an "extended version". Often recordings are inconsistent in sound and volume, in which case they have to be balanced with the right equalizer or compressor settings and mastered with a mixing console to create a transparent, homogeneous final mix.
So editing music together entails more than just pasting audio files together. Free tools on the Internet may quickly reach their limit. Our recommendation: Use Music Maker instead. The basic version of this established audio software is available for free and, in addition to professional editing features, offers high-quality audio effects and a virtual mixer that lets you combine your music and mp3s together any way you want and balance each audio file in the mix perfectly. Another advantage is that the workflow is simple and intuitive, you get started right away and save on training time
Furthermore, you can get creative and explore the endless possibilities for music production. For example, simply drag and drop the provided sound loops to create your own songs, or play and record VST instruments directly using your computer's keyboard.
Music Maker is a modular system that you can use for free or upgrade into a complete virtual recording studio for your PC. This article provides a step-by-step guide for how to use it to edit your music and other audio files on your PC and turn them into perfect playlists or podcasts.
First, download Music Maker Free – the free program version of Music Maker – and double-click the installation file to install the program. Then, start the program and open a new, empty project from the start dialog. Now, you can get started.
Cut and Merge Audio Files – Step-by-step

Basic functions for cutting and merging music and audio
To load your songs or an audio file into a project, do the following:
- Open the file manager by clicking on the file manager icon in the toolbar. The file manager will open in the area to the right of the track window.
- Go to the folder with the audio files.
- Drag & drop the files you want to edit together onto the desired tracks.
Move each audio file to a separate track and arrange all the audio files one after the other so that they play in the correct order.

The easiest way to play and pause playback is by pressing the spacebar. During the playback, the playback marker moves across the tracks from left to right to show the position that is being played back. You can move it to a different position in the timeline with the mouse at any time, as well as during playback. This allows you to quickly jump to different position.
The range that is marked by the yellow bar above the tracks will be played. You can adjust this bar by enlarging, reducing, or moving it as you wish with the mouse.
The timeline's units are currently displayed in beats and bars. This setting is important for music production, however standard units of time are more useful for editing songs together into playlists.
- Right-click in the timeline and select "Display milliseconds".
Now, you can see how long the audio files are on the tracks.

When mixing music, the most important detail is the transitions: One song should fade into another as seamlessly as possible. When working with several songs, this can quickly become a bit complex. If this is the case, then it's necessary to zoom in on the individual position that you're currently working on.
There are several options for zooming:
- You can zoom in horizontally and vertically using the buttons in the lower right corner of the track range.
- The scroll bars can be moved together or dragged apart for zooming. Move the mouse to the edge of the scroll bar until it turns into a double arrow. You can now hold down the mouse button to move the bars together and zoom in to the display.
- Zooming is even easier if you're using a mouse with a mouse wheel. Just hold the Ctrl key and the shift key while using the mouse scroll wheel to zoom. This will zoom the display at the position of the playback marker.

Cutting and merging music and audio – the transitions
At this point, it's necessary to edit the objects on the tracks in such a way that an unobtrusive, seamless transition is created.
- Move the objects on the track so that the end of the first object and the beginning of the second object slightly overlap each other.
- Zoom in on this area so that you can see the transition in detail.
The transition's length depends largely on the media and your expectations. For dance music, it will often take up to 5 seconds for the preceding song to completely fade out.
- You can use the fade handles to create a smoother transition. You will find them on the edges. Drag the front object's fade handle slightly to the left and that of the trailing object to the right. This will fade the first song out while the second fades in.
- Play the transition and listen to the result. If it isn't quite right yet, move the objects around on the tracks and adjust the fade handles until you hear the desired result.

Cutting within an audio file
Sometimes you need to delete a section from an audio recording because it contains noise, or because you need to make the recording shorter. Music Maker lets you cut a recording easily and precisely.
- Simply place the playback marker at the beginning of the passage you want to cut.
- Zoom in to see the passage in the waveform better.
Loud noises can be identified by the high peaks visible in the waveform. A passage of silence appears flat.
- When the point is clearly visible, place the playback marker on this position.
- Press the T key.
This will split the audio object into two independent objects.
- Now zoom out a little until you see the end of the passage you want to cut.
- Move the playback marker there, zoom back in a little and place the playback marker as precisely as possible at the point where you want to trim the end of the audio passage.
- Press the T key again.
You have now cut out the passage at the front and back.
- Zoom in so that you can see all three sections – the beginning of the audio object, the middle part and the part at the end.
- Click on the middle passage to select it and then delete it from the track with the Del key.

There are now only two audio objects in the track with a gap in between. Next, examine the borders of the cut. Did you make a clean cut at the correct position? If not, you can drag accidentally removed material back out of the object or trim the rest of the audio file retroactively:
- Move the mouse to the cut edge of the object on the left until it turns into a double arrow.
- Click and drag the section you cut out a little. Or conversely, if you have cut away too little, drag the object edge to the left until the passage is completely trimmed away.

If the recording crackles or pops at the beginning or end of a clip during playback, you can fade out the audio to remove the crackling noise:
- Move the mouse pointer to the right-hand corner of the audio object, click and drag the upper fade handle a little inward.
Repeat these steps for the start of the clip on the right too until the cut sounds clean as well.

- Move the two cut audio objects together to close the gap in the track.
The crackling section can now no longer be heard during playback and the front object fades seamlessly into the one on the right.

Cutting and merging music and audio – sound optimization
After you're done with cutting your audio, consider whether you need to edit the sound, since several objects edited together frequently can sound quite different.
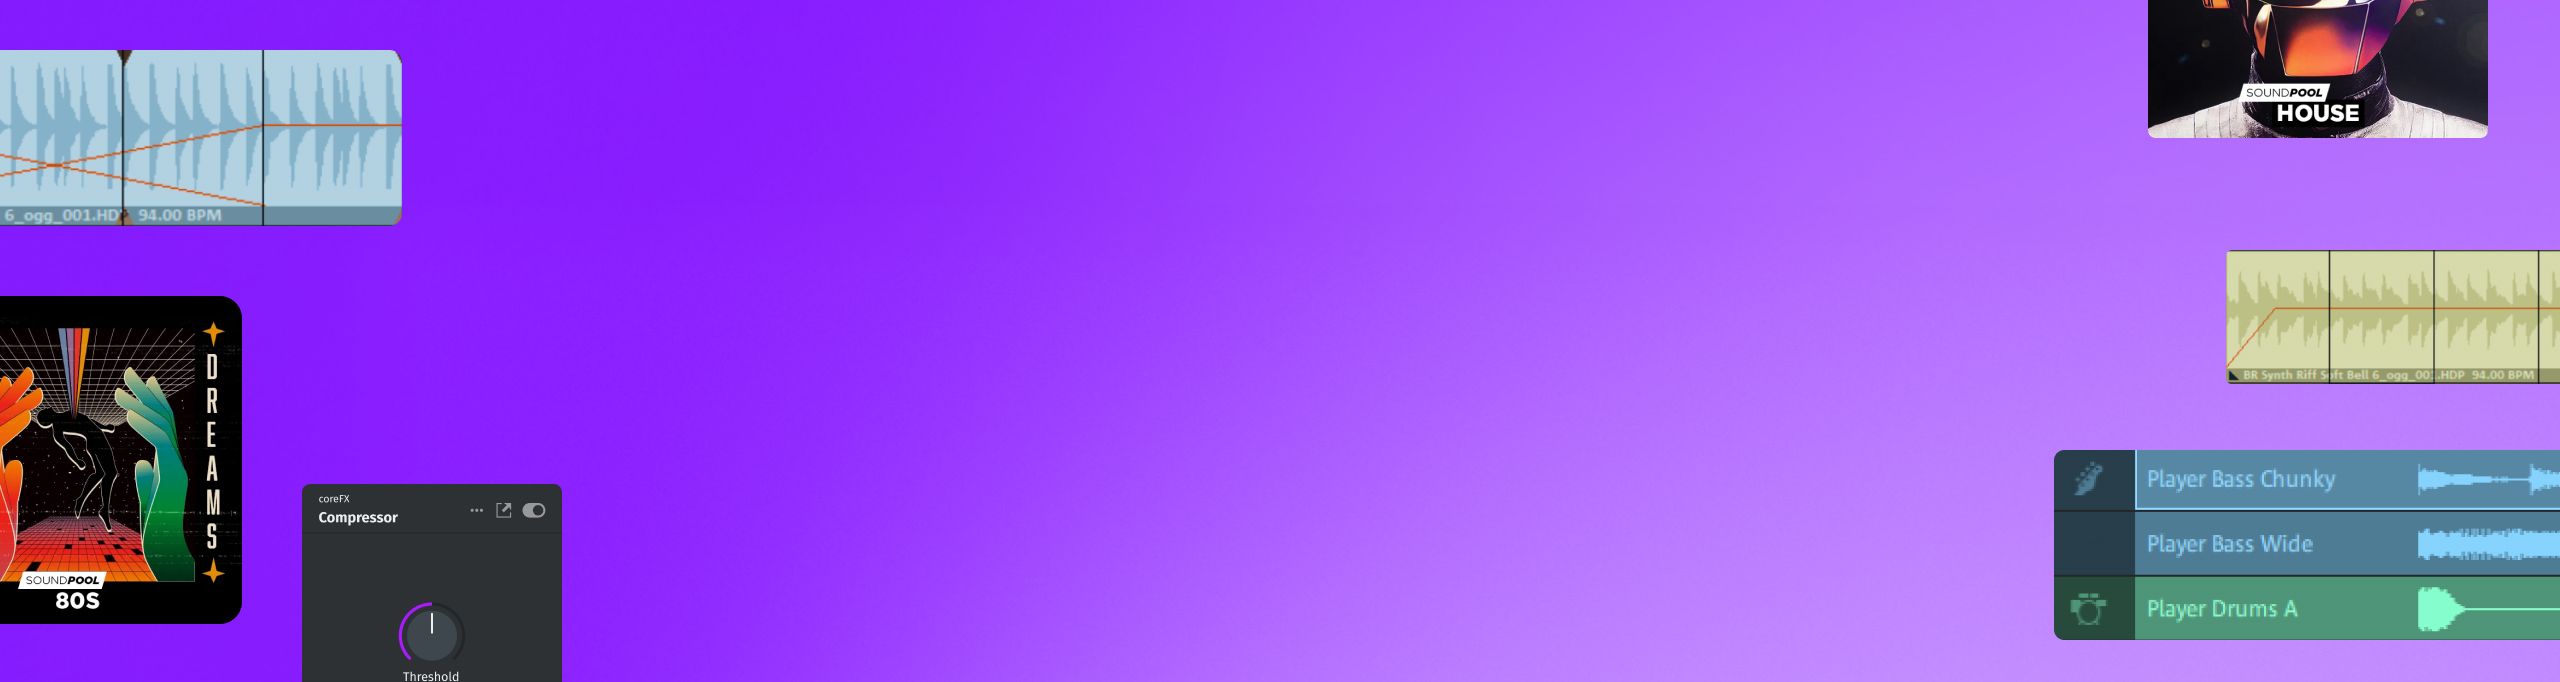
To do this, apply the effects available in Music Maker. Effects can be applied at three levels: To individual objects, to complete tracks and to the master mix.
- Click on the FX button in the toolbar, which will open the "Object effects" at the bottom of the interface.
Here, the compressor, equalizer, reverb and echo are available for use. Additional effect modules can be purchased from the Store.

- Open the mixer by clicking on the mixer button or simply pressing the M key.
Here, you can find a volume control and a pan control available for each track. The track effects can be accessed by pressing the FX buttons on top of the channels.
On the right in the mixer, you'll find the mastering section for controlling the overall sound. The master effects (in addition to the object and track effects) are used for editing the overall sound.

Cutting and merging music and audio – exporting
Finally, export your edited audio files, for example as a WAV file or in the compressed format OGG.
- Select "File" > "Export". You can find all common audio formats in the submenu. The WAV, WMA and OGG formats are available for free and unlimited use.
- If you only want to export a specific section within a large arrangement, activate the option "Only export the area between the start and end markers" in the export dialog. Beforehand, make sure that the yellow playback bar is highlighted directly above the passage.
During export, all tracks in the arranger are mixed down together with all effects and mixer settings into one "proper" audio file. The final result will sound exactly the same as when played back in Music Maker.

Music Maker: Add-ons for the program
Now you've learned about the essential functions for cutting and combining music and other audio files. But there's much more to discover in Music Maker. The basic version, Music Maker Free, can be expanded with additional content from the Store, which can be accessed from directly within the program.
As well as many additional Soundpools and VST instruments, you'll also find a wide range of professional, virtual effects and program functions that you can purchase and then immediately start using in Music Maker.
- In the top right, click on "Store".
- Sort the items in the dropdown menu. For professional effects and other add-on modules, select "Features".
- Browse through the products offered. Click on an item for more information.
- Click on the price and follow the instructions provided.
Tip: If you sort the products by price, free items will be displayed at the very top. You will not be charged for free items during the purchase process. All you have to do is register as a MAGIX customer.


Start your music
journey today
Create songs with loops, experiment with effects, and push
your creativity – all in MUSIC MAKER Free.