MP3 cutting with Music Maker
– step by step!
Want to use Music Maker to crop MP3? Keep reading to find out how.
- For MP3 cutting in the free version of Music Maker, you need the "More tracks and formats" add-on pack (or an edition such as MUSIC MAKER Premium). Open the program's in-app Store in the upper right and install the additional module (or edition).
- Click the icon for the File manager in the upper toolbar. This will open the File manager on the right. Navigate to a folder containing your MP3 files and drag and drop the MP3 files you want to crop into the arranger.
- Play back the project by pressing the space bar. To move the playback marker, simply click in the timeline. Zoom in using the buttons lower right to see all of the material.
- To cut, you move the MP3 file inwards at its ends. In this way, you trim the file at its beginning and/or end. Press the "T" key to place a cut at the playback marker – this creates two independent MP3 tracks. Then simply delete the part you want to cut from the project using the Del key. For MP3 cutting and joining, move the files you need to different tracks. You can use the object handles to control transitions and set fades. To balance volume, use the mixer (key "M"). Good to know: All MP3 file cutting with Music Maker is non-destructive, which means that your original MP3s files remain untouched.
- Decide whether you want to export the entire project from start to finish or only a specific range as a file. In order to export only a certain range, place the yellow playback marker above the part. Then select "Export" from the "File" menu and choose WAV, MP3, OGG, WMA or FLAC as the export format. If necessary, you can specify an option within the export dialog to only have the current range exported.
Cutting and edit MP3 files with Music Maker
MP3 cutting usually involves trimming away a long intro at the beginning, or cropping the song a little. Such edits can be easily accomplished with many free MP3 tools. But you might want to do more than just split your file. Maybe you'd like to enhance the audio of your MP3 a little too? Or you want to cut and join several MP3 files together to create a longer MP3 file and cross-fade them into each other.
Rather than using specialized freeware tools, we recommend that you use a comprehensive audio program right from the start that can handle MP3 cutting as well as all other MP3 editing tasks. And if it's easy-to-use, broadens your creativity and is fun to use, then that's the ideal solution.
Music Maker is exactly this type of program. With Music Maker, you can both cut MP3 files as well as enhance their sound, for example with effects such as equalizer or compressor. You can easily crop and join several MP3s together and even create your own remixes. Plus, it offers you the capabilities of a complete recording studio for audio and music production. You can get creative yourself and compose your own songs using the included Soundpool loops. Alternatively, you can record VST instruments using your computer keyboard or with MIDI keyboard. The possibilities are endless.
Alternatively, you can simply use Music Maker for cutting your MP3 files. Find out how to do just that in this article.
Here are the basic steps:
- Download the free version of Music Maker. This is a free version of the program that you can use for an unlimited period of time.
- Double-click the installation file you downloaded to install the software, start Music Maker and create a new project in the start dialog.
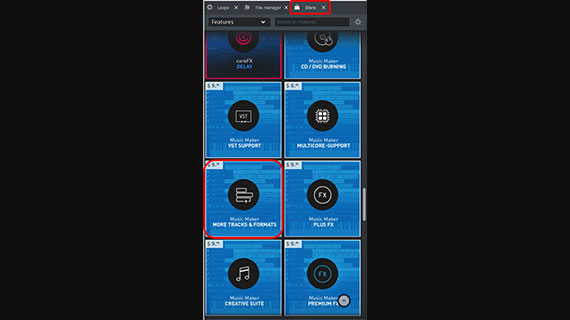
Installing the "More tracks and formats" add-on module
In order to edit MP3 files, they must first be converted back into "normal" audio files. For that, you'll need the add-on pack "More tracks and formats" or a Music Maker Edition such as MUSIC MAKER Premium. Both can be purchased and activated directly in the program's in-app Store.
For the add-on, proceed as follows:
- Open the "Store" top right.
- Select the "Features" option from the dropdown menu.
- Search for "More tracks and formats" or scroll down the list of items.
- Click on the "More tracks and formats" tile to read more detailed information.
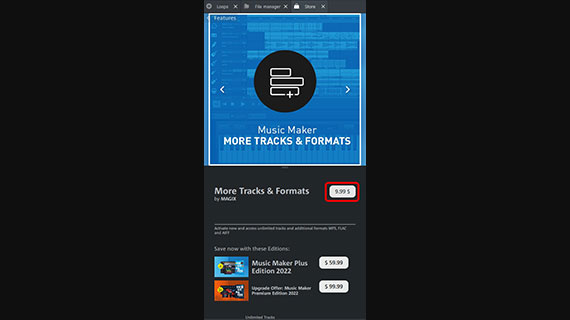
- Click on the price to to buy the add-on and follow the instructions.
Afterwards, in addition to the WAV, WMA and OGG export formats already included in Music Maker Free, you also have unlimited access to the fee-based MP3 and FLAC encoders. This means that you can now import and edit all MP3 file formats, as well as create them from other audio formats. You also now have an unlimited number of tracks in the project window.
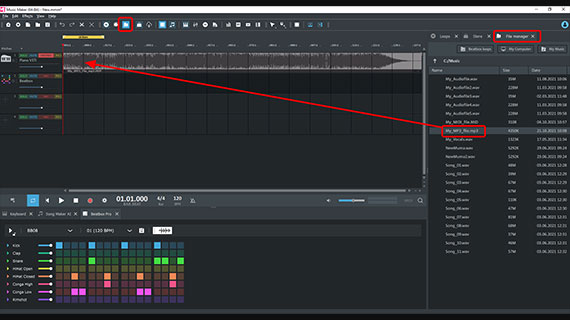
Importing and playing MP3 files
Here's how to import your own MP3 file into the program:
- Click the icon for the File manager in the upper toolbar. This will open the File manager on the right.
- In the file manager, go to the folder where your MP3 files are located.
- Drag & drop the MP3 file into the arranger on the left. You can place several MP3 files there in a row.
- If required, zoom in using the zoom buttons in the lower right so that you can see all the media in the arranger.
You can drag your MP3 files anywhere onto any track. In general, it makes the most sense to drag the first MP3 file directly to the beginning of track 1 and place all the others to the right of it, leaving a bit of a gap between them.
- Press the space bar to play or pause playback.
- Click in the timeline to move the playback marker. This allows you to jump to different position.
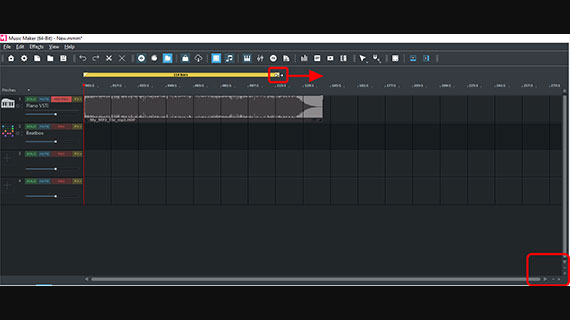
The yellow range above the top track is the section that is played.
- To change the range, drag the ends of the bar to the left or right with the mouse. You can also move the ends with a simple click in the range bar: Left-clicking sets the start of the range, right-clicking sets the end of the range.
- The yellow playback range can also be shifted freely. To do this, click in the middle of the area and drag the range to the left or right over another part of the project, for example over another MP3 file in the timeline.
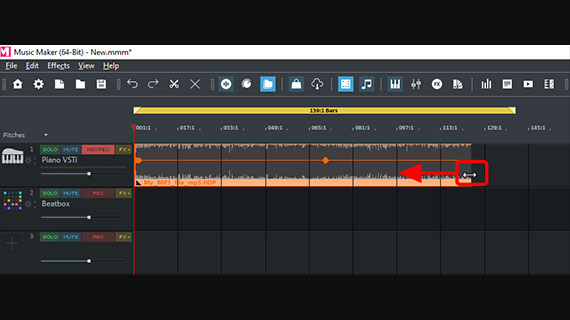
Crop and trim MP3 files
All MP3 files in the project can be edited easily using the same method. To cut the MP3 file at its ends, proceed as follows:
- Move the mouse pointer to the front or back edge of the object until the mouse pointer becomes a double arrow.
- Click and drag the object edge inwards.
This allows you to cut out unnecessary parts at the beginning and end.
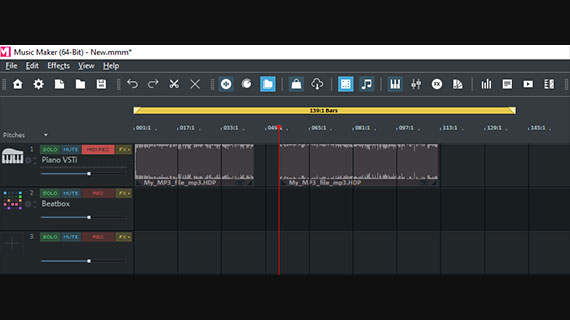
- To cut an MP3 file in the middle, place the playback marker at the desired position for the cut and press the "T" key.
This cuts the object in the track into two separate objects. To delete a certain section, cut the file once at the start and again at the end, and then simply delete the part using the Del key.
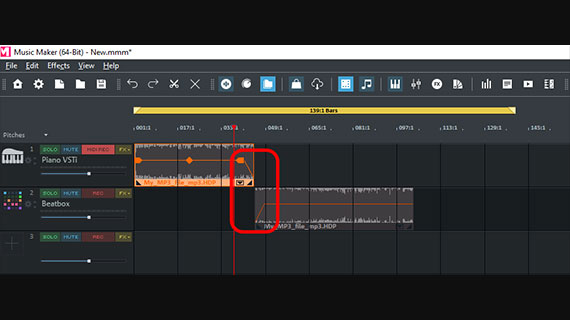
You can fade two objects into each other by applying a crossfade with the object handles:
- Move the object on the right onto its own track below and drag it forward so that the start overlaps with the end of the first MP3 file.
- Click the object above to select it.
Now, handles will appear on the object.
- Drag the handle at the back object edge to the left. This will create a fade-out.
- Click the bottom object and drag its front handle to the right. This creates a fade-in.
Alternatively, you can merge the two objects on the same track. This will create a crossfade. But it's also possible to adjust the crossfade more precisely if the two objects are placed on two different tracks.
- Play the transition and listen to the result. If necessary, adjust the position of the objects on the tracks and the fade handles until you get the result you want.
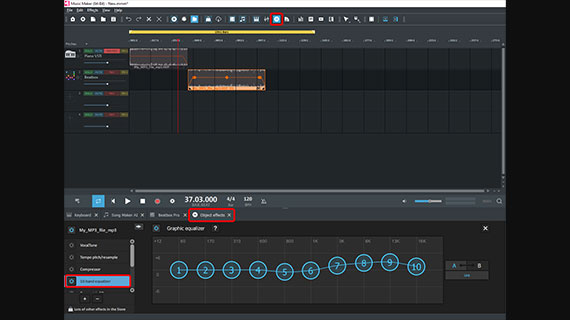
Cutting and optimizing MP3 files
Want to enhance the audio of your MP3?
- Click on the FX button in the upper toolbar to open the object effects
The object effects will then display below on your interface. Effects are always applied to the object that is selected in the track. You can use the equalizer to give dull recordings more excitement and intensity. Use the compressor to increase loudness and punch.
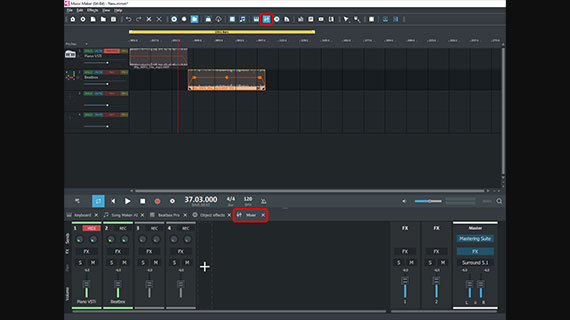
- Use the mixer to balance the volume of MP3s on different tracks. Open this by pressing the "M" key or by clicking the mixer icon in the toolbar.
You can find additional track effects for all the objects in a track and a mastering section for overall sound in the mixer as well.
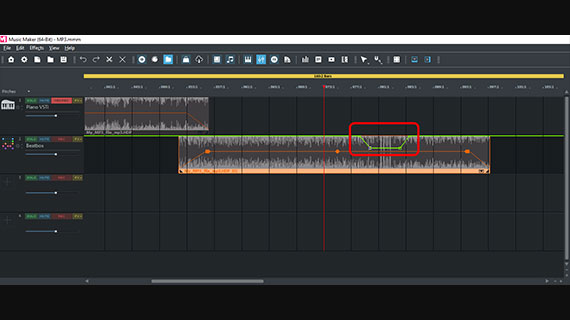
In some cases, you may want to reduce or increase the volume of certain parts of an MP3 file. This can be done using a volume curve.
- Right-click on an empty area and select "Display track curves" > "Volume".
- Zoom into the display if necessary and place curve handles by double-clicking on the volume curve.
- Drag the curve downwards using the handles.
To make a specified range louder, do the opposite and make all the other ranges quieter using the volume curve. This helps prevent clipping.
The mixer also lets you control the overall volume of each track. This lets you achieve a harmonious volume balance across several objects in the arranger.
MP3 cutting and exporting
Once you're happy with your cutting, and with the sound and volume levels, you can export your project. You have the choice between exporting the complete project from the first to the last object or only the current playback range.
If you only want to export a specific area, make sure that the playback range is exactly over the desired portion of the project. If you have several MP3 files, it's usually best to export each MP3 file separately and then move and adjust the export range accordingly.
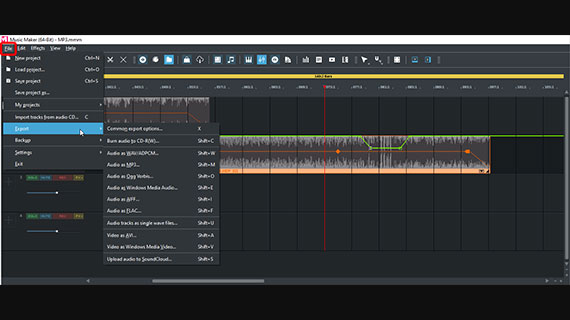
To export, open the "File" menu and select an option from the "Export" submenu. The following audio formats are available for compressing files:
- Audio as MP3: This option creates MP3 files again, which contain all the cuts and editing made in the project.
- Audio as Ogg Vorbis: OGG has almost the same properties as MP3. The main advantage of this format is that it is available for free. That means this option is also available for use without the additional package "More tracks and formats".
- Audio as Windows Media Audio: WMA files are also free. This codec was developed by Microsoft and is included with your Windows operating system.
- Audio as FLAC: This format is the only truly lossless compression format (aside from WAV). This means it offers the highest sound quality. Even formats with quality loss, like MP3 and OGG, settings can be adjusted so that you don't notice any quality loss or artifacts in the sound. Like MP3, FLAC requires the purchase of the "More Tracks and Formats" add-on pack or a Music Maker Edition.
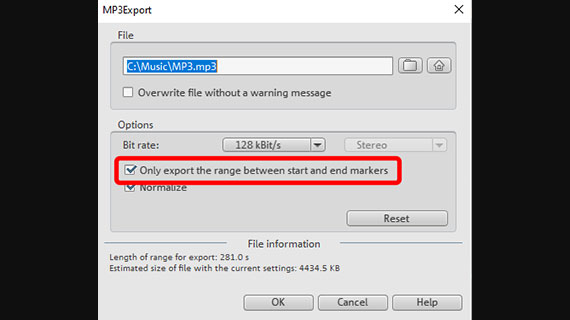
Whatever format you choose, there is an export dialog where you can change the compression settings.
- If you only want to export the current playback range instead of the complete project, be sure to select the "Only export the area between the start and end markers" option in the export dialog.
- Click "OK" and select a target folder for storing your files.
This is where you can find your compressed files and then copy them to your smartphone, for example.


