How to improve your video quality using software!
To enhance video quality, you can do the following:
- Open the program Video deluxe and import your video.
- Open the Effects tab in the Media Pool and apply video effects to make the video quality better. Optimize your footage with just one click using the "Auto exposure". Achieve smooth video in just one click with Video stabilization. Filter noises from your audio track and improve the audibility of speech using the audio effects.
- Select the desired export format (e.g., HEVC) from the "File" menu > "Export movie" to export your improved video as a file. This is also how to improve your video resolution of your exported video. Or you can upload it to YouTube from directly within the program, as well as burn it to a Blu-ray Disc or DVD.
Improve your video quality using Video deluxe, the video editing software for downright amazing movies:
- 1-click image optimization
- Brightness, contrast, gamma, color
- Video stabilization, picture sharpness, special effects
- Audio track optimization: DeNoiser, DeClipper, EQ, Compressor, filters and Stereo FX
- Easy-to-use thanks to helpful Wizards
- Convert files into all essential formats
How to improve video quality
– what you need to know
To make video quality better, the next step is to optimize the basic characteristics of your video: Brightness, contrast and color. These three parameters are all linked and should be optimized collectively. Gamma correction is an especially sophisticated process for editing brightness and contract accounting for the subjective perception of people. HDR Gamma is a special process that extends image color depth to 10-bit. Because of this, the enhanced image appears more brilliant and detailed.
Other further quality optimizations should be considered in addition to these fundamental image improvements. In the case of distorted or shaky footage, such as from a phone, stabilization can be used to smooth video. Out of focus footage can be sharpened and pans that are too fast can be slowed.
Video deluxe offers all of the tools necessary to improve your video quality. In addition to an editor for brightness, contrast and gamma, there are features for color correction, powerful video stabilization and editors for playback speed and image sharpness. Video deluxe Plus also offers HDR Gamma with HDR blur and secondary color correction that separates picture processing into two areas, which allows for separate editing of color in the foreground and background.
Moreover, tools for enhancing audio quality are also provided. With the 10-band equalizer, you can control the frequency spectrum of your audio recording to emphasize highs and allow speech to be better understood. Comprehensive noise removal helps to reduce distracting noises in audio tracks. The DeClipper corrects overdriven, distorted areas. You can amplify loudness and presence with the compressor to allow for more dynamic in your audio. The Stereo FX editor make it possible to arrange sounds in a stereo panorama.
If you find the in-depth editing described here too difficult, simply use the video and audio presets provided and improve your video quality in just one click.
In this article we'll show you how it all works in a detailed step by step process.
Improve video quality
with Video deluxe software
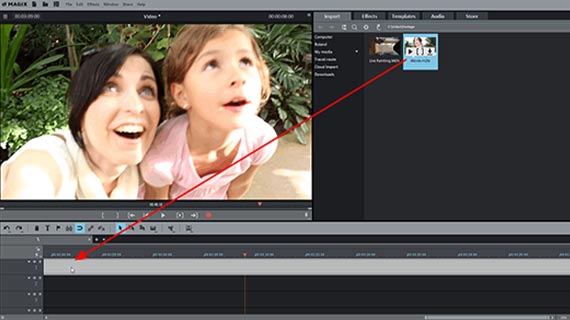
Step 1: Import video
- Open Video deluxe and create a new project using the Start dialog.
- Open the "Import" tab in the Media Pool in the upper right and navigate to the folder containing your video.
- Drag & drop the video file into the program.
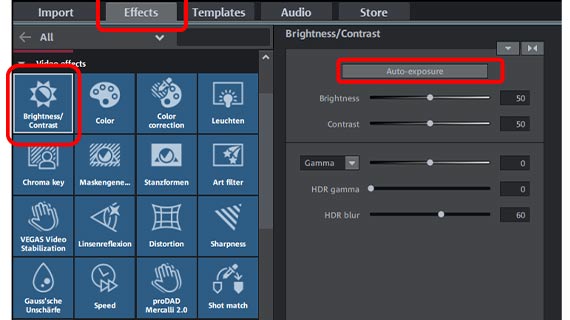
Step 2: Improve brightness and contrast
To improve the quality of your video, go to the Media Pool to the right, open the "Effects" tab and under "Video effects", and then click on the tile "Brightness & Contrast".
- The "auto exposure" button sets parameters following an automatic analysis of the image.
- The "brightness" and "contrast" sliders can be used to change the basic values manually.
- "Gamma" is subjective brightness, i.e. brightness as perceived by people. This is different from objective brightness, which deals with the ratio of bright to dark image areas. When you adjust the brightness, all of the pixels in the picture are made brighter or darker; when you adjust the gamma, the ratio is changed.
- In Video deluxe Plus, two addition options for improving quality are available: "HDR Gamma" and "HDR blur". "HDR", or "High Dynamic Range", refers to a particularly high range between the brightness and contrast values. This controller regulates how big the range is between the brightness and contrast values. "HDR blur" affects the transitions between bright and dark areas.
Play around with the settings to see what kinds of results you get, and try to find the optimal video. If you change your mind about an effect you've applied, you can undo it with the shortcut Ctrl + Z.
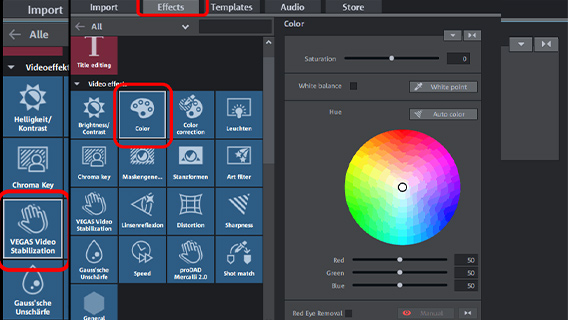
Step 3: Enhance color
It is often recommended to also correct the color of your footage. All three of these parameters – color, brightness and contrast – work together to define how the video picture looks.
- Click on the "Color" icon to open the color dialog.
- To balance out a specific tint, select the complementary color of the tint in the dialog. In other words, click the center of the color wheel and drag the slider to the color area that is located on the opposite side of the wheel to the tint in the video picture. For blue tint, select yellow. For green, select violet.
- To tone down colors or intensify them, use the "Saturation" fader.
- In the Plus version of Video deluxe, an additional effect dialog is available for secondary color correction: "color correction". This allows for colorization of the foreground and background to make specific objects in the picture stand out from each other. Click on "Add" in the effect dialog and select the color range that should be used for editing the foreground with the mouse cursor which is now a pipette. Then, adjust the colors for the foreground and background separately.
Hint: In the "Templates" tab of Video deluxe Plus, you'll find "film looks" which can be used to apply presets for typical image effects from cinematic films. You can simply drag this onto your own footage to make video quality better.
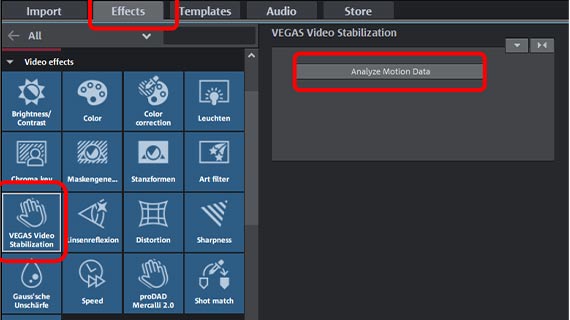
Step 4: How to improve video quality with stabilized video
Video deluxe offers powerful and easy-to-use 1-click Video stabilization, which can turn shaky footage into smooth video.
- Click on the "VEGAS Video Stabilization" icon in the Media Pool to activate this plug-in effect.
- Click on "Analyze Motion" in the effect dialog. Then, the video material will automatically be analyzed and stabilized. The analysis may take some time depending on the length of the video.
Pro tip: If you wish to customize or change the Video stabilization process, use the "proDAD Mercalli V2" editor that can also be found in the "Video effects".
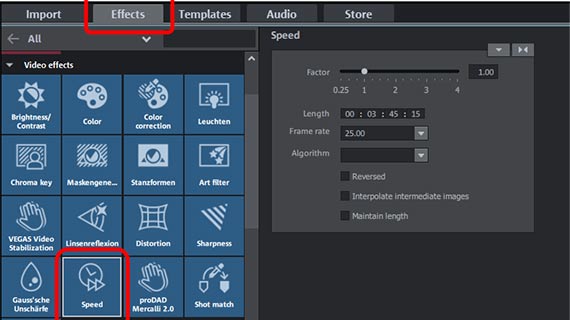
Step 5: How to enhance video quality with slow motion or time lapse footage and other effects
You'll find many effects in Video deluxe's range of video effects, with which you can make video quality better.
- For example, the playback speed of a video can be changed with the effect "Speed:". A little slow motion can rescue panning shots that were too fast, whereas a time lapse can smooth out long, static scenes. To apply a speed change to a specific passage, first cut the passage into an individual object and then adjust the speed for that object. Simply press the "T" key to place a cut at the position of the playback marker.
- The "Mask generator", the various "Stamp forms" and the "Chroma key" effect allow for creative combinations of several videos and photos.
- The "Gaussian blur" offers a high-quality blur effect.
- You'll find movement effects in the "View/animation" category, for example, for animating zooms to simulate camera movements to a section of the frame. This can also be used to improve video quality, if the video is too static.
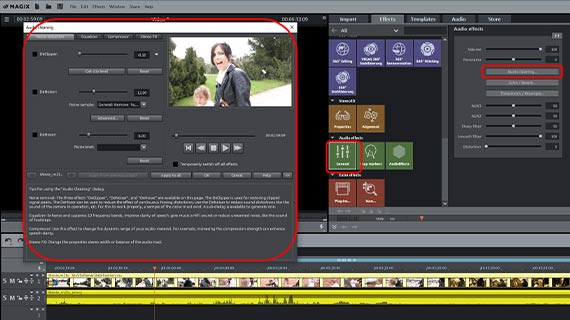
Step 6: Make video quality better with enhanced audio tracks
If your video contains an audio track that you'd like to enhance, there are several methods for achieving this:
- To display the audio track, right-click on the video in its track and select "Show wave" in the context menu.
- It is generally convenient to display the audio track separately. To do this, select the command "Audio functions" > "Video/Audio on separate tracks" in the context menu (via right-click).
- To control the volume at any point in an object, select "volume curve" from the context menu of the audio object. A thin line will appear on the object that represents the volume level. Double-click the envelope to create a curve handle which you can drag and position to change the volume envelope during playback. If you raise the curve handles, the volume will increase at this point. Should you lower a handle, the volume will be reduced.
- Effects for optimizing an audio track can be found in the Media Pool under "Audio effects". "Audio Cleaning" opens a comprehensive dialog for removing background noise (DeClipper, DeNoiser and DeHisser), as well as an equalizer, compressor and stereo FX for editing stereo audio. You will also find notes and tips in the dialog for how to properly apply individual audio effects.
- In the Media Pool under "Audio effect presets", you can find presets that you can easily drag on to your audio track, if you find the options for configuring effects overwhelming or want to work more quickly.
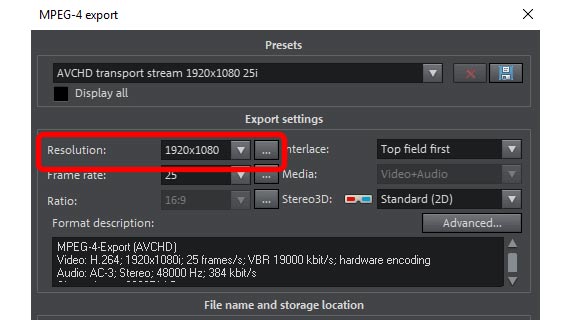
Step 7: Improve video resolution and export
When you are finally satisfied with the video quality, you can also improve your video quality when exporting your video.
- Export as video file: To export an enhanced video file, go to "File" > "Export movie" to export your footage in a range of formats, including MP4 and HEVC. There is a wide range of video resolution settings available in the Export dialog. Please note that exporting a higher resolution video (upscaling) does not mean you can improve video quality of your source footage. Normally, you should leave the video resolution the same as in the source file or lower it, if you need a smaller file.
- Burn directly to disc: You can also burn your footage to disc from right within the program. DVD, AVCHD and Blu-ray Disc are all available. To open the "Burn" interface, click to the right on the button with the disc icon.
- Upload to online platforms: Vimeo and YouTube are directly connected to the program. A click of the mouse is all it takes to upload your new, enhanced video to your account. Click on the arrow symbol in the top right to open the dialog "Finish movie".


