Create your own film trailer with Video deluxe Plus
– here's how it's done.
Want to make a movie trailer? Keep reading to learn how.
- Start Video deluxe Plus and under the "Templates> tab in the Media Pool, open the film and cutting templates.
- Pick a template for your trailer. Load the template using the Import icon or simply drag and drop the template into the project window.
- Drag video scenes or still images from the Media Pool onto a placeholder and add a title.
- Export the trailer as an MP4 or upload it directly to your Vimeo or YouTube account.
Create film trailers with Video deluxe Plus, the video editing program for ambitious movie makers:
- Massive selection of trailer templates
- Use as many video scenes and photos as you want in your movie trailers
- Easy-to-use Trailer Wizard
- Easy operation, professional results
Trailers: From exciting movie teasers to stand-alone video clips
Film trailers are smaller video clips that are designed to create interest in a full-length film. They appear on social networks and websites or are shared via email to create excitement about a movie and attract viewers. But trailers aren't just used to promote a feature film or TV series – they can be used for all kinds or events and occasions too. For instance, a trailer can be created to provide video commentary for current events, or simply as an end in itself.
Trailers are short – usually not longer than 2-3 minutes. They usually contain a captivating intro, fast cuts, music score, a few titles that fade in and occasionally a voice-over. A film trailer doesn't have to be complete as the focus is not on providing information – it's solely to spark interest and make people want to see the film itself.
At the start of any movie trailer production, you have to choose which material you want to include in the trailer. So, when you're producing a movie trailer, it's best to look for scenes from the film that will capture people's interest. You might already have favorite passages in mind that you think would be perfect for making a trailer. For an interview, for example, look for key statements or stand-out exchanges in the conversation. But remember, no one likes a trailer that gives too much away – your trailer should be free of spoilers. Even if your trailer has been made for purposes other than promoting a film, you'll still need video material or photos for your trailer.
Start by creating a kind of material vault where you'll store all your movie clips, still shots or audio passages. Trailer creation is simple when you use Video deluxe video editing software. Video deluxe delivers a whole range of trailer templates that you can use to easily create professional movie trailers using your content. You can use the Trailer Wizard to easily swap out the existing placeholders with your own footage. As a result, you'll be able to make a great trailer with the right design and tempo in no time at all.
If you want to spend a bit more time on your trailer, you can edit it further. For instance, you can change the music included in the trailer template to another track of your choice or record a dedicated commentary. In the editing mode in Video deluxe, you've got access to all the functions provided by this comprehensive video editing software.
Want to make your own trailer from scratch without using a trailer template? No problem. You can combine any number of videos and photos, cut them to the perfect length and have them fade in and out of each other exactly the way you want. Enjoy total creative freedom when it comes to using effects and image animation, too: Have movie scenes fly in from off-screen, shrink them, zoom in on them, move them straight from one end of the screen to the other. If you can imagine it, you can do it.
Keep reading to learn more about trailer creation with Video deluxe through our practical step-by-step guide.
Create a film trailer in Video deluxe
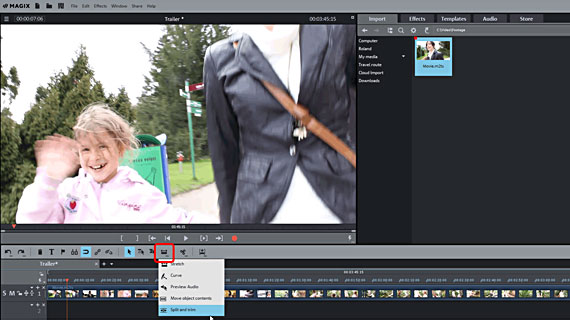
Step 1: Compile material for your trailer
Start by compiling all the video scenes, still shots or photos that you want to use in your movie trailer. To cut out scenes from a longer film, proceed as follows:
- Load the video file with the film to a Video deluxe project. Drag and drop the file from the Media Pool into the project window.
- Right-click the Mouse Mode button in the toolbar and select Split and trim.
- Drag the pointer slowly over the video object. You can follow the video scenes that the pointer moves over in the preview monitor.
- One you have found a scene that you would like to use in your trailer, in the video object in the track, click once before the scene and once after it to cut it. You don't need to cut in the exact position, since the cuts you make can be trimmed later using the Trailer Wizard. At this point we just want to create rough cuts of the most important movie scenes. And also, don't worry about changes to your film file, as it's only cut "virtually". The video data on your hard drive will remain unchanged.
- Your Video deluxe now contains a number of cut video objects, which you can now export one-by-one as video files. Set a range for each object by placing the range above it. To do this, left-click above the first track to set the beginning of a range and right-click further right after the object to set the end of the range. The range will appear as a blue bar that runs between these two positions. Again, a rough selection is fine here – the range used in the trailer can be adjusted at a later point.
Tip: If you want to set an exact range over a cut object, move the playback marker to the object start using the shortcut Alt + Q, press the I key (for in-point),to set the start of a range, then set the playback marker at the object end using Alt + W and press the O key (for out-point).
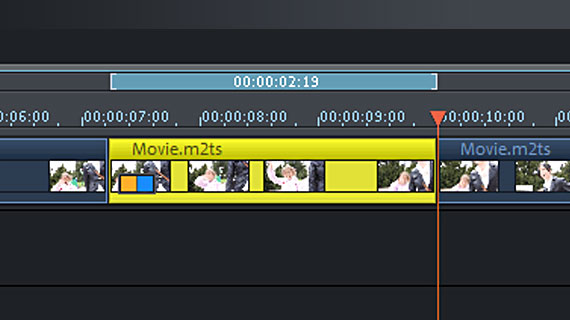
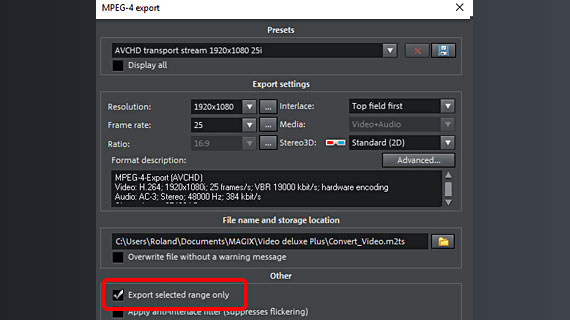
- Go to "File" > "Export movie" > "Video as MAGIX Video" and in the export dialog, activate the option "Only export selected range". The MXV format is recommended for file transfer within the program. Export all ranges one-by-one as MXV files in this way.
- If you want to include still shots in your trailer as well as scenes from your movie, position the playback marker at the location where you want to insert the still shot and then select "File" > "Export movie" > "Single frame as BMP file...".
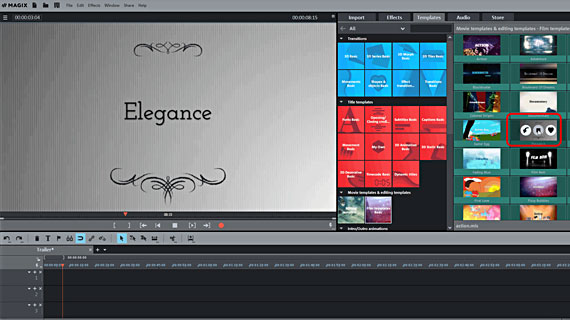
Step 2: Select a trailer template and add content
- In the "Templates" tab, open the film and cutting templates. Film templates contain complete trail templates with transition effects, intros, outros and background music. Editing templates contain cutting patterns and background music. In general, all elements can be modified, deleted, swapped out, or you can add content to an element. This way, the editing templates can be used as a basis when you want to create your own movie trailer.
- Hover over a template in the Media Pool. In the pop-up window that appears, click on the middle arrow symbol to play a preview of the template. Using the previews, try to find a template that most closely resembles the idea you have in mind.
- To use a template, click on the left arrow symbol in the pop-up window that appears. Or simply drag and drop the template into the project window. This loads it as an additional film into the current project and opens the Template Wizard.
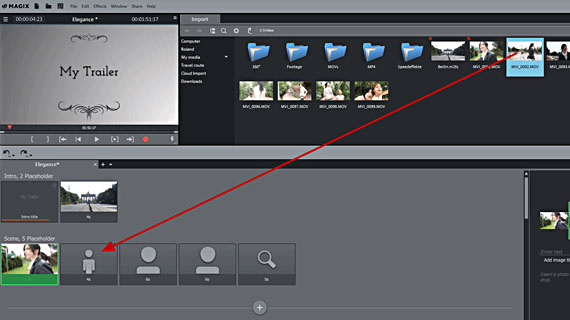
- Drag & drop the scenes and photos from their storage location to this placeholder. Virtually all video formats (e.g. MXV, MP4, M2S) and image formats (JPG, BMP) can be used.
- If you want to make things even easier, you can select multiple scenes at once while holding down the Ctrl key and dragging then into the editing area below. This automatically fills the placeholder.
- Spare placeholders cannot be deleted, as this would muddle up the audio track. It's best to fill all placeholders in a template with video material. If you still want to delete some placeholders, switch to the normal editing view, which includes all the functions you need (see Step 3 below).
- After inserting content you can modify the scene section. You can use the info window below right for this. Move the movie strip in the info window until the section "sits" in position. This way, you can use a longer scene for several placeholders be assigning a different section of the scene to each placeholder.
- Title placeholders display the label "text". You can enter your own text for the scene below on the right.
- Once you're happy with your trailer creation, you can skip the next step and export the trailer as a video (see Step 4 below).
Step 3: Edit your trailer in more detail (optional)
If the trailer's not quite the way you imagined, you can switch to detailed editing mode.
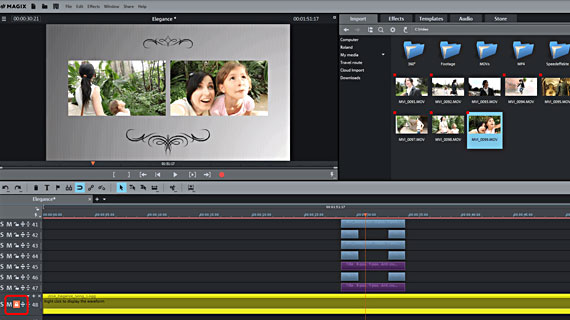
- Click the tick above right in the info window to close the Wizard and to open your trailer in the standard Video deluxe editing mode.
- Scroll the view down using the scroll bar on the right so you can see the elements on the lower track. Sometimes as many as 50 tracks contain objects. You can enlarge the track range by positioning the mouse at the upper border and dragging the range upwards.
- To delete empty placeholders or the music, select the objects you want to remove and then delete them. The audio object with the music is easily recognized. This is the longest object, stretching from the beginning of the trailer to its end. You may need to deactivate the lock symbol, located on the left in the track header, beforehand – if active, this protects all objects on the track from accidental changes.
- To load different music, open a Media Pool folder containing audio files and drag the audio file you want to an empty track. To trim the audio, use the mouse to move the end or beginning of the audio object on the track.
- To adjust cuts between scenes, move the mouse to the interface between two objects until the mouse pointer turns into a double arrow. You can now fix the borders between the objects.
- If you want to record commentary over the scene, click on the red recording button underneath the preview monitor to activate audio recording. To record commentary, you'll need a microphone that is set up and ready for use.
- Additional media can be easily dragged from the Import tab of the Media Pool to the position you want in the trailer. The "Effects" tab contains a wide range of effects, not just for image and sound optimization, but for creating image collages or animating photos.
Step 4: Create your film trailer and share it with the world
Once you play your trailer in Video deluxe and are happy with how everything looks, you can export the trailer as a video file or load it directly to your YouTube account from the project.
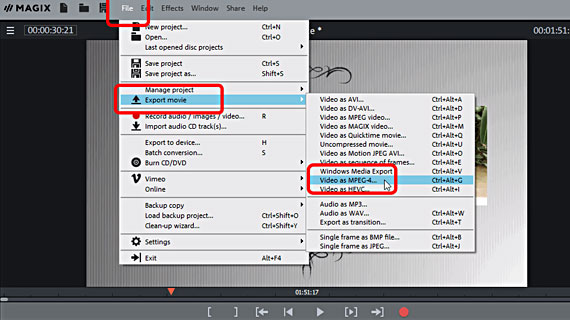
- Under "File" > "Export movie", you'll see the full list of files formats supported by Video deluxe. If you're not sure which format to use, "Video as MPEG-4" is usually a good choice.
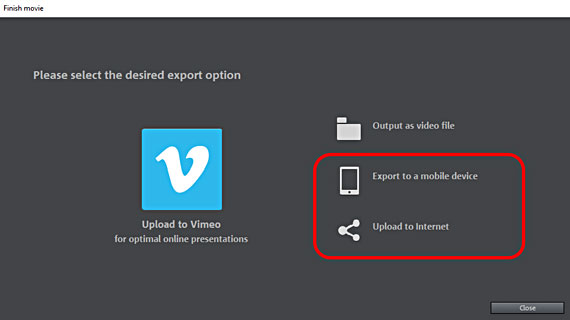
- Above right, you will see the dialog "Finish movie" top right. You can now transfer the trailer to a connected smartphone, for instance, or upload it directly to your YouTube account.
Video deluxe Plus: One of a kind – just like your movies.
- Smooth proxy editing in up to 4K quality
- Up to 1500 effects and music
- Automatic program wizards
- Burn your movies to DVD, AVCHD or Blu-ray


