Make a video brighter – here's how!
Want to make dark videos brighter? Find out how easy it is here.
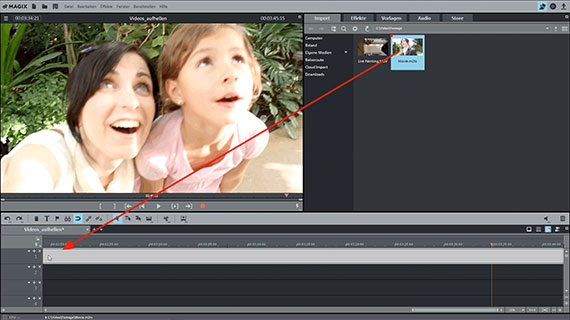
- Start Video deluxe and drag & drop to import video files from the Media Pool.
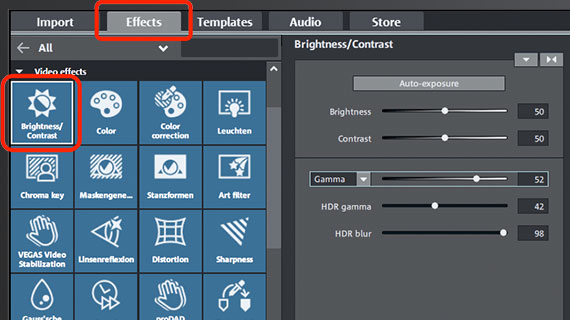
- Open the "Effects" tab, select "Brightness / Contrast" and click on "Auto exposure".
- If you want to adjust brightness settings further, you can set the brightness and contrast sliders manually. For perception-based correction, use the gamma slider.
- You can then export the corrected video as an MP4 or HEVC file, burn it to disc or upload it directly to your Vimeo, Facebook or YouTube account.
Make a video brighter or black and white with Video deluxe Plus, the video editing program for ambitious movie makers:
- Auto exposure (1-click video brightness increaser)
- Adjust brightness and contrast
- Perception-based brightness correction (gamma)
- HDR Gamma for ultra-high brightness dynamic range
- Color saturation and selective color correction
How to make a video brighter
Making a dark video brighter and clearer involves more than sliding up the brightness controller, because this will just make all image areas equally lighter. You can't brighten the lightest areas of your original image, since these are already white. As a result, more white areas are created instead and the contrast in your picture will suffer, giving the impression that it's overly faded and washed out.
Brightness and contrast should therefore be adjusted together, which means adjusting their levels. A simple level correction usually isn't enough. The image appearance changes as soon as tonal values are adjusted. These three parameters – color, brightness and contrast – are all linked. For this reason, it's best to perform color corrections right after you correct brightness/contrast.
What's more, changes to dark or bright image areas affect the end result in different ways. Colors and tonal values are best modified according to how the human eye perceives them: eyes perceive light differently to image-capturing devices. The process that takes this light sensitivity into account is called "gamma".
Gamma correction can be done in various ways. "HDR Gamma" is gamma editing with a particularly high dynamic range (High Dynamic Range = HDR). HDR Gamma extends image color depth to 10 bit. 10 bit allows for 1024 brightness levels per color channel, 8 bit only 256 levels. HDR technology means that the resulting video footage appears even more brilliant and detailed.
As you might have gathered by now, making a video brighter is a little more complicated than you think. Video deluxe combines all the different processes that let you increase video brightness in one comprehensive and easy-to-use video editor. In addition to video brightness and contrast editing, it offers gamma correction and color editing. The Plus version of Video deluxe also provides selective color correction, i.e. color editing divided into foreground and background, HDR gamma correction as well as HDR blur for borders.
If you're short on time and don't want to experiment with the settings, simply use the 1-click auto exposure function or one of the included "Bleached out" film look templates to make your videos brighter and clearer in no time at all.
Below, we'll show you all of the possibilities for making video brighter in Video deluxe.
Brighten up video with Video deluxe
Import video
Open Video deluxe and import the video you want to make brighter by opening the Import tab in the Media Pool and navigating to the folder containing your video. Then, simply drag and drop the video into the program. To do this, select the video directory with your video file in the top right-hand corner of the "Import" tab of the Media Pool and simply drag and drop the file into the program.
Brighten up videos
You can now increase brightness in your video directly. To do this, in the Media Pool to the right, open the Effects tab and under "Video effects", click on "Brightness & Contrast". This opens the brightness/contrast levels.
- The "auto exposure" button sets parameters following an automatic analysis of the image.
- The "brightness" and "contrast" sliders can be used to change the basic values manually.
- "Gamma" is subjective brightness, i.e. brightness as perceived by people. This is different from objective brightness, which deals with the ratio of bright to dark image areas. When you adjust the brightness, all of the pixels in the picture are made brighter or darker; when you adjust the gamma, the ratio is changed.
- "HDR", or "High Dynamic Range", refers to a particularly high range between the brightness and contrast values. This controller regulates how big the range is between the brightness and contrast values.
- "HDR blur" affects the transitions between bright and dark areas.
Experimenting with different settings is the best way to find out what works best when you want to make a video brighter. Play around with the controls to see what kinds of results you get, and try to find the optimal settings for your footage.
Changing colors
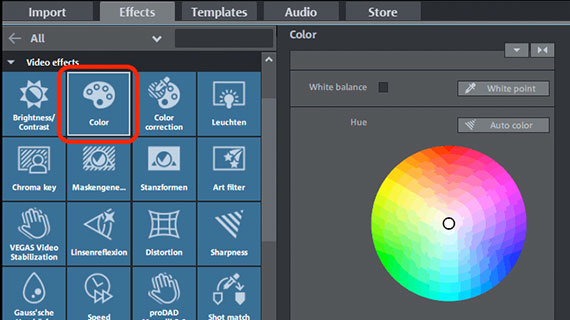
We generally recommend correcting image color after making video brighter. All three of these parameters – color, brightness and contrast – work together to define how the video picture looks.
- To balance out a specific tint, select the complementary color of the tint in the dialog. In other words, click the center of the color wheel and drag the slider to the color area that is located on the opposite side of the wheel to the tint in the video picture. For blue tint, select yellow. For green, select violet.
- To tone down colors or intensify them, use the "Saturation" fader.
Colorize foreground and background
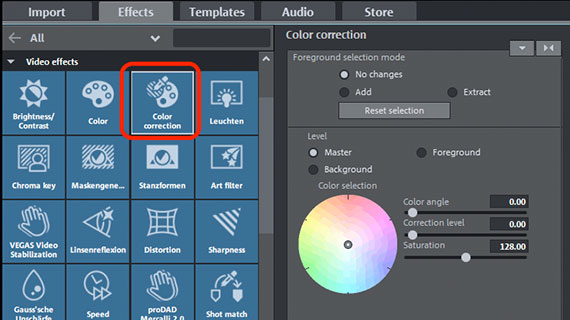
You can accomplish more detailed image editing with the color correction tools in Video deluxe Plus. With this program version, you can colorize the foreground and background separately to make objects in the picture stand out from each other. Simply follow these steps:
- Under Foreground selection mode, select Add.
- Place your mouse over the preview image in the video monitor. The mouse cursor should change to a pipette.
- Click the areas of the image that you want to select as the foreground. Selected areas are marked with criss-cross lines. If you select too much, switch to "Extract" mode in the color correction dialog and click on the areas that you want to remove.
- Lastly, activate the "foreground" layer in the color correction dialog and change the color of the selected areas using the color wheel. To change the rest of the image, select the "background" layer.
Make a video black and white
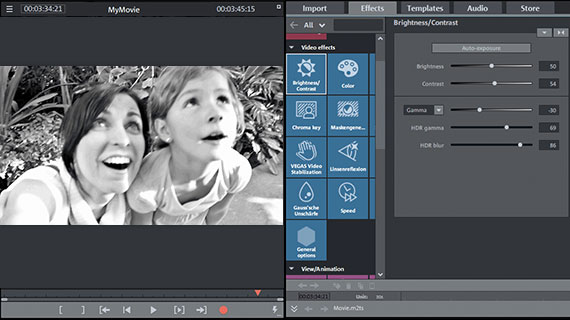
Making a video black and white is a special use case scenario for the brightness editor tool in the software. Here's how it's done:
- In the Media Pool open the effect dialog "Color" and drag the color saturation controller the whole way to the left to the value -100%. This creates a gray scale image.
- Open the dialog within the dialog "Brightness/Contrast" and adjust brightness, contrast and gamma (or HDR gamma and HDR Plus in the Video deluxe Plus version).
Increase video brightness with film looks
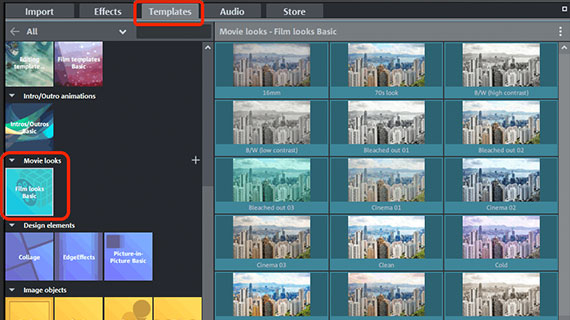
Another way to make a dark video brighter is to apply a film look. Film looks are effect templates with preconfigured contrast, gamma and color settings that are based on a familiar cinematic aesthetic or appearance. These can be used to give your video the desaturated tones of a crime series or the brightly colored hues of a romantic movie, for instance. Here's how it's done:
- In the Media Pool, go to "Templates" > "Film looks Basic" to see the available templates. You can preview each film look via its little preview arrow. The "Bleached out" templates are particularly suitable for making a video brighter.
- To apply the film look, simply drag it onto your video.
Share your brightened video
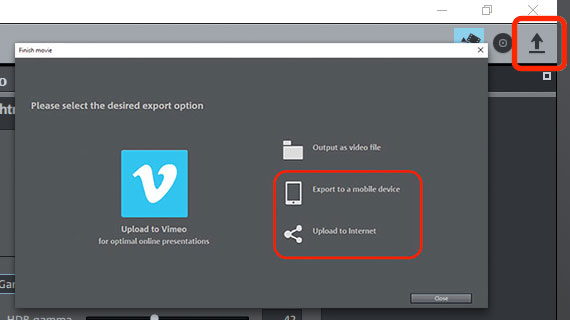
Once you're finished editing and are happy with the brightness and color properties of the video, you can share the end result in various ways:
- Export as video file: To export a video file, go to "File" > "Export movie" to export your footage in a range of formats, including MP4 and HEVC.
- Burn direct to disc: You can also burn your footage to disc from right within the program – DVD, AVCHD and Blu-ray Disc are all available. Zur Auswahl stehen DVD, AVCHD oder Blu-ray Disc.
- Upload to online platforms: Vimeo and YouTube are directly connected to the program. A click of the mouse is all it takes to upload your new, brighter video to your account.


